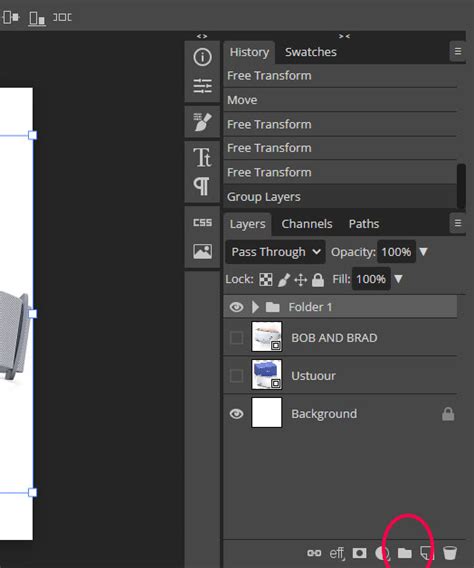
The Layers panel is the central hub for managing the intricate structure of any document within Photopea, mirroring the functionality of other advanced image editing software. This panel displays a comprehensive list of all layers, accompanied by their visual thumbnails, providing a clear overview of the document's composition. In complex projects with numerous layers, efficiently identifying and selecting the specific layer for editing is paramount. Photopea facilitates this by allowing users to group layers into folders, which can also contain nested subfolders. When a folder is selected, all the layers within it are implicitly selected, even if they aren't visually highlighted individually in the panel.
Understanding Layer Properties and Manipulation
Each layer possesses several fundamental properties that can be modified directly within the Layers panel. The name of a layer is a crucial organizational tool, especially in large and complex documents, as it aids in understanding the overall structure. To rename a layer, a simple double-click on its current name allows for the input of a new, more descriptive label.
The ability to reorder layers is also a core function accessible through drag-and-drop manipulation within the Layers panel. This feature is indispensable for organizing layers into folders, extracting them from existing folders, or even nesting one folder within another. For the removal of unwanted layers, the garbage bin icon serves as a straightforward method to delete all currently selected layers. To introduce a new organizational unit, the "New Folder" button, typically located at the top of the current layer, adds an empty folder to the panel. Furthermore, duplicating layers offers another convenient pathway; this can be achieved by dragging selected layers to a designated "another panel" using the Move tool.
Common Causes for Uneditable Layers
When encountering a situation where a layer in Photopea is not editable, several common culprits can be at play. Understanding these potential issues is the first step towards resolving the problem and restoring full functionality.
Locked Layers
One of the most frequent reasons for a layer being uneditable is that it has been locked. Photopea, like many other image editors, provides locking mechanisms to prevent accidental modifications. These locks can be applied to various aspects of a layer, including its position, opacity, or even the layer itself entirely.
- Position Lock: Prevents the layer from being moved.
- Opacity Lock: Prevents changes to the layer's transparency.
- Pixel Lock: Prevents any pixel-based editing on the layer, such as painting or erasing.
- All Lock: A comprehensive lock that prevents all forms of editing and manipulation.
To check if a layer is locked, examine the icons present in the Layers panel. Typically, small padlock icons will appear next to the layer's name or within its properties. To unlock a layer, simply click on the padlock icon to disable the lock. If multiple locks are applied, you may need to click each corresponding icon to unlock the layer fully.
Layer Type and Blending Modes
The type of layer and its active blending mode can also influence editability. For instance, certain adjustment layers or type layers might have specific editing workflows that differ from standard pixel layers. Understanding the nature of the layer you are trying to edit is crucial.
- Adjustment Layers: These layers are designed to modify the appearance of layers below them. While you can edit the settings of the adjustment layer itself, directly painting on it might not be possible in the same way as a regular pixel layer.
- Type Layers: Text layers have their own dedicated editing modes. To edit the text content, you typically need to select the Type tool and click on the text itself, rather than attempting to paint on the layer directly.
- Smart Objects/Smart Filters: If a layer has been converted to a Smart Object, direct pixel editing is not possible. Instead, you would need to double-click the Smart Object thumbnail to open it in a separate tab, edit it there, and then save the changes to update the original document. Similarly, Smart Filters are applied non-destructively and are edited through their respective filter settings.
- Blending Modes: While less likely to cause complete uneditability, certain blending modes can affect how edits appear. If you're expecting a certain visual outcome and not seeing it, double-checking the blending mode is a good practice.
Layer Mask Issues
If your layer has an associated layer mask, the editability of the layer's pixels can be indirectly affected. A layer mask controls the transparency of a layer. If the mask is active and painted with black, the corresponding areas of the layer will be hidden and therefore appear uneditable.
To troubleshoot this, ensure that you have the actual layer selected (not the mask thumbnail) when attempting to edit pixels. If you intend to edit the mask itself, make sure the mask thumbnail is selected. Painting with white on a mask reveals the layer, while painting with black conceals it. Gray values create semi-transparency.
Selection and Clipping Masks
The presence of an active selection or a clipping mask can also restrict editing to specific areas or layers.
- Active Selection: If you have an active selection on your canvas, any editing actions will be confined to the area within that selection. If you're trying to edit outside the selected area, it will appear as if the layer is uneditable. To remove a selection, use
Select > Deselector the keyboard shortcutCtrl+D(Windows) /Cmd+D(Mac). - Clipping Masks: A clipping mask confines the visibility and effects of a layer to the shape or transparency of the layer directly below it. If a layer is clipped, you can only edit within the boundaries defined by the layer it's clipped to. To edit the layer freely, you would need to release the clipping mask.
Corrupted Layer Data or Document Issues
In rare instances, the layer data itself might be corrupted, or there could be underlying issues with the Photopea document. This is less common but can occur, especially with very large or complex files that have undergone numerous edits.
If you suspect corruption, try the following:
- Save and Reopen: Save your document, close Photopea, and then reopen the file.
- Duplicate Layer: Try duplicating the problematic layer. Sometimes, a fresh copy might resolve underlying data issues.
- Flatten or Merge: As a last resort, if preserving individual layers is not critical, you might consider flattening or merging layers. However, this is a destructive process and should be done with caution, ideally on a duplicate of the document.
Advanced Troubleshooting and Workarounds
When the basic checks don't yield a solution, delving into more advanced troubleshooting or employing workarounds can help you overcome uneditable layer issues in Photopea.
Checking Layer Visibility and Opacity
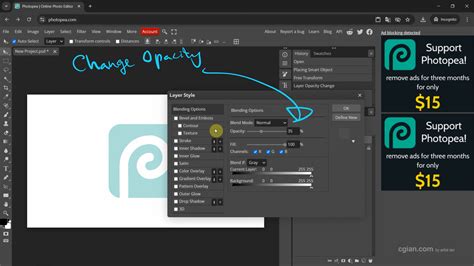
It might seem obvious, but ensuring the layer is actually visible and its opacity is not set to 0% is a fundamental step. An invisible layer or a layer with 0% opacity will naturally appear uneditable because its content is not displayed. Check the eye icon next to the layer in the Layers panel to ensure it's visible. Adjust the opacity slider if necessary.
Understanding Layer Permissions and File Formats
While Photopea is a web-based editor, it often emulates the behavior of desktop applications. If you are working with a PSD file that was created or heavily edited in another program, there might be specific layer types or properties that Photopea handles differently or with limitations. For example, some highly specialized Photoshop features might not translate perfectly.
If you're importing a file from another source, consider saving it in a more universal format like PNG or TIFF (if layer information is crucial) after ensuring all edits are as intended, or re-saving it from Photopea to ensure compatibility.
Resetting Photopea Workspace (If Applicable)
Although Photopea runs in a browser, it maintains a session state. If you suspect a browser-level issue or a persistent glitch within Photopea's session, clearing your browser's cache and cookies related to Photopea, or trying to access Photopea in a different browser or incognito mode, can sometimes resolve unexpected behavior. This effectively resets Photopea's local session.
Using the Move Tool for Layer Selection
As mentioned earlier, the Move tool (V) has a handy feature for selecting layers. When the Move tool is active, clicking on an element on the canvas will select the corresponding layer in the Layers panel. This can be particularly useful if the layer is difficult to locate by name or thumbnail in a crowded panel. Ensure that "Auto-Select" is enabled in the Move tool's options bar if you want this functionality. If "Auto-Select" is off, you'll need to manually select the layer in the panel after clicking on the canvas.
How to Select Part of a Layer in Photopea | Photopea
Investigating Layer Blend If 'Grayed Out'
In some scenarios, layer editing options might appear "grayed out" or unavailable. This often indicates a restriction imposed by the layer's current state or properties. For instance, if a layer is part of a smart object that has been rasterized, its editability might change. Understanding the history of how the layer was created or modified is key.
If you encounter a "grayed out" option, consider the following:
- Rasterize Layer: If the layer is a vector shape or type layer that you intend to pixel-edit, you might need to rasterize it first. Right-click the layer and select "Rasterize Layer." Be aware that this is a destructive operation.
- Convert to Smart Object: Conversely, if you want to make edits non-destructively, converting a rasterized layer into a Smart Object can be beneficial.
- Check Layer Properties: Some advanced layer properties, like certain blend options or filter effects, might require specific layer types to be fully functional.
The Role of Photoshop vs. Photopea Compatibility
It's important to remember that while Photopea aims for high compatibility with Photoshop's PSD format, there can be edge cases. If a PSD file was created with very advanced or legacy Photoshop features, Photopea might interpret them differently or have limitations. In such situations, if direct editing is critical, revisiting the file in Photoshop itself might be necessary to understand or adjust the problematic layers. However, for the vast majority of common layer operations, Photopea provides a robust and familiar environment.
Recreating the Layer
As a final resort, if a layer remains stubbornly uneditable and all troubleshooting steps have been exhausted, consider recreating the layer from scratch. This might involve re-applying effects, re-typing text, or re-importing an image. While this can be time-consuming, it often resolves persistent issues stemming from corrupted or complex layer data that cannot be easily repaired. Always ensure you have a backup of your work before attempting such drastic measures.
By systematically working through these potential causes and solutions, users can effectively troubleshoot and resolve most instances of uneditable layers in Photopea, ensuring a smoother and more productive editing experience.