Creating realistic and visually appealing clouds in digital art can sometimes feel like a daunting task, especially for those new to graphic design or without access to specialized equipment like a graphics tablet. However, for users of Photopea, a powerful, browser-based image editor that closely mimics Photoshop's functionality, generating impressive cloud effects is remarkably accessible, even when relying solely on a mouse. This guide aims to demystify the process, offering a straightforward approach for beginners to add beautiful, fluffy clouds to their Photopea projects.
Getting Started: Essential Preparations
Before diving into the creative process, it's important to have your workspace set up and understand the basic tools you'll be employing. Photopea's accessibility means you can begin immediately by navigating to Photopea.com in your web browser.
Step 1: Setting Up Your Canvas
The first step in any design project is to establish your working area. You can either create a new canvas by going to "File" > "New" and specifying your desired dimensions, or you can open an existing image where you intend to add clouds. For this tutorial, let's assume you're starting with a new, blank canvas.
Step 2: Establishing a Sky Background
Clouds exist within the sky, so having a sky background is crucial for context and realism. You can achieve this in several ways:
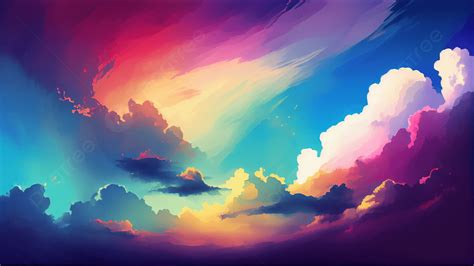
- Using a Gradient: A simple and effective method is to create a gradient. Select the Gradient Tool (G), choose a color palette that represents a sky (e.g., blues fading into lighter blues or even oranges and pinks for a sunset), and drag it across your canvas.
- Using a Stock Image: Alternatively, you can find a suitable sky image online (from sources like Unsplash or Pexels) and place it onto your canvas using "File" > "Open" and then dragging the image over or using "File" > "Place Embedded."
Step 3: Selecting the Right Brush Tool
The Brush Tool (B) is your primary instrument for painting clouds. For creating soft, diffused cloud shapes, a soft-edged round brush is ideal.
- Choosing the Brush: In the top toolbar, locate the Brush Tool. Click on the brush preview to open the brush selection panel. Choose a basic soft round brush.
- Brush Size and Hardness: Adjust the brush size to be appropriate for the scale of your canvas and the clouds you want to create. For soft clouds, ensure the hardness is set to a low percentage (or even 0%) to achieve feathered edges.
- Color Selection: For realistic clouds, select a white or a very light gray color. You can do this by clicking on the foreground color swatch in the toolbar and picking your desired shade from the color picker.
Painting Your Clouds: Building Form and Texture
With your tools ready, it's time to start painting. The key to creating believable clouds is layering and varying brush strokes.
Step 4: Dabbing in Cloud Shapes
Think of clouds as collections of soft, irregular blobs. Don't try to paint perfect shapes. Instead, use your mouse to "dab" or "click and drag" lightly to create these forms.
- Layering is Key: Start by making broad strokes or dabs to establish the basic mass of your clouds. Don't worry if it looks too solid or artificial at this stage.
- Varying Opacity and Flow: To create depth and variation, adjust the brush's Opacity and Flow settings in the top toolbar. Lowering these values allows you to build up the cloud density gradually, mimicking how light interacts with real clouds. A lower opacity and flow will create softer, more translucent layers.
- Creating Different Blobs: Continue adding more dabs and strokes, varying the size and placement of your "blobs." Overlap them slightly to create a more natural, organic look. Remember, clouds aren't sharp or perfect; they are random and soft.
Step 5: Refining with Smudge and Blur Tools
Once you have the basic shapes down, you'll want to soften the edges and blend the colors to achieve a more realistic appearance.
- The Smudge Tool: The Smudge Tool can be incredibly useful for pulling and blending paint. Select the Smudge Tool from the toolbar. Choose a soft brush tip for the smudge tool and a strength setting that allows for subtle blending. Gently drag the tool along the edges of your painted clouds to soften them and create wispy, ethereal effects. Experiment with different strength settings to see how it affects the texture.
- The Blur Tool: The Blur Tool can also be used to soften areas. Similar to the Smudge Tool, use a soft brush and a low strength to gently blur the edges or internal areas of your clouds to create a more diffused look. Be cautious not to over-blur, as this can make your clouds look muddy or indistinct.
Step 6: Erasing for Definition and Shape
Sometimes, you'll want to refine the edges of your clouds or remove excess paint to define their shapes better. The Eraser Tool (E) is perfect for this.
- Soft Edges: Use a soft-edged eraser with a low opacity and flow. This allows you to gently sculpt the cloud's edges, creating softer transitions and more natural-looking outlines.
- Creating Gaps and Breaks: You can also use the eraser to create breaks or thinner sections within clouds, suggesting where light is passing through or where the cloud is dissipating.
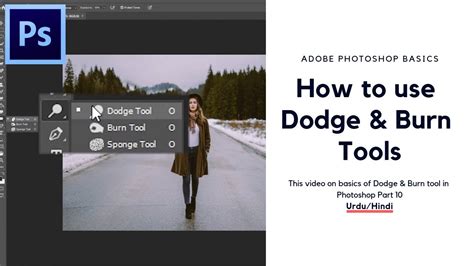
Step 7: Adding Highlights and Depth
To make your clouds look three-dimensional and illuminated, you need to add highlights and shadows.
- The Dodge Tool: The Dodge Tool is used to lighten specific areas. Select the Dodge Tool. In the options bar, set the Range to "Highlights" or "Midtones" and adjust the Exposure to a low percentage (e.g., 5-15%). Use a soft brush to gently paint over the areas where light would naturally hit the clouds - typically the tops and edges facing a light source.
- The Burn Tool: Conversely, the Burn Tool is used to darken areas. Select the Burn Tool, set the Range to "Shadows" or "Midtones," and use a low Exposure. Paint over the undersides and areas of your clouds that would be in shadow. This contrast between highlights and shadows is what gives clouds their form and volume. Remember that shadows in clouds aren't solid black; they still retain subtle detail and color.
Step 8: Incorporating Finishing Touches
A few final adjustments can elevate your cloud creation.
- Layering and Blending Modes: If you want more control, paint your clouds on a separate layer. You can then experiment with different Blending Modes (e.g., "Screen," "Overlay," or "Soft Light") for the cloud layer to interact with the sky background in interesting ways. Adjusting the layer's Opacity is also a powerful way to control the intensity of the cloud effect.
- Adding Subtle Color: For more dynamic skies, like sunsets or sunrises, you can introduce subtle color variations. Use a very soft brush with low opacity and flow, picking colors like pale orange, pink, or yellow, and gently dab them onto the edges or undersides of your clouds where they would catch the light. The Sponge Tool can also be used to subtly desaturate or saturate specific areas to enhance color realism.
Tips and Tricks for Mouse-Based Cloud Creation
- Embrace Imperfection: Real clouds are irregular and varied. Don't strive for perfect symmetry.
- Less is More: Sometimes, a few well-placed dabs and subtle blending are more effective than overworking an area.
- Zoom In and Out: Regularly zoom in to refine details and zoom out to assess the overall composition and how the clouds fit into the scene.
- Experiment with Brush Presets: While a soft round brush is a great starting point, Photopea supports custom brush files (.ABR). You can find or create brushes that mimic cloud textures for more advanced effects.
- Think in Layers: Use layers to keep your work organized and to easily make adjustments without affecting other parts of your image.
Bonus: Creating Colored Clouds for Sunset Effects
To add colored clouds, especially for sunset or sunrise scenes:
- Select a soft brush with low opacity and flow.
- Choose colors like soft oranges, pinks, purples, or yellows.
- Gently dab these colors onto the edges and undersides of your clouds where they would catch the ambient light of the setting or rising sun.
- You can use the Smudge or Blur tool very lightly to blend these colors into the white or gray base of the clouds.
How to Make a Cloudy Sky in Photopea
Conclusion
Mastering the art of creating clouds in Photopea with just a mouse is an achievable goal for any beginner. By understanding the fundamental tools like the Brush, Smudge, Blur, Dodge, and Burn tools, and by employing techniques such as layering, varying opacity, and focusing on soft, irregular shapes, you can produce impressive and realistic cloud effects. The process is not only functional but can also be an enjoyable and rewarding part of your digital design journey. Remember that even professional artists often start with simple tools, and practice is key to developing your skills. So, experiment, have fun, and let your creativity soar as high as the clouds you'll be painting!