When embarking on digital illustration projects using software like Procreate, a critical decision point arises: selecting the appropriate canvas size for printing. This choice directly impacts the final output's clarity, detail, and overall aesthetic appeal. Understanding the interplay between digital dimensions and physical print requirements is paramount for achieving professional-grade results. The purpose of the artwork is the primary driver in this decision-making process, guiding choices related to resolution, color profiles, and measurement units.
The Foundation: DPI and Its Impact on Print Quality
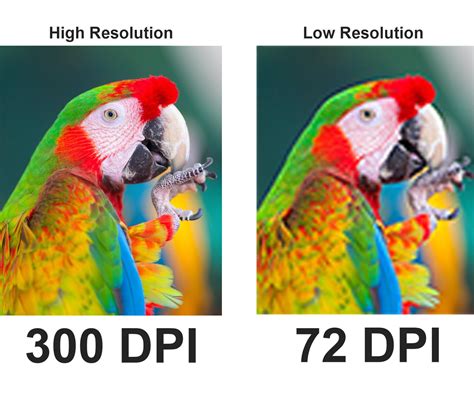
At the heart of print quality lies DPI, or dots per inch. This metric quantifies the density of ink dots that a printer lays down within a single linear inch of a printed page. Fundamentally, DPI is a measure of how many pixels will be printed in an inch of space. A higher DPI signifies a greater concentration of pixels within that inch, translating directly into a more detailed and crisper print. For the vast majority of print projects, it is strongly recommended to utilize a DPI of at least 300. This benchmark ensures that your meticulously crafted artwork will appear sharp, clear, and free from pixelation when reproduced physically. Lower DPI values, while acceptable for on-screen viewing, will inevitably lead to a noticeable degradation in quality upon printing, resulting in a blurry or blocky appearance. The principle here is straightforward: more dots per inch mean more information captured in the printed output, allowing for finer details and smoother transitions.
Color Profiles: Bridging Digital Vision and Printer Reality
The digital realm operates on additive color models, while printing utilizes subtractive ones. Navigating this difference requires a firm grasp of color profiles. RGB (Red Green Blue) is the foundational color profile for digital displays. It works by emitting light, combining red, green, and blue light in various intensities to create the spectrum of colors we see on screens. This profile is best for digital artwork intended for on-screen consumption, such as web graphics, social media posts, or digital paintings viewed on a tablet.
Conversely, CMYK (Cyan Magenta Yellow Key/Black) is the color profile that is ideal for printed materials. This model is subtractive, meaning it works by absorbing certain wavelengths of light and reflecting others. Printers use inks in these four primary colors to create the full range of hues on paper. CMYK precisely matches the color process used by commercial printers, ensuring that the colors you see on your screen are translated as accurately as possible to the printed page. It's important to note that when working in CMYK, colors on-screen might appear less vibrant than in RGB. This is because the gamut, or range of colors, that CMYK can reproduce is smaller than that of RGB. This is why it’s always best to start with an RGB profile unless your client specifically mentions otherwise, and then convert to CMYK closer to the final print stage if necessary. Previewing your colors in a CMYK simulation is crucial to anticipate any significant shifts.
Understanding Units: Pixels vs. Inches in Procreate
Procreate offers flexibility in how canvas dimensions are defined, allowing users to work with either pixels or inches. Each unit serves a distinct purpose and understanding their relationship is key to successful print preparation.
Pixels: Pixels are the fundamental building blocks of any digital image. They are tiny, individual squares, each with a specific color value, that collectively form the complete picture. The number of pixels in your canvas, often referred to as resolution, directly determines the digital size and detail of your artwork. A canvas with a higher pixel count possesses more pixels, thus enabling a more detailed and intricate image. For instance, a canvas measuring 4000 pixels wide by 3000 pixels tall contains significantly more detail than a canvas measuring 1000 pixels by 750 pixels. The more pixels you have, the more detail your image will contain, which is crucial for preserving quality when scaling up or printing.
Inches: Inches, on the other hand, measure the physical dimensions of the artwork when it is printed. If you plan on printing your artwork, it is absolutely crucial to consider the size in inches. To ensure a high-quality print that retains its detail and clarity, you should aim to set up your canvas with a resolution of at least 300 DPI (dots per inch). This means that for every inch of printed output, there will be 300 pixels of image data. Therefore, if you need to print an artwork that is 8 inches by 10 inches, you would ideally set up your Procreate canvas with dimensions that, at 300 DPI, result in those physical measurements. For an 8x10 inch print at 300 DPI, your canvas would need to be 2400 pixels wide (8 inches * 300 DPI) and 3000 pixels tall (10 inches * 300 DPI). Knowing the required output size for your project is a fundamental step in setting up your canvas correctly.
Strategic Canvas Setup for Optimal Print Results
The process of setting up a Procreate canvas for printing involves a strategic approach that balances detail, file size, and workflow efficiency. When creating a new canvas in Procreate, you are presented with options to define its dimensions in pixels or inches, along with the crucial DPI setting.
For print-oriented work, it is generally advisable to set your dimensions in inches and establish the DPI at 300 from the outset. This ensures that Procreate is working with the intended physical print size and resolution from the very beginning. For example, if you intend to print a poster that is 18 inches by 24 inches, you would create a new canvas with these dimensions and set the DPI to 300. Procreate will then automatically calculate the necessary pixel dimensions for that canvas.

It is important to be aware that a higher canvas resolution, meaning a larger pixel dimension or a higher DPI, directly translates to a larger file size. This, in turn, can reduce the number of available layers you can utilize within Procreate. Procreate, like all software, has limitations on memory and processing power. A canvas with millions of pixels requires more resources to manage than one with thousands. Therefore, while aiming for high resolution is essential for print, striking a balance is often necessary to ensure a smooth and efficient creative process. If you find yourself hitting layer limits, you might need to consider optimizing your workflow, such as merging layers that are finalized or breaking down a very complex piece into multiple files.
Advanced Considerations and Best Practices
Beyond the fundamental settings of DPI and dimensions, several advanced considerations can further enhance your print-ready artwork.
Client Briefs and Specifications: Always prioritize any specific requirements provided by your client. If a client specifies a particular print size, resolution, or color profile (e.g., a specific CMYK profile for a commercial printer), adhere to those instructions meticulously. This prevents costly errors and ensures client satisfaction. It is better to always start with an RGB profile unless your client mentions otherwise, as RGB offers a wider color gamut and is more forgiving during the initial creative stages.
Understanding Color Shifts: As mentioned, CMYK colors can appear less vibrant on screen compared to RGB. This is a known characteristic of the CMYK color space. If you are working primarily in CMYK, it is beneficial to use your software's color proofing features to get a more accurate on-screen representation of how the colors will appear when printed. Regularly preview your colors in a CMYK simulation to anticipate and manage these shifts.
Scaling and Resizing: Starting with a canvas that is larger than your intended print size (at 300 DPI) provides a buffer for potential scaling or resizing needs. If you anticipate needing to print your artwork at various sizes, creating it at a resolution that can accommodate larger prints without significant quality loss is a wise strategy. However, it is generally not recommended to significantly enlarge an image that was originally created at a low resolution or for a small print size, as this will inevitably lead to pixelation and a loss of detail. The principle of "garbage in, garbage out" applies here; you cannot magically create detail that wasn't there to begin with.
File Format for Printing: When exporting your artwork for printing, consider the file format. TIFF (.tif) and high-quality JPEG (.jpg) are common choices. TIFF is a lossless format, meaning no image data is lost during compression, making it ideal for professional printing. JPEG uses lossy compression, so ensure you export at the highest quality setting to minimize data loss. If your artwork includes transparency, PNG (.png) is a suitable format, though it might not be universally accepted by all print services. Always check with your print provider for their preferred file format.
Procreate Basics: Setting Up Your First Canvas in the Gallery | Easy Tutorial for Beginners
Practical Workflow Example: Designing a Greeting Card
Let's consider a practical example: designing a greeting card that will be printed. A standard greeting card size might be 5 inches by 7 inches when folded.
- Determine the Print Size: The final printed dimensions are 5 inches wide by 7 inches tall.
- Set the DPI: For a high-quality print, we need 300 DPI.
- Create the Canvas in Procreate:
- Open Procreate and tap the "+" icon to create a new canvas.
- Tap "New Canvas."
- In the "Create" panel, tap the "i" icon to access advanced settings.
- Under "Dimensions," select "Inches."
- Enter Width: 5.0, Height: 7.0.
- Set "Resolution" to 300 DPI.
- Ensure the "Color Profile" is set to RGB initially, unless specifically instructed otherwise.
- Tap "Create."
Procreate will now generate a canvas that is 1500 pixels wide (5 inches * 300 DPI) by 2100 pixels tall (7 inches * 300 DPI). This canvas is perfectly sized for a high-quality 5x7 inch print. You can now proceed with your illustration, confident that you are working with the correct dimensions and resolution for your intended output.
Accessories that Enhance the Printing Workflow
While the Procreate canvas settings are paramount, certain accessories can subtly enhance the overall workflow, particularly for artists who rely heavily on their digital tools for professional output. For instance, maintaining the precision of your input device is crucial. The Apple Pencil nib, for example, is a component that experiences wear over time. I bought this once my existing nib stopped working after 5 years of using them. I purchased through Amazon as I was in the middle of an urgent project and no Apple Store had these as ready stock. Having spare nibs on hand can prevent project delays. These are often available through online retailers like Amazon, and while they are affiliate links, they come at no additional cost to you and support creators through small commissions.
Subscribing to newsletters for more such tips related to Procreate and to follow small business journeys can also be beneficial for continuous learning and staying updated on best practices.
By carefully considering the purpose of your artwork, understanding the nuances of DPI and color profiles, and strategically setting up your Procreate canvas, you can ensure that your digital creations translate beautifully into tangible, print-ready illustrations.