ibisPaint X is a powerful and versatile drawing application, offering a wide array of features for both amateur artists and seasoned professionals. Among its many functionalities, understanding how to effectively manage layers and drawing tools is paramount for achieving precise and controlled artistic results. This tutorial delves into the specifics of preparing your canvas, selecting and configuring your drawing tools, and leveraging the application's settings to refine your workflow, ensuring a smooth and efficient digital art creation process.
Preparing Your Workspace: Layer Management
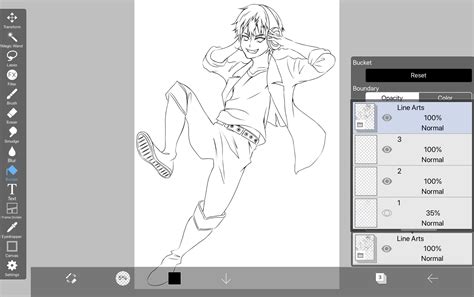
Before you begin any drawing or tracing, it's crucial to ensure your layers are correctly set up. The Layer window in ibisPaint X is your central hub for managing these elements.
Selecting the Current Layer
The first step is to open the Layer window. Within this window, you'll see a list of your active layers. It is essential to verify that the layer you intend to draw on is designated as the "Current Layer." For instance, if you are tracing a sketch, you would want the layer containing your sketch to be active. The provided information highlights a scenario where "Layer 2 (it has a light blue background) is selected." If Layer 2 is not the current layer, you must tap on it to make it the active layer. Once confirmed, you can close the Layer window by tapping the designated button to return to your canvas.
Choosing and Customizing Your Drawing Tools
With your layer prepared, the next step involves selecting the appropriate drawing tool and fine-tuning its settings for optimal performance.
Activating the Brush Tool
In the "Tool Selection" window, locate and select the "Brush tool." This is the primary instrument for most drawing tasks.
Configuring Brush Settings
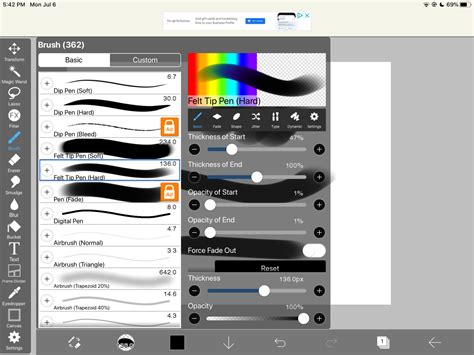
Once the Brush tool is selected, you'll need to access the "Brush Setting" window. Here, you can customize various parameters of your brush. The interface allows for adjustments to:
- Thickness of Start: Controls the thickness of the brush stroke at its beginning.
- Thickness of End: Dictates the thickness of the brush stroke at its conclusion.
- Opacity of Start: Determines the transparency of the brush stroke at its beginning.
- Opacity of End: Sets the transparency of the brush stroke at its conclusion.
- Thickness: The overall thickness of the brush stroke.
- Opacity: The overall transparency of the brush stroke.
Dragging the sliders for these options allows you to experiment and find the desired effect. To revert to the previous pane or exit the Brush Setting window, utilize the "Pane Switch button."
Tracing with Precision: The Dip Pen (Hard)
The tutorial specifically mentions using the "Dip Pen (Hard)" brush for tracing. To apply these settings, you would typically navigate to the Brush Setting window, select the Dip Pen (Hard) option, and then adjust the aforementioned parameters.
Mastering Canvas Navigation and Stroke Control
Effective drawing in ibisPaint X involves not only tool selection but also proficient navigation and precise stroke execution.
Navigating the Canvas
- Drawing: Use a single finger to draw strokes on the canvas.
- Zooming: Employ a two-finger pinch gesture to zoom in and out of the canvas. This is crucial for working on fine details or getting an overview of your artwork.
- Panning: Use a two-fingered drag to move around the canvas, allowing you to reposition your view without altering your drawing.
Achieving Clean Lines
The speed and confidence with which you draw directly impact the quality of your lines.
- Detailed Work: Zooming in allows for more controlled and precise drawing of intricate areas.
- Smooth Strokes: Swiping too slowly can result in wobbly lines. Maintaining a steady and consistent speed is key to achieving clean, smooth strokes.
- Line Weight Variation: Moving your finger slowly with the Dip Pen tool can lead to fine start and end points for your lines, creating a natural tapering effect.
- Consistent Line Weight: For even, uniform lines, move your finger confidently and at a steady speed.
Quick Slider for Adjustments
ibisPaint X offers a "Quick slider" as a shortcut for adjusting brush size and opacity without needing to open the full Brush Properties window every time. This feature significantly speeds up the workflow for on-the-fly modifications.
Customizing the ibisPaint X User Interface
Beyond the core drawing tools, ibisPaint X provides extensive options to customize the application's interface and gestures for a more personalized and efficient user experience. These settings can be accessed by tapping the "Back button" and then selecting "Settings."
Gesture Controls and Undo/Redo
- Undo by Two Fingers Tap: Enabling this gesture allows you to quickly undo your last action with a simple two-finger tap on the screen. This is an invaluable feature for correcting mistakes rapidly.
- Redo by Three Fingers Tap: Conversely, a three-finger tap can be configured to redo actions that were previously undone.
Brush Tool Enhancements
- Quick Eyedropper: This setting determines whether the Quick Eyedropper tool activates when you long-press on the canvas while using the brush. If you find it activating unintentionally, you can turn it off. If it is on and appears unexpectedly, holding down with two fingers without lifting can cancel its function.
- Time for Activation of Quick Eyedropper: If the Quick Eyedropper is enabled, you can customize the duration of the long-press required to activate it. This allows for finer control over when this feature comes into play.
Canvas and View Settings
- View Rotation: This option allows you to rotate the canvas using a two-finger gesture, which can be helpful for drawing at different angles.
- Reference Window: Toggling this on displays a "Reference Window," which can be used to display reference images without obscuring your main canvas. Its visibility can also be managed from the "View Menu."
- Interpolation on Zoom In: This setting affects how the image appears when enlarged. With interpolation on, the image may appear blurred; with it off, it will look pixelated. Choosing between these depends on your preference for visual fidelity versus sharpness.
- Default Value of Display When Zoomed: This setting dictates how the "Display When Zoomed" property of an artwork file is determined upon creation. The "Zoom In" setting itself can be adjusted within the View menu.
Import and Tool Selection Preferences
- Suggest Processing after Import: When importing an image, ibisPaint X can suggest image processing filters like "Line Drawing Extraction" or "Background Removal." Turning this off can streamline the import process if you don't frequently use these features.
- Tool Select Position: You can choose where the "Tool Select window" appears on your screen, allowing you to place it in a location that best suits your workflow.
- Number of Columns in Tool Select Popup: This setting allows you to adjust the number of columns displayed in the tool selection popup, typically between one and three. The actual number of columns displayed may vary based on your device's screen size.
- Show Label in Tool Selection: If turned off, tool names will not be displayed in the Tool Selection window, potentially saving space and offering a cleaner visual.
Sound and Layer Window Customization
- Sound: You can enable or disable sound effects for actions like "Undo" and "Redo." Note that even if enabled, these sounds will not play if your device is in mute mode.
- Show Message on Undo: This option controls whether messages appear on screen when you perform an undo or redo action.
- Layer Row Height: You can adjust the height of the rows in the "Layer window" and the "Floating Layer Window" (available on tablets and Windows devices) to better suit your visual preference and screen real estate.
- Drag Left Side to Reorder Layers: Enabling this allows you to easily reorder your layers by dragging them from the left side of the layer row.
- Layer Window Thumbnail: Choose between displaying the "Whole" layer in the thumbnail preview or "Only Contents," which shows just the drawn parts of the layer.
Canvas Background and Video Watermarks
- Background Color: You can set the background color of your canvas screen. This is a "Prime feature" on iOS/Android and a "Pro feature" on Windows. The "Reset" button allows you to return to the default background color.
- Watermark on Videos: Disabling this option removes the ibisPaint logo watermark when you play back videos of your drawing process.
Advanced Eyedropper Functionality
- Disable Contents Layer Selection function when using Eyedropper: When enabled, this prevents the Layer Selection button from appearing when you activate the Quick Eyedropper by long-pressing the canvas with the Brush tool. This can be useful for preventing accidental layer changes.

Cloud Synchronization and Storage Management
ibisPaint X offers robust cloud synchronization features to safeguard your artwork and ensure accessibility across devices.
Syncing Options
- Cloud Synchronization: This feature allows you to sync your local files with cloud storage.
- Synchronize automatically even with Mobile Network: By default, syncing might be restricted to Wi-Fi. Turning this on enables automatic syncing even when using a mobile network, though manual syncing is always an option.
- Do not sleep during synchronization: To prevent syncing from being interrupted by your device going into sleep mode, especially for large files or numerous artworks, enable this option.
Deleting Synchronized Items
The "Behavior on Deleting Synchronized Item" setting offers control over how files are handled when deleted. You can choose to:
- Confirm: Be prompted each time to decide whether to delete local files, cloud files, or both.
- Delete Only Local File: Remove only the copy on your device, leaving the cloud version intact.
- Delete File on Cloud As Well: Permanently remove the artwork from both your device and the cloud storage.
Storage Expansion and Ads
- Get More Capacity: ibisPaint X offers increased cloud storage capacity through Prime Membership, allowing you to expand from 64MB to 20GB.
- Remove Ads: Access to the "Remove-Ads Add-on" product page.
- Show Product Info: Opens the "Prime Membership" product page for more details.
- Redeem Promo Code: A page to input promotional codes for membership benefits (not available on iPhone/iPad).
Fine-Tuning Stylus and Brush Behavior
For users employing digital styluses, ibisPaint X provides advanced settings to optimize pressure sensitivity and stylus interaction.
Pressure Sensitivity Control
- Use Pressure Sensitivity: Enabling this allows for subtle variations in brush thickness and opacity based on how hard you press with your stylus. This feature may appear grayed out if your device or stylus does not support it.
- Weak Sensitivity: This setting allows you to decrease the overall sensitivity to pressure, making it harder to achieve drastic changes in brush strokes with varying pressure.
- Pressure Curve Adjustment: The pressure sensitivity can be fine-tuned using a graph. By adjusting "knobs" on this curve, you can precisely control how pressure affects line thickness and opacity. Raising a knob on the graph generally results in thicker, more opaque lines, while lowering it leads to thinner, less opaque lines. Knobs can be added by tapping on empty areas of the curve and deleted by dragging them outside the graph frame. A "reset button" is available to revert to the initial pressure settings.

Stylus Interaction Settings
- Touch Offset: If drawing feels misaligned with your stylus or finger input, this function allows you to adjust the touch positioning. It's particularly useful for stylus users.
- Supported Stylus: This section lists the digital styluses compatible with ibisPaint X. A digital stylus is defined as one with batteries that can communicate with the device, often supporting pressure sensitivity.
- Selecting a digital stylus: Instructions on how to connect your specific digital stylus are available here, usually requiring reference to the stylus's user manual.
- Stylus Settings: After connecting a stylus, this screen provides specific settings for it. Not all styluses have a dedicated settings screen.
- Palm Rejection: When enabled after connecting a compatible stylus (like Wacom's), this feature allows you to rest your palm on the screen without it interfering with drawing. However, it also makes the screen unresponsive to fingers for gestures like zooming. Assigning a button on the stylus to toggle Palm Rejection on/off can be very convenient.
- Show Thickness Mark while Hovering: Displays a visual indicator of the brush's thickness on the screen when the stylus is hovering just above the canvas.
- Show Cross Mark while Hovering: Shows the exact position of the stylus tip on the canvas while hovering.
- Button 1 & Button 2: If your stylus has programmable buttons, you can assign functions like "undo" or switching between brush and eraser to these buttons.
Saving Preferences and Brush Defaults
- Save Bucket Settings: If turned off, your Bucket tool settings will reset to default when you return to "My Gallery." Turning it on preserves your customized settings.
- Save Stabilizer Settings: Similar to the Bucket tool, this switch preserves your Stabilizer window settings when you re-enter the canvas screen.
- Save Selection Area: When disabled, any selected area on the canvas will be reset upon returning to "My Gallery."
- Save Filter Parameters: Ensures that filter settings are retained when switching filters or returning to "My Gallery."
- Save Adjustment Layer Parameters: Preserves custom parameters for adjustment layers.
- Set Added Layer as Current Layer: If turned off, a newly added layer will not automatically become the active layer. The previously active layer will remain as the working layer.
- Brush Thickness Depends on Canvas: When this is enabled, the brush thickness scales with the canvas size. If disabled, the brush thickness remains constant regardless of canvas dimensions.
- Texture Memory Size: This setting allows you to manually adjust the memory allocated for artwork creation. Increasing it might improve performance but could lead to instability, while decreasing it can enhance stability at the potential cost of performance. The "Auto Adjust Texture Memory Size" option can be turned off to manually control this slider. This setting is not present on the Windows version.
Resetting and Font Management
- Show Tutorials Again: Re-displays the application's introductory tutorials for users who need a refresher.
- Reset Basic Brush Parameters / Reset Custom Brush Parameters: These options allow you to reset all brush settings back to their factory defaults.
- Reset Color Palette: Returns the color palette to its default configuration.
- Reset Filter Parameters / Reset Adjustment Layer Parameters: Resets all parameters related to filters and adjustment layers.
- Reset Stylus Settings: Resets all pressure-sensitive stylus configurations.
- Uninstall Fonts: If you have downloaded numerous fonts and are concerned about storage space, this option allows you to remove all downloaded fonts at once. Individual fonts can be deleted by tapping the trash icon next to them in the Font List window.
- Remove All References: Deletes all images loaded into the "Reference Mode" of the Reference window.
- Delete the Brush Pattern images: Removes all Brush Pattern images that were automatically downloaded when using brushes with original patterns.
By understanding and utilizing these features, artists can significantly enhance their drawing experience in ibisPaint X, achieving greater precision, efficiency, and creative freedom. The ability to customize layers, tools, and interface elements ensures that the application adapts to individual workflows, making digital art creation a more intuitive and enjoyable process.