DaVinci Resolve 18, a powerful video editing software developed by Blackmagic Design, offers a robust suite of tools for video enhancement, color correction, visual effects, and audio refinement. Among its many significant features are its comprehensive video exporting capabilities. This article provides an in-depth guide on how to export videos, specifically in the widely compatible MP4 format, using DaVinci Resolve 18, ensuring high-quality results for your projects.
Understanding the Fundamentals of Video Exporting
Before delving into the specifics of DaVinci Resolve, it's crucial to grasp the core concepts of video exporting. Essentially, exporting a video involves converting your edited project file into a standalone format that can be readily viewed on various devices and platforms. The quality of this exported video is significantly influenced by the settings you choose during the export process. Therefore, familiarizing yourself with the options available in DaVinci Resolve is indispensable.
Video Formats and Codecs: The Building Blocks of Your Export
When you export a video, you'll be making two critical selections: the file format and the codec. The file format, such as MP4, MOV, or AVI, dictates the structure of the video file. The codec, on the other hand, is the software responsible for compressing and decompressing the video data. Efficient codecs can significantly reduce file size while preserving video quality, making them ideal for exporting.
The MP4 format is particularly noteworthy due to its widespread compatibility. It's a universally supported video file format, meaning that if you convert a video to MP4, it's highly likely to play on almost any device. Many video editing tools may not work optimally with other file formats, but MPEG-4 (MP4) is a widely supported video type that saves videos in high quality. This makes MP4 an excellent choice for ensuring your exported videos are accessible across a broad spectrum of devices and platforms.
DaVinci Resolve supports common formats like MOV, ProRes, and DNxHR for import and export, but MP4 compatibility issues can sometimes arise due to codec limitations or corrupted files. DaVinci Resolve primarily imports MP4 videos with H.264 or H.265 (HEVC) codecs.
Resolution and Frame Rate: Defining Visual Clarity and Smoothness
Two pivotal settings to consider during export are resolution and frame rate. Resolution refers to the number of pixels displayed on the screen, directly impacting the video's visual clarity and detail. Frame rate, measured in frames per second (fps), determines the fluidity of motion in your video. A higher frame rate generally results in smoother playback but can also lead to larger file sizes. It's crucial to match these export settings to your project's original timeline settings to avoid errors or quality degradation. If you need to check your timeline settings, navigate to the Media tab, right-click on your timeline, and select Timeline Settings.
Exporting MP4 Videos in DaVinci Resolve 18: A Step-by-Step Walkthrough
With the foundational knowledge in place, let's proceed with the detailed steps for exporting MP4 videos in DaVinci Resolve 18.
Accessing the Deliver Module
The first step is to navigate to the "Deliver" module, which is visually represented by an icon resembling a rocket. This module is specifically designed for exporting your finished projects.
Upon entering the Deliver module, you'll notice various export presets at the top, catering to platforms like YouTube, and common formats like H.264 and H.265, as well as options for exporting projects for use in other editing software such as Final Cut Pro or Adobe Premiere Pro. While these quick settings can be useful for rapid exports, for precise control over your output, it's recommended to delve into custom settings.
Customizing Your Export Settings
To gain full control over your export, click on the "Custom" icon. This action opens up a panel where you can manually adjust all the available options. The initial steps involve naming your video file and selecting the desired save location on your computer.
Defining the Export Range
Before rendering, you need to specify which part of your project will be exported. The gray bar on the timeline indicates the section that will be rendered. You can set the "In" point by pressing the 'I' key and the "Out" point by pressing the 'O' key. It's essential to ensure these markers are precisely placed, as any unselected frames will not be included in the export. Zooming in on the timeline can help you make these adjustments with greater accuracy.

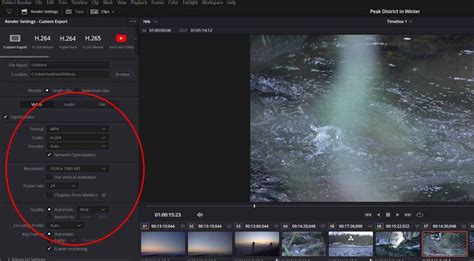
Configuring Render Settings for MP4 Export
In the "Render" section, you can choose to export an individual clip or multiple clips. For the "Format," selecting MP4 is highly recommended for broad compatibility.
When it comes to "Resolution," ensure it accurately reflects your video's resolution. Avoid exporting at a lower or higher resolution than your source material unless intentionally creating a downscaled or upscaled version. For most projects, a middle-grade resolution like 4K is often suitable. For "Frame Rate," it's best to stick with the frame rate you've been using throughout your project to maintain consistency.
Regarding the "Codec" options, H.264 is the most popular and widely supported codec. H.265 (also known as HEVC) is a more streamlined codec that can achieve similar quality to H.264 but with smaller file sizes, making it an excellent choice for efficient exports.
Advanced Settings for Optimal Quality
Within the "Advanced Settings" section, consider activating the "Force Sizing" option to ensure the highest possible quality output. For audio, selecting the AAC or PCM codec is advisable if available. Ensure the "Sample Rate" is set to its maximum for the best audio fidelity.
Adding to the Render Queue
Once you have finalized all your export settings, click on "Add to Render Queue." Your project will then appear in the Render Queue panel, ready for processing.
For those requiring the absolute highest quality, potentially for archival purposes or professional workflows, exporting using the MXF OP1A format with the DNxHR codec (selecting either 444 12-bit or 444 10-bit) is an option. This format is often favored in professional post-production environments for its uncompressed or lightly compressed nature.
If you need to export different versions of your video with varying settings, you can duplicate the current render job in the queue, change its name, and add it as a new item to be processed.
Understanding Video Compression and Bitrate
When preparing a video for export, a grasp of how video compression functions is important. Video compression is the process of reducing the file size of a video without significantly compromising its quality. There are two primary methods: lossless and lossy compression. Lossless compression aims to maintain the video's original quality, resulting in a less substantial file size reduction. Conversely, lossy compression can considerably shrink the file size, but at the cost of some data and, therefore, quality. In DaVinci Resolve, you have the option to choose your compression level based on your requirements. For critical applications like film festivals or archival purposes, opting for less aggressive compression is wise to preserve top-notch quality.
Bitrate is another crucial factor influencing video quality and file size. Bitrate refers to the amount of data processed per unit of time in a video file, typically measured in kilobits per second (Kbps). A higher bitrate generally results in better video quality but also leads to larger file sizes. DaVinci Resolve allows you to adjust bitrate settings to strike a balance between video quality and file size. For instance, if you're exporting for streaming purposes, reducing the bitrate can ensure faster loading times and smoother playback.
Different platforms have varying specifications for video formats, resolution, and bitrate. For example, YouTube suggests using the MP4 format with frame rates of 24, 25, 30, 48, 50, or 60 frames per second. DaVinci Resolve's custom export settings enable you to tailor your output to meet the specific requirements of your target platform.
Troubleshooting Common Export Issues
While DaVinci Resolve is a powerful tool, you might occasionally encounter issues during the export process. Here are some common problems and their solutions:
- Exported Video Has Poor Quality: This is often due to low export settings. Review your resolution, frame rate, and bitrate settings and increase them if necessary.
- Exported Video is Too Large: Conversely, excessively high export settings can lead to large file sizes. Try reducing the resolution, frame rate, or bitrate.
- Exported Video Doesn't Play Correctly: This can stem from an incompatible format or codec. Attempt exporting the video in a different format (e.g., MOV) or with a different codec (e.g., H.265 if you used H.264).
- Render Fails or Stops Halfway: This can be caused by corrupted media, problematic effects, or insufficient hard drive space. Identify the point of failure on your timeline, check for media issues, disable complex effects temporarily, and ensure you have ample free space on your drive.
- Audio and Video are Out of Sync: This can be due to corrupt audio clips, frame rate mismatches, or outdated software. Re-import audio, ensure consistent frame rates across your project and export settings, and update DaVinci Resolve. Variable frame rate footage can also cause sync issues; consider converting it to a fixed frame rate using external tools.
- Render Artifacts Appear: Glitches, color shifts, or black screens can occur due to software bugs or outdated graphics card drivers. Try changing the render codec or format, updating your graphics card drivers, or rendering using optimized media.
- No Sound in the Exported File: This can be caused by missing or incorrect audio tracks, improper audio output settings in the Deliver tab, or incorrect project settings. Double-check your audio settings, ensure "Export Audio" is enabled, and verify that the output track is set correctly (e.g., "Bus 1 (Stereo)").
- File Size is Larger Than Expected: This typically indicates that the bitrate has been set too high. Lower the bitrate to achieve a more manageable file size. For reference, YouTube's recommended bitrates for standard dynamic range videos vary by resolution and frame rate, with values often ranging from 8,000 kb/s for 1080p at 30 fps up to 68,000 kb/s for 4K at over 30 fps. Experimenting with different bitrate settings is key to finding the optimal balance.
Quick Export vs. Custom Export
DaVinci Resolve offers a "Quick Export" feature, accessible via "File > Quick Export." This is ideal for generating a quick preview or for users who need to export rapidly without delving into detailed settings. However, for precise control and professional results, the "Deliver" page with "Custom Export" settings is the preferred method.
How To Export Video In Davinci Resolve 19 Tutorial
Enhancing Your Projects with External Assets
As you embark on your video editing journey with DaVinci Resolve, consider enriching your projects with high-quality content available on platforms like Envato Elements. Envato Elements offers unlimited downloads of millions of digital assets, including video templates, music, sound effects, and more, which can significantly elevate the production value of your films, YouTube videos, or promotional clips.
Conclusion
Exporting videos in DaVinci Resolve 18, particularly in the versatile MP4 format, is a streamlined process when you understand the available settings. This comprehensive guide has walked you through the essential steps, from understanding basic video concepts to configuring advanced export options and troubleshooting common issues. Remember that practice makes perfect; by consistently utilizing the features and tools within DaVinci Resolve, you will enhance your video editing abilities and achieve professional-quality results for all your projects.