In the realm of digital image manipulation, the ability to make precise selections stands as a cornerstone of professional editing tasks. With advanced selection techniques, we not only carve out intricate details and composite images effortlessly but also apply tailored adjustments and corrections to elevate the visual narrative. Selections in Photoshop afford us the control to isolate and manipulate complex objects, delicate fringes, and nuanced textures within an image, which is especially crucial when dealing with intricate backgrounds or overlapping elements. Mastering advanced selection tools in Photoshop is paramount for professionals who strive to deliver refined and sophisticated edits. Before we dive into specific tools, it's essential to understand that Photoshop provides a plethora of selection tools, each with unique attributes suitable for various tasks.
The Foundation: Understanding Basic Selection Tools
Photoshop offers a diverse array of tools to initiate selections, catering to different needs and complexities. Understanding their fundamental operations is the first step towards mastering advanced techniques.
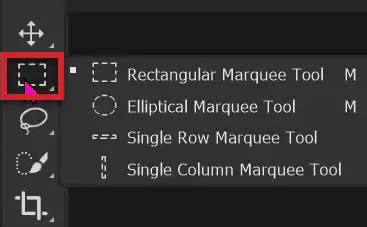
Geometric Selections with Marquee Tools
Marquee Tools are Photoshop's answer to geometric selections. They're straightforward; we use the Rectangular Marquee for selecting square or rectangular areas and the Elliptical Marquee for circular or elliptical selections. These are ideal for selecting basic shapes or defining areas of interest with clear boundaries. For instance, if you need to apply a uniform adjustment to a square object, the Rectangular Marquee tool is your most efficient choice. The Elliptical Marquee tool serves a similar purpose for circular or oval elements.
Freeform and Polygonal Selections with Lasso Tools
For more organic or irregular shapes, the Lasso Tool family comes into play. The Lasso Tool is one of our first go-to choices when we need to make freeform selections. With it, you simply draw around the object you wish to select. For more precision, the Polygonal Lasso Tool allows us to make selections using straight lines, useful when dealing with angular subjects. It operates by clicking to create anchor points, forming a polygon around the desired area. This is a significant improvement over freehand tracing when dealing with subjects composed of straight edges. The Magnetic Lasso Tool, another in this family, attempts to "snap" to the edges of objects with good contrast, simplifying the tracing process.
Color-Based Selections with the Magic Wand
For a more automated approach, the Magic Wand Tool is our quick-fix option. It selects areas based on color and tone, efficient for high-contrast images. This tool is particularly useful for selecting large areas of a solid color, such as a clear blue sky or a plain background, allowing for quick isolation and manipulation. The Tolerance setting in the Options bar is crucial here; a lower value selects fewer colors similar to the pixel you click, while a higher value selects a broader range.
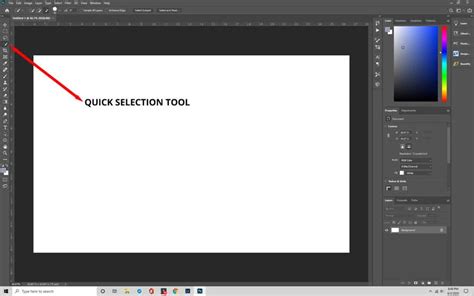
Intelligent Selections with Quick Selection and Object Selection Tools
The Quick Selection Tool uses a brush-like interface to paint out selected regions. The regions you select are almost Magic-Wand-tooled, because Quick Selection Tool also senses edges and creates more knowledgeable selections. It's considered a quick and smart tool, and you will probably use this tool the most. It works by intelligently detecting edges and colors as you paint over the desired area.
More advanced, the Object Selection tool uses artificial intelligence to help make selections of objects within an image. Choose between Rectangular or Lasso "Mode" and drag a loose rectangle or lasso around an object in the image. Photoshop will help to identify and "shrink-wrap" the selection around the subject. This AI-powered tool can even select objects that are out of focus, making it incredibly powerful for complex compositions.
Advanced Techniques for Complex Selections
While basic tools are essential, truly professional results often require more sophisticated methods to handle intricate details and challenging subjects.
Harnessing the Power of the Pen Tool
For the utmost precision, we turn to the Pen Tool. It creates paths that can be converted into highly precise selections. The Pen Tool allows for the creation of vector paths with adjustable anchor points and Bezier curves, offering unparalleled control over the selection's edge. This is the preferred tool for designers and illustrators who need absolute accuracy, especially for product shots or graphic elements. When dealing with irregular shapes and fine details like hair and fur, we must approach selection with a combination of tools and patience. The Lasso tool is perfect for outlining general shapes. For more precision, we zoom in and switch to the Pen tool, creating paths to define the edges carefully.
Leveraging Channels for High-Contrast Isolations
Channels offer a unique approach to making complex selections, especially when the object and background have a high contrast. We examine each channel (Red, Green, Blue) to find the one with the greatest contrast and duplicate it. Using Levels and Curves, we increase the contrast further to define the selection, turning the subject into white and the background into black. This duplicated channel can then be loaded as a selection. This technique is particularly effective for isolating elements like hair against a plain background or separating subjects with distinct tonal differences. With certain ultra-complex subjects, you can take advantage of the channels to quickly create extremely complex, yet shockingly accurate selections. For instance, with a photo of a tree, we can grab the blue color channel and duplicate it.
The Select and Mask Workspace: A Refinement Hub
The Select and Mask workspace is a dedicated environment for refining selections. When tackling intricate selections, we often turn to the Refine Edge tool within this workspace to polish the edges of our subject. It's particularly helpful when the object we're selecting has wispy hair or fuzzy boundaries, which can be challenging to capture with standard selection tools. By using the Refine Edge functionality, we can adjust parameters like radius, smoothness, feather, and contrast to enhance the selection's edge, making sure it looks natural within the context of its new background. This is where you can truly dial in the details, especially for elements like hair, fur, or foliage. Features like "Select Subject" and "Select and Mask" leverage Adobe Sensei, Photoshop's AI, to automate much of this process.
PERFECT Subject Removal in Adobe Photoshop - How to Use the Select & Mask Workspace
Strategies for Complex Edits and Workflow Optimization
Beyond mastering individual tools, an efficient workflow and strategic application of techniques are key to achieving professional results.
Working with Layers and Masks for Non-Destructive Editing
Layers and masks are powerful allies in our selection arsenal, providing non-destructive editing capabilities. After creating a selection, we use Ctrl+J (Cmd+J on Mac) to duplicate the selected area to a new layer, maintaining the integrity of the original image. Alternatively, we can create a layer mask from a selection, which allows us to hide or reveal parts of a layer without permanently deleting pixels. This flexibility is crucial for iterative editing and making adjustments later without degrading the image quality.
Refining Edges for Seamless Compositing
Modulating the border of a selection allows for a more integrated blending into the new background. While feathering, we always strive for a balance that suits the image. Too much feathering can lead to a ghostly halo, while too little can produce an unrealistically sharp edge. The "Shift Edge" slider in Select and Mask is also invaluable for subtly expanding or contracting a selection to eliminate fringing or ensure a tight fit. To address the complexities of edge selections, we typically use the Refine Edge tool, which allows us to smooth, feather, and contrast edges for a seamless blend.
Automating Selections with Adobe Sensei
Adobe Photoshop offers a myriad of keyboard shortcuts that we, as designers and photographers, use to accelerate our editing process. For instance, pressing Ctrl+D (Cmd+D on Mac) quickly deselects any active selection, while Ctrl+Click (Cmd+Click on Mac) on a layer thumbnail in the Layers panel loads that layer's contents as a selection. We leverage Adobe's AI, known as Adobe Sensei, to automate the more tedious aspects of selections. Features like 'Select Subject' give us a one-click solution to isolate subjects with a high degree of accuracy. The "Select Sky" feature is another powerful AI tool that can automatically select the sky in an image, making sky replacement much more efficient.
Workflow Optimization and Keyboard Shortcuts
Our workflow as designers and photographers is greatly enhanced by employing a structured approach to selection. We begin by analyzing the image to determine the best tool for the job, be it the Quick Selection tool, Pen tool, or a combination of both. Understanding essential keyboard shortcuts can dramatically speed up your workflow. For example, holding down Shift while using a selection tool adds to the current selection, while holding down Alt (Option on Mac) subtracts from it. Using Ctrl+D (Cmd+D on Mac) to deselect and Ctrl+Shift+I (Cmd+Shift+I on Mac) to inverse a selection are fundamental commands.
Specific Scenarios and Advanced Applications
The application of selection techniques often depends on the specific content of an image and the desired outcome.
Selecting People and Intricate Details
In our detailed photo editing process, we often encounter the need to make complex selections that cater to the specific requirements of a project. For accurate selections of people within various environments, we use a combination of tools such as the Pen tool and Channel-based selections. The Pen tool allows us to draw precise paths around the subject, which is especially useful for intricate outlines such as hair or clothing. We also utilize Channel-based selections to capture fine details by targeting the contrast in a given channel and converting that into a selection. Select Subject has also been trained on portraits so that if it identifies a person in the image, it will create an accurate selection around difficult-to-select attributes such as hair.
Isolating Text and Basic Shapes
When it comes to text and basic shapes within an image, our approach requires a different set of techniques for clear and sharp selections. We frequently use the Magic Wand tool and Lasso tool to quickly select standard shapes and text. For geometric shapes, the Marquee tools are most efficient. If you need to make an adjustment to an area which has a basic geometric shape, the rectangular marquee tool (M) is the best tool for the job. Simply click on one corner and drag to the opposite one. The Elliptical Marquee Tool is just like the Rectangular Marquee Tool, but surprisingly it works with ellipses and circles rather than rectangles.
Applying Adjustments and Filters Strategically
After making a precise selection within Photoshop, our next steps involve leveraging those selections to enhance the image effectively. Using selections strategically allows us to apply color correction to specific areas of an image. For instance, if we need to adjust the hue of a subject's clothing without affecting skin tones, we can use a new layer above the original and utilize blending modes to apply the correction only to the chosen selection. When it comes to applying filters, selections can be a game-changer. We can isolate areas of the image for sharpening, blurring, or adding special effects that contribute to the overall composition's depth and focus.
Refining and Saving Selections
The process of selection doesn't end with the initial tool. Further refinement and the ability to save selections are crucial for complex projects.
Modifying and Transforming Selections
All selection tools can be modified after an initial selection is made. You can add to a selection by holding Shift, subtract by holding Alt (Option on Mac), or find the intersection by holding Shift+Alt (Shift+Option on Mac). Transforming a selection allows you to resize, rotate, or distort the selection marquee itself, independent of the image content. This is done via Select > Transform Selection.
Saving and Loading Selections for Reuse
If a selection was difficult and you spent a lot of time refining it, it's often a good idea to save it (just in case!). Simply choose Select > Save Selection, then type a name for the selection in the dialog box. If you save a selection, it will always be available for you to load. This is incredibly useful for recurring tasks or when working on projects with multiple similar elements. Loading a saved selection can be done through Select > Load Selection.
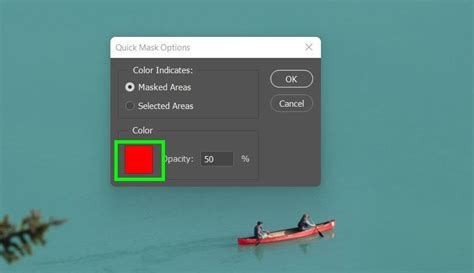
Utilizing Quick Mask Mode for Pixel-Level Editing
Previewing Selections using Quick Mask is another powerful way to refine selections. Tapping the Q key toggles Quick Mask mode, where the selected area is shown as a translucent overlay (defaulting to red). Painting with black in this mode removes from the selection, while painting with white adds to it. This allows for very granular, pixel-by-pixel adjustments to the selection's edge. You can also toggle the Quick Mask color to better contrast with your image.
Conclusion: The Art and Science of Photoshop Selections
Mastering all the different selection tools of Photoshop means better masks, fills, crops, adjustments, and more control over an extremely complex and powerful program. Making selections in Photoshop can be an incredibly tedious and time-consuming task, so it helps to know every possible method for a variety of situations. Selection tools are critical in Photoshop. When you select a region, edits you make only affect the region and donât touch the rest of your work. This is why selections are important and why Adobe has dedicated numerous different tools to create general to extremely detailed selections. No Photoshop selection tool is best; instead, some selection tools are more useful than others in specific situations. Itâs also a matter of personal preference and skill level. In most cases, youâll need more than one selection tool to get the job done â so it pays to know a few different tools and how they work. With practice, these skills become second nature, enhancing your ability to bring your creative visions to life.