The journey from a traditional sketch to a polished digital illustration often involves bridging the gap between the physical and the digital. For artists using Clip Studio Paint (CSP), this transition can be made remarkably smooth, especially when starting with a scanned or photographed sketch. This process is crucial for ensuring that your line art is clean, defined, and ready for the vibrant world of digital coloring. Whether you're a seasoned digital artist or just beginning your journey, understanding how to effectively import and refine your hand-drawn work is a foundational skill.
Importing and Preparing Your Sketch
If you have access to a printer, this would be the time to upload a scanned picture of your sketch to your iPad or tablet. The initial import of a hand-drawn sketch into digital software, like Clip Studio Paint, can sometimes result in a less-than-ideal appearance. Even if the original image consists of black lines on white paper, the imported version might exhibit a gray tone, or the lines may lack the crispness of the original. This is where image adjustment tools become indispensable for preparing your artwork for the digital coloring process. The goal is to achieve a background that is purely white and lines that are solid and clearly defined.
Adjusting Tonal Correction for Clean Lines
To rectify these common import issues, Clip Studio Paint offers powerful tools for image manipulation. A key function for this is "Level Correction," accessible through the [Edit] > [Tonal Correction] > [Level Correction] menu. This feature allows you to fine-tune the colors and tonal values of your raster layer, ensuring that your sketch is optimized for digital use.
Upon opening the Level Correction dialog, you'll encounter three adjustable arrows positioned at the bottom of a graph. These arrows represent the black, white, and gray points of your image. By dragging these triangle nodes to the left or right, you can precisely adjust the tonal range. The primary objective here is to manipulate these sliders so that the pencil markings of your sketch effectively disappear, and your intended lines become completely filled with solid black. This process effectively "cleans up" the scanned image, removing unwanted background noise and strengthening your linework.
The middle slider, in particular, is vital for controlling the level of pixelation around the lines. Adjusting it carefully can help to smooth out any jagged edges or artifacts that might have been introduced during the scanning or import process, leading to a cleaner, more professional-looking line art.
Once these adjustments are complete, they are applied in the form of an adjustment layer, specifically a "Tonal Correction layer." This non-destructive editing method ensures that you can always go back and tweak the settings if needed without permanently altering the original imported image data.
Utilizing Brightness and Contrast for Further Refinement
In addition to Level Correction, the "Brightness and Contrast" dialog offers another layer of control for preparing your line art. Adjusting the Brightness slider is essential for ensuring that the paper background appears completely white. It's important to monitor this adjustment closely to prevent thin lines from becoming so faint that they disappear, or conversely, becoming too thick and losing their delicate quality.
Subsequently, by adjusting the [Contrast] and [Brightness] sliders together, you can further darken and sharpen your lines. This combined approach ensures that your scanned sketch is transformed into a clear, high-contrast image with pure white backgrounds and bold, distinct lines, making it ideal for subsequent digital coloring.
How to prepare your SCANNED ARTWORK for COLORING in CLIP STUDIO PAINT | Clip Studio Paint Tutorial
Understanding Image Types: Raster vs. Vector
Before delving deeper into Clip Studio Paint's tools, it's beneficial to understand the fundamental differences between raster and vector images, as this impacts how your artwork is handled.
Many images viewed on digital screens are known as raster images. These are composed of a grid of individual pixels. When you zoom in on a raster image, you can discern each pixel. Raster images excel at expressing complex gradients and are generally easy to edit. However, a significant drawback is that repeated editing and scaling can degrade their quality, leading to a loss of sharpness or pixelation.
In contrast, vector images do not degrade when scaled up or down. This means you can resize them infinitely without any loss of quality, and you can edit them extensively even after their initial creation. Software like Adobe Illustrator is renowned for creating vector images. Clip Studio Paint also supports vector layers, which are instrumental in creating vector artwork.
Vector Layers in Clip Studio Paint
Vector layers in Clip Studio Paint function by creating points known as "control points" on lines. These control points allow you to draw and manipulate vector graphics. Unlike raster layers, where erasing unwanted parts might inadvertently remove essential lines, vector layers offer a greater degree of freedom. You can draw lines without excessive worry about overextending or crossing them, as these can be precisely adjusted later.
As a veteran illustrator, the concept of vector layers might initially seem complex. However, upon using them, one realizes they are not drastically different from standard raster layers, with the key advantage being the ability to adjust lines as needed. The vector eraser tool in Clip Studio Paint is particularly convenient for this purpose, allowing for precise trimming and modification of vector paths. This is akin to how, when drawing with pen and paper, artists naturally rotate the paper to achieve a more comfortable drawing angle. Similarly, the canvas can be rotated in digital art to facilitate drawing from top to bottom or left to right, which can improve line quality and flow. The increased friction between the pen tablet and stylus, when compared to traditional pencils or dip pens, might also be mitigated by this flexibility.
Essential Clip Studio Paint Techniques for Line Art Refinement and Beyond
Clip Studio Paint boasts an extensive array of functions designed to enhance an artist's workflow. Beyond the initial preparation of scanned sketches, several advanced techniques can significantly improve the quality and efficiency of your illustration process. These techniques, honed by experienced digital artists, offer powerful solutions to common challenges.
Color Jitter for Organic Brushes
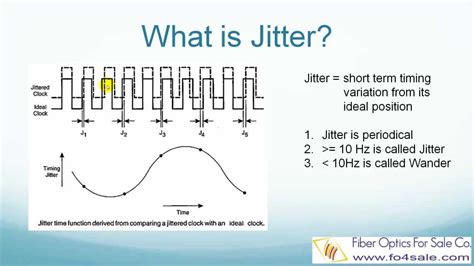
One of the subtle yet impactful features in CSP is Color Jitter, found within the Sub Tool Detail palette. When enabled, Color Jitter introduces slight variations in hue, saturation, and brightness with every brush stroke. This creates a dynamic and organic feel to your lines and fills, moving away from flat, uniform colors. The effect is a more natural, painterly look, reducing the need for constant manual color picking and accelerating the path to richness and realism. Even a small variation, such as +8 in Hue, can be sufficient to achieve a noticeable and pleasing effect, as seen in the subtle shifts of color within grass and ground textures.
Referencing Layers for Fill Tools
When coloring on a separate layer but needing the Fill tool to accurately respect your line art, CSP provides a crucial option: referencing layers. You can choose whether the Fill tool should reference "All layers" or only specific designated layers, such as a "Reference layer." This ensures that your fills stay within the boundaries of your line work, even when working on multiple layers for different elements of your illustration.
Selection Layers for Efficient Workflow
Selection Layers are a powerful feature that can significantly streamline the process of refining, storing, and reusing selections. These layers allow you to isolate specific areas of your artwork, such as a character's outfit or a particular shape, and save these selections for later use. This means you don't have to painstakingly re-select areas repeatedly, saving valuable time and effort, especially for complex illustrations or when creating shape masks for intricate details.
Masking for Non-Destructive Editing
A common pitfall for artists when starting out is overusing the eraser tool directly on painted layers, which can lead to accidental deletion of good details. A more effective approach is to utilize masks. Instead of erasing directly from the painted layer, you can "erase" by painting on the mask. If you make a mistake or change your mind, you can simply paint back onto the mask to reveal the details again. This technique is particularly beneficial when refining lighting, shadows, or special effects, offering a non-destructive way to edit and experiment.
Leveraging 3D Models for Lighting Reference
Achieving realistic and compelling lighting can dramatically enhance an illustration. Clip Studio Paint's integration of 3D models offers an exceptional tool for setting up lighting references. By loading a simple 3D model, adjusting its pose or camera angle, and then setting up the 3D lighting within the Sub Tool Detail palette, artists can gain instant visual feedback on how shadows fall, where light hits, and how to best convey the mood of a piece without guesswork. This is especially helpful when working under time constraints or when aiming for consistent lighting across multiple scenes or comic panels.
Optimizing Your Drawing Environment and Technique
Beyond software features, the physical setup and drawing habits can profoundly impact the quality of your digital line art. Small adjustments can lead to significant improvements in comfort and line control.
Pen Tablet Placement and Aspect Ratio
A fundamental aspect of digital drawing is the correct placement of your pen tablet. It's crucial to position your tablet directly in front of your monitor. Even if you believe it's correctly positioned, your elbow can inadvertently shift it during the drawing process. Furthermore, ensuring the aspect ratio of your pen tablet's drawing area matches your monitor's aspect ratio is important. If your monitor has a 16:9 aspect ratio, your tablet's drawing area should ideally also be 16:9. If the tablet is too large, leading to excessively long strokes, you can shrink the drawing area while maintaining the same aspect ratio to achieve more manageable and controlled lines.
Canvas Rotation for Natural Drawing
Digital art software, including Clip Studio Paint, allows for canvas rotation, mimicking the natural way artists rotate paper when drawing traditionally. This enables you to draw lines more comfortably, whether from top to bottom or left to right. This flexibility can lead to smoother, more confident strokes, especially if you are accustomed to the tactile feedback of drawing with pencils or dip pens.
Line Weight and Style for Expressive Art
The way you apply line weight and style can convey a wealth of information about your subject matter and contribute significantly to the overall mood and readability of your illustration.
Varying Line Thickness
The thickness of your lines should not be uniform. For instance, in an example illustration, thick lines are used for parts that require emphasis, such as hands. Conversely, thin, light lines are suitable for rendering soft materials like T-shirts and blouses. For clothing made from harder materials, such as leather jackets and suits, thicker brushes and firmer lines can effectively communicate their texture and structure.
Line Weight and Light/Shadow
The principle of using light and dark colors for light and shadow areas in coloring also applies to line art. Employ thinner pens for areas that represent light sources or are illuminated, and use thicker pens for shadowed regions. This subtle variation helps to create a sense of depth and form within your linework itself, even before color is applied.
Dip Pens and Intersecting Lines
When using dip pens, a natural phenomenon occurs where intersecting lines become darker. This is because ink tends to pool in these areas, creating a richer, darker mark. This effect can be intentionally used to add depth and visual interest to your line work.
Stabilization for Smooth Lines
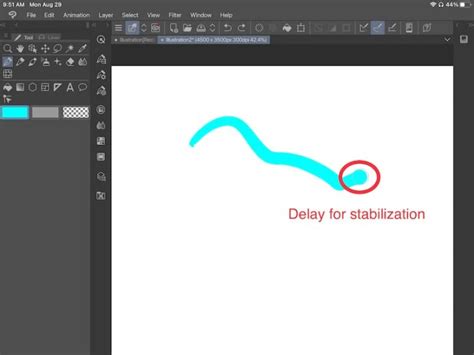
One of Clip Studio Paint's most beneficial features for achieving clean lines is Stabilization. This function automatically corrects wobbles and jitters as you draw. The higher the stabilization value, the smoother and more consistent your lines will be. This feature is not unique to CSP; software like MediBang Paint, Paint Tool SAI, and GIMP also offer similar stabilization capabilities. For artists who struggle with shaky hands or desire exceptionally smooth linework, stabilization is an invaluable tool.
Advanced Techniques for Richer Illustrations
Beyond the foundational aspects of line art, Clip Studio Paint offers advanced features that can elevate the richness and complexity of your digital paintings.
Alpha Lock for Controlled Coloring
The Alpha Lock feature is incredibly useful when you've blocked in the basic shapes of your illustration on separate layers. By alpha locking a layer, you restrict any painting or filling to the existing pixels on that layer. This means you can paint shadows and highlights directly onto the base colors without the risk of accidentally painting outside the intended areas. This is particularly helpful when working with loose sketch lines that have many gaps, as the Lasso Fill tool can be used to draw the outlines of fill areas, and then Alpha Lock ensures subsequent color and shading stays within those boundaries.
Expressing Texture and Material
When rendering specific materials, such as the glossy satin of a dress, the choice of highlights and shadows is paramount. Combining sharp highlights with deep shadows within the fabric's creases can effectively convey texture. This is especially noticeable around areas like a brooch where the fabric bunches together in small folds, requiring careful attention to detail.
Incorporating Warm Tones and Rim Lighting
When painting skin tones, the subtle addition of warm tones in the shadows can create a more natural and lifelike appearance. Furthermore, incorporating reflective rim lighting from the background can add depth and dimension. For instance, subtle blue tones can be added to areas like the neck and arms, reflecting atmospheric light from the sky or surrounding elements, creating a balanced interplay of light that bounces onto the skin from the side opposite the primary light source.
The Liquify Tool for Subtle Adjustments
The Liquify tool in Clip Studio Paint is a powerful asset for making small, precise adjustments to shapes without the need to repaint entire sections. This tool is handy for refining details, such as adjusting the fit of a belt or the drape of fabric, especially in the later stages of an illustration when minor tweaks are often required. Its ease of use makes it a time-saver when details don't look quite right.
Adding Background Detail and Atmospheric Effects
Once the main subject of an illustration is rendered to satisfaction, adding detail to the background can enhance the overall composition and narrative. Furthermore, applying filters like Chromatic Aberration and Noise can be used as a final step to soften the overall look. Chromatic Aberration, when applied to the brightest parts of an image, such as jewelry or highlights, can intensify glow effects and make a scene appear more radiant and visually captivating.
The world of digital art, particularly within a robust program like Clip Studio Paint, is one of continuous exploration and learning. Each tool and technique, from the fundamental preparation of scanned sketches to advanced features like Color Jitter and the Liquify tool, contributes to a more efficient and expressive artistic workflow. By treating each piece as an opportunity to explore these capabilities, artists can unlock the full potential of their digital canvas.