Pitching your design services or trying to sell an idea to a client requires gorgeous, polished idea boards. The secret of getting a sign-off on your design is by making your presentation stand out. Do yourself a favor and avoid the cliché look of PowerPoint. While many tools can assist in creating presentations, Adobe InDesign stands out as a powerful and flexible option for designers. It offers a robust set of features that, when utilized effectively, can elevate your presentations from ordinary to extraordinary.
The Power of Adobe InDesign for Presentations
Adobe InDesign is an industry-standard software for page layout and design, making it an ideal choice for creating professional presentations. Its primary strength lies in its unparalleled control over typography, image placement, and overall page composition. Unlike presentation software that often relies on pre-defined templates and limited customization, InDesign grants designers the freedom to craft unique and visually compelling layouts. This flexibility is crucial when aiming to create branding that is both cohesive and impactful, ensuring your presentation perfectly reflects your client's identity or your own design ethos.
The software's extensive settings allow for a high degree of customization, catering to a wide range of design needs. Whether you're assembling a mood board, presenting product mockups, or detailing a comprehensive design proposal, InDesign provides the tools to execute your vision with precision. Furthermore, InDesign's popularity in the design community means there's a vast ecosystem of resources available, including tutorials, plugins, and software integrations, all designed to enhance its functionality and streamline your workflow.
Setting Up Your Document for Success: Bleeds, Margins, and Slugs
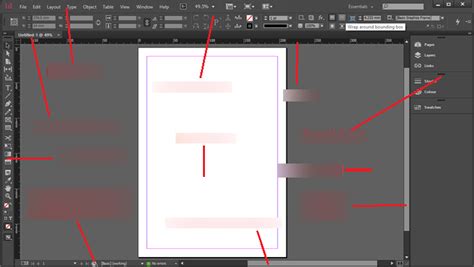
The foundational step in creating any professional design document, including presentations in InDesign, is to correctly set up your document's initial parameters. This involves paying close attention to the sections for ‘Margins’ and ‘Bleed and Slug’ when creating a new document.
Bleed: Bleed refers to the area of an image or design element that extends beyond the trim edge of a page. This is essential for printing to ensure that there are no unprinted white borders when the page is cut to its final size. If your design elements are meant to go all the way to the edge of the page, they must extend into the bleed area. For a standard presentation that might be printed, setting an adequate bleed (often 3mm or 1/8 inch) is critical.
Margins: Margins are the spaces between the content and the edge of the page. Setting appropriate margins guides your layout, preventing content from appearing too close to the edge and creating a visually pleasing and readable document. Consistent margins contribute significantly to the overall professionalism of your presentation.
Slug: The slug is an area outside the trim edge of the page that can contain notes or other information not intended for printing. While less commonly used for digital presentations, it can be helpful for internal notes during the design process.
Properly configuring these settings from the outset prevents potential issues later in the design process, ensuring that your final output is clean, professional, and ready for its intended use, whether that's digital viewing or professional printing.
Achieving Consistency Through Duplication and Master Pages
Consistency is the cornerstone of a professional-looking presentation. When your design elements, formatting, and overall layout remain uniform across all pages, it creates a sense of order, polish, and brand cohesion. InDesign offers several powerful features to help you achieve this.
The Power of Duplication
One of the most efficient ways to maintain consistency is by duplicating elements that you want to appear on multiple pages. Instead of recreating similar layouts or elements from scratch, you can copy and paste or use InDesign's intuitive duplication shortcuts.
To duplicate an element, select the object you wish to copy. Then, press and hold the Option key on a Mac or the Alt key on a PC. While holding the modifier key, click and drag the selected object. As you drag, a duplicate of the object will be created. Release the mouse button first, then release the modifier key. This technique is incredibly useful for replicating text boxes, image frames, or even entire sections of your layout. By duplicating and then simply modifying the specific content that needs to be changed, you save time and ensure that the underlying structure and styling remain identical.
Leveraging Master Pages
Master Pages are a fundamental feature in InDesign for ensuring page-level consistency. A Master Page acts as a template that holds all the elements such as headers, logos, page numbers, and footers that you want to appear on every page within your document.
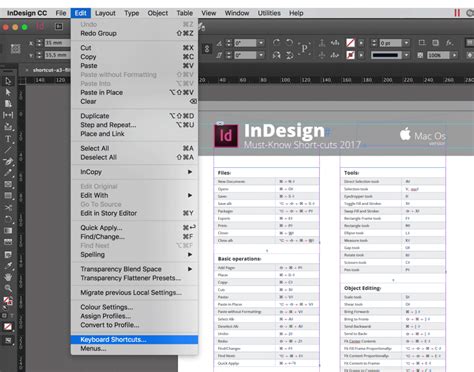
To utilize Master Pages, navigate to the "Pages" panel. You can create new master pages or modify existing ones. Once you've designed your master page with recurring elements, you can apply it to any document page. Any changes made to the master page will automatically update on all pages that use that master. This is a game-changer for maintaining consistency, especially in lengthy presentations. For instance, if your client's logo needs to be in the top-left corner of every page, placing it on the master page ensures it's always there, perfectly aligned. Similarly, consistent page numbering, footer information, or stylistic borders can all be managed efficiently through master pages.
The interplay between duplicating elements and utilizing master pages creates a robust framework for building a cohesive and professional presentation that is both time-efficient to produce and visually harmonious for the viewer.
Enhancing Layouts with Grids and Transform Again
Beyond basic duplication and master pages, InDesign offers advanced features to refine your layouts and ensure precise element alignment and scaling. Grids and the "Transform Again" functionality are invaluable tools for achieving a sophisticated and organized presentation.
Utilizing Grids for Structure
Grids provide an underlying structure to your pages, helping you align elements consistently and create visually appealing compositions. While InDesign has built-in margin and column guides, you can also create custom grids to suit your specific layout needs.
A quick and intuitive way to create custom grids is by drawing a frame. Start by drawing any frame on your page. Once the frame is drawn, you can modify its grid structure directly. While holding the mouse button down after drawing the frame, use the up/down arrow keys on your keyboard to add or remove rows within the frame. Simultaneously, use the left/right arrow keys to add or remove columns. This allows you to quickly create a grid of cells within a specific area, which can then be used for placing images, text blocks, or other design elements in a structured manner. This method is particularly useful for creating consistent layouts for image galleries, product showcases, or data presentation.

Precise Transformations with "Transform Again"
When you need to replicate transformations (like moving, scaling, rotating, or skewing) on multiple objects consistently, the "Transform Again" feature is your best friend. This tool allows you to apply the same transformation sequence to different objects, ensuring perfect alignment and repetition.
The process begins by performing a transformation on one object. For example, you might resize an object that you want to use as a specimen or reference point. After you have made the desired transformation to this first object, you can then select other objects that you want to apply the same transformation to. With the other objects selected, go to the Object menu, then navigate to Transform Again, and choose Transform Sequence Again or Transform Sequence Again Individually.
- Transform Sequence Again: This option reapplies the entire sequence of transformations that were applied to the first object. If you moved, scaled, and rotated an object, this command will perform all those actions in the same order and magnitude on the selected objects.
- Transform Sequence Again Individually: This option applies each transformation in the sequence to the selected objects one by one. This can be useful if you want to apply scaling, then rotation, then moving, as separate steps to multiple items.
This feature is incredibly powerful for creating patterns, ensuring consistent spacing between elements, or precisely positioning multiple copies of an object. It takes the guesswork out of repetitive transformations, leading to a more polished and professional final output. By combining the structured approach of grids with the precise control of "Transform Again," you can elevate your InDesign presentations to a new level of sophistication.
Integrating External Tools: The Fohlio Plugin and Beyond
While Adobe InDesign is a powerful standalone tool, its capabilities can be further amplified through integration with specialized plugins and web applications. These external resources are designed to streamline workflows, automate repetitive tasks, and enhance the functionality of your design process, particularly for presentations involving product data and mood boards.
Fohlio: Automating Presentation Creation
One such tool that can be tremendously helpful is the Fohlio plugin. Fohlio is a web application specifically designed to simplify the creation of interior design presentations and other visual documents. It offers a unique approach by allowing users to auto-generate presentations in various formats, including InDesign mockup files.
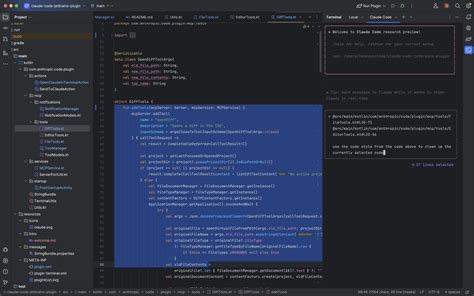
The Fohlio ecosystem includes a smart browser plugin that enables users to quickly add product information directly from any webpage. With simple clicks, you can capture details like images, specifications, and pricing, and then organize this information within Fohlio. Products can be neatly organized by schedule and location layers, making it easy to manage large amounts of data.
Once your product information is gathered and organized, Fohlio allows you to generate stylish mood boards through a thumbnail gallery view and create professional presentation documents. The key benefit here is the ability to export a well-designed grid of selected products directly into InDesign or as a PDF. This exported content will instantly look good and contain all the necessary data, organized in a unified and professional manner. This significantly reduces the manual effort involved in gathering product images, their specifications, and arranging them into a visually appealing layout within InDesign.
The Broader Ecosystem of InDesign Integrations
Fohlio is just one example of how InDesign integrates with other software. The popularity of InDesign means there's a rich ecosystem of plugins and extensions available. These can range from tools that enhance typography, automate image processing, manage color palettes, or even connect to other design and project management platforms. Exploring these integrations can unlock new efficiencies and creative possibilities for your presentation workflows.
When your design proposal will definitely contain some actual products, a mood board, or even cutsheets, leveraging tools like Fohlio can transform a labor-intensive process into a streamlined and efficient one. The goal is to make your presentations stand out and to get a sign-off on your design, and these integrated solutions can be a secret weapon in achieving that objective.
Frequently Asked Questions and Best Practices
As you delve into creating polished InDesign presentations, certain questions and best practices tend to emerge. Understanding these can further refine your approach and ensure you're leveraging the software to its full potential.
What are your favorite idea board hacks?
Idea board hacks often revolve around efficiency and visual impact. Beyond the core InDesign features, designers frequently employ techniques such as:
- Consistent Image Cropping and Resizing: Using scripts or actions to batch crop and resize images to a uniform aspect ratio before placing them in InDesign.
- Color Palette Harmony: Establishing a strict color palette for the entire presentation and using it consistently in backgrounds, text, and graphic elements. Tools like Adobe Color can help in generating harmonious palettes.
- Typography Hierarchy: Using a limited set of fonts (often two or three) and establishing a clear hierarchy for headings, subheadings, body text, and captions. This ensures readability and visual flow.
- Strategic Use of White Space: Don't overcrowd your slides. Ample white space (or negative space) allows elements to breathe, improving readability and drawing attention to key content.
- Incorporating Textures and Overlays: Subtle textures or graphic overlays can add depth and a tactile feel to digital presentations, making them more engaging.
Have you tried creating your own InDesign presentation templates?
Creating your own InDesign presentation templates is a highly recommended practice for designers who frequently produce presentations. It allows you to:
- Establish Brand Consistency: If you have a design studio, custom templates ensure all your pitches and client presentations adhere to your brand guidelines.
- Save Significant Time: Once a template is built with master pages, pre-defined styles, and layout structures, creating new presentations becomes a matter of populating content rather than designing from scratch.
- Maintain Professionalism: Well-designed templates inherently look more professional than generic ones, projecting an image of expertise and attention to detail.
- Experiment with Layouts: Building your own templates gives you the freedom to experiment with unique layouts that best showcase your work and your clients' products.
When creating templates, consider different page sizes and orientations if you anticipate needing them. Save your templates as .indt files, which is InDesign's template file format. This prevents accidental overwriting of the template itself when you open it to create a new project. The flexibility of InDesign, combined with thoughtful template design and the use of helpful plugins, empowers designers to create presentations that are not only visually stunning but also highly functional and effective in achieving their communication goals.
tags: #presentation #mode #in #indesign