InDesign paragraph styles are an indispensable tool for any designer working with text. While they might appear intimidating at first glance, their underlying logic is straightforward, and mastering them can dramatically enhance efficiency, consistency, and professionalism in your document creation process. This guide aims to demystify paragraph styles, particularly focusing on how to understand and effectively manage style overrides, transforming a potentially frustrating aspect of InDesign into a powerful ally.
The Power of Paragraph Styles: What They Are and Why You Need Them
At their core, InDesign paragraph styles are collections of formatting rules that govern how your text appears and behaves. These rules encompass both character-level attributes, such as font, color, and scaling, and paragraph-level attributes, like indents, alignment, and hyphenation. The primary advantages of utilizing paragraph styles are manifold: they significantly save time, streamline workflows, ensure consistent and professional formatting throughout a document, and facilitate the management of last-minute edits.
Furthermore, many advanced InDesign features are intrinsically linked to the use of paragraph styles. Perhaps the most notable is the automatic generation of a Table of Contents. While not strictly mandatory to use paragraph styles, their adoption is highly recommended for any text within an InDesign document. The benefits of adopting this practice are so profound that once you begin, you'll find it difficult to revert to older methods. Styles dramatically improve your output and help prevent errors. Once your styles are established, you can format an entire document with just a few clicks, leading to a genuine appreciation for their utility.
Paragraph Styles vs. Character Styles: A Crucial Distinction
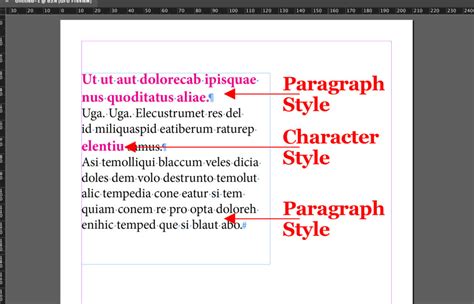
To truly grasp the functionality of paragraph styles, it's essential to differentiate them from character styles. An excellent analogy found on the Adobe Forums vividly illustrates this:
Imagine walking a dog. Paragraph styles dictate the overall route, the pace, and the frequency of breaks - the fundamental structure of your walk. Character styles, on the other hand, are for the smaller, more immediate actions: picking up the poop, or tightly holding the leash if a distraction like another dog or a shiny car appears.
It is crucial not to confuse InDesign's character styles with paragraph styles. If you find yourself needing to apply a character style to an entire sentence, it's a strong indicator that you should instead create a new paragraph style. Character styles are best reserved for applying formatting to a single character or a very small group of words, not exceeding a sentence.
Building Your Style Foundation: Creating Paragraph Styles
InDesign offers two primary methods for creating paragraph styles: directly from the Paragraph Styles panel or by deriving them from already formatted text.
Creating a Paragraph Style from the Paragraph Styles Panel
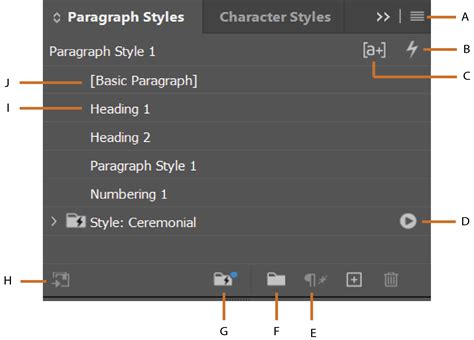
To begin, ensure no text is currently selected. Open the Paragraph Styles panel by navigating to Window > Styles > Paragraph Styles. Click on the "Create new style" icon, typically located at the bottom of the panel. For a more efficient workflow, you can hold down the Alt (Windows) or Option (macOS) key while clicking the "Create new style" icon. This action will simultaneously create the new style and open the Paragraph Style Options window.
Within the Paragraph Style Options window, you'll find various settings. The "Style name" is self-explanatory. "Location" indicates if the style is organized within a folder. "Based on" allows you to link a new style to an existing one, a feature we'll explore further. "Next Style" lets you define which style will automatically be applied when you press Enter or Return. The "Style settings" section provides a summary of the chosen formatting. A good practice, even before naming your style, is to review this summary. If it contains any unintended formatting, clicking "Reset to Base" can help clean it up before finalizing the style.
Creating a Paragraph Style from Formatted Text
Alternatively, you can create a new paragraph style based on existing formatted text. Simply select the text that has the desired formatting, and then click the "Create new style" icon in the Paragraph Styles panel. This action will generate a new style that mirrors the selected text's attributes, which you can then further refine by double-clicking its name.
Effortless Revisions: Quickly Modifying a Paragraph Style
One of the most powerful aspects of InDesign styles is their dynamic nature. If you've established your styles and later decide to alter the formatting of, for instance, a title (perhaps changing its color), you can propagate this change across all instances of that title style with remarkable ease.
Select a portion of text that uses the style you wish to modify. Then, in the Paragraph Styles panel, click the icon in the top-right corner and choose "Redefine Style." Instantly, all paragraphs formatted with that style will update to reflect the new formatting, behaving as if by magic.
Advanced Linking: Understanding "Based On" Styles
The "Based on" functionality within InDesign paragraph styles is a particularly favored feature for its ability to create hierarchical style relationships. You can define a new paragraph style to inherit all properties from another existing style. Any subsequent modifications made to the parent style will automatically cascade down to all styles based upon it.
This feature is invaluable for several reasons:
- Rapid Document Appearance Changes: By adjusting a base style, you can quickly alter the visual theme of an entire document, experimenting with different font combinations or color palettes.
- Multilingual Project Management: For documents requiring multiple languages, "Based on" styles simplify the process of adapting layouts. You can set a base style with language-specific hyphenation and spell-check settings. By adjusting the horizontal scale of the text in the base language (e.g., English), you can visually estimate how much space a more expansive language (like German, which can be up to 140% of English) will require. This allows you to proactively adjust text boxes and layout elements before inputting the translated text, ensuring a cohesive design.
To implement this, select the desired parent style from the "Based on" dropdown menu within the Paragraph Style Options window.
The Pitfall of Overrides: Why Local Styling is an Error
Local styling, often referred to as inline or direct formatting, is a practice that should be rigorously avoided. While it might seem convenient for minor, one-off adjustments, it fundamentally undermines the control and efficiency that styles provide. By applying formatting directly to text rather than through a defined style, you lose the ability to manage your layout effectively, complicate collaboration with other users, and increase the likelihood of introducing formatting inconsistencies and errors.
Always prioritize using Paragraph and Character Styles. Do not be concerned about having an extensive style library. Professional InDesign documents, especially those created by experienced designers and consultants, often feature a vast number of styles. As stated earlier, styles are indeed an InDesign user's most valuable asset.
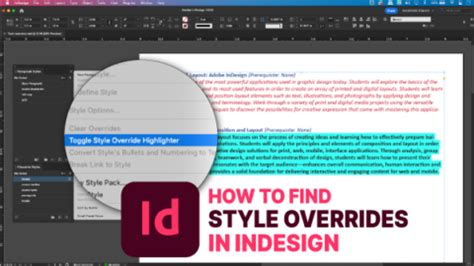
Identifying Overrides with a Click
InDesign provides a straightforward way to detect text that has been formatted locally, deviating from its applied style. Click the "Style Override Highlighter" icon, typically found in the Paragraph Styles panel. Text with local overrides will be highlighted, usually in blue, making it immediately apparent where manual formatting has been applied.
Clearing Overrides with a Click
To remove these local overrides from selected text, paragraphs, or text frames, utilize the "Clear overrides in selection" icon, also located in the Paragraph Styles panel. It's important to note that if Character Styles have been applied to the text, they will need to be removed manually, as this function primarily targets paragraph-level overrides.
Streamlining Your Workflow: The Style Sheet Boilerplate
As designers progress through their careers, the initial excitement of creating beautiful layouts can sometimes be overshadowed by the time spent troubleshooting formatting issues and style inconsistencies, especially on complex projects. This can detract from the more enjoyable and creative aspects of the job. To reclaim this time and ensure a more organized and efficient workflow, many designers develop reusable "boilerplate" files. These serve as a foundation for new projects, incorporating established organizational methods and style structures.
Grouping Styles with Empty Paragraph Styles
A clever technique, shared by designer Kai Rübsamen, involves using "empty" paragraph styles to create hierarchical groupings for your other styles, rather than relying solely on the built-in folder structure. By naming an empty paragraph style with a folder-like designation (e.g., "01Headers," "02Body Text"), you can visually organize your styles. Asterisks (*) appended to style names can further indicate main styles that other styles are based on, providing a clear overview of the style hierarchy and dependencies.
This method is particularly useful when importing styles from other documents. Imported styles will typically appear outside of your organized folders, making them easy to identify and manage, whether you intend to delete them or integrate them into your existing structure.
Naming and Structuring Your Styles: A Convention for Clarity
Establishing a consistent naming convention for your styles is crucial for maintainability and collaboration. A recommended approach includes:
- Organize within Folders: Use InDesign's folder feature or the empty paragraph style method to group related styles.
- Prefix with "p_": Start paragraph style names with
p_to clearly distinguish them from character styles. - Use Asterisks for Base Styles: Employ asterisks (e.g.,
p_H1*) to denote styles that other styles are based on. - Avoid Leading Numbers: Do not start style names with numbers. This is because CSS styles, used in web exports like EPUBs, cannot begin with a number. Renaming styles later can be a tedious process.
For multilingual projects, a p_base_language style can be highly effective. This style can be used as the foundation for header and body text styles. By setting only the text language and horizontal scale (initially 100%) in this base style, you gain precise control over hyphenation and spell-checking. The horizontal scale is a powerful tool for anticipating layout adjustments needed for different languages. For example, if German text typically occupies 140% of the space of English text, you can adjust the horizontal scale of your English placeholder text to simulate this expansion. This allows you to modify layout elements, such as enlarging text boxes or inserting column breaks, before the final translation is available.
A common design practice that enhances visual appeal is to use distinct font families for headers and body text. By linking all header styles to a p_H1 base style and body text styles to a p_body base style, you can easily experiment with different font pairings to improve your layout's aesthetic.
You can download a sample boilerplate style sheet to further explore these organizational principles.
Beyond the Basics: Other Useful Style Features
InDesign offers several other style-related features that can significantly enhance your workflow.
The "Next Style" Option
For any Paragraph Style, you can define the subsequent style that will be automatically applied when the Enter or Return key is pressed. This is particularly useful when typing text directly within InDesign, ensuring a smooth transition between different text elements.
Drop Caps and Nested Styles
These powerful features allow for automated sophisticated typographic treatments. Drop Caps, for instance, enable you to automatically enlarge the first letter of a paragraph to span multiple lines, a common design element in publications. Nested Styles offer even more granular control, allowing you to automatically apply character styles to specific words or phrases within a paragraph based on predefined rules (e.g., applying an italic style to all instances of a particular keyword).
How to Drop Cap in InDesign
Seamless Style Management: Copying and Importing Styles
Copying Paragraph Styles to Another Document
Transferring paragraph styles between InDesign documents is a straightforward process. In the Paragraph Styles panel of your target document, click the panel menu icon (top-right corner) and select either "Load Paragraph Styles…" or "Load All Text Styles…". Then, navigate to and select the InDesign file containing the styles you wish to import.
Importing Word Documents with Styles Intact
When importing text from Microsoft Word, InDesign offers the capability to retain the original text styles. By configuring the import options correctly, you can preserve the formatting structure, which can then be mapped to your existing InDesign styles or used as a basis for creating new ones. This significantly reduces the manual reformatting required after importing content from external sources.
Automating and Enhancing Styles with Scripts
The InDesign scripting community offers a wealth of resources that can further automate and enhance your work with paragraph styles. A curated list of the best InDesign scripts often includes a dedicated section for style-related utilities. These scripts can perform tasks such as batch renaming styles, finding and replacing styles, or applying complex style transformations, saving considerable time and effort.
One particularly useful script, developed by Marc Autret, provides a clear visual indicator for style overrides. Instead of relying on subtle cues like the plus (+) symbol in the Styles panel, this script highlights all overridden text with a distinct red line, offering immediate and unambiguous feedback on formatting discrepancies. This script has been tested and found to be functional across various InDesign versions.
The integration of scripts into your workflow can unlock advanced capabilities, allowing for more sophisticated style management and error detection. For those delving into the technical aspects, understanding the InDesign Scripting DOM (Document Object Model) reveals that paragraph styles are essentially collections of key-value pairs that define both character and paragraph attributes. Character styles, conversely, are more focused, encompassing only character attributes and often specifying only the differences from a default state.
The concept of "overrides" in InDesign can be complex. A paragraph style itself is a collection of paragraph (ℙ) and character (ℂ) attributes. When text deviates from these defined attributes, it's considered an override. ℙ+ overrides relate to paragraph-level formatting, while ℂ+ overrides pertain to character-level formatting. The [No Paragraph Style] item in the panel represents the default formatting for text that has no specific style applied.
Detecting and managing overrides can be intricate. While InDesign's UI offers tools like the Style Override Highlighter, programmatic detection via scripting can be more nuanced. Methods like Text.styleOverridden and Text.textHasOverrides provide insights, but distinguishing between ℙ+ and ℂ+ overrides, especially when character styles are involved, requires careful consideration of the script's arguments and InDesign's internal logic. For instance, a ℂ+ override might occur when a character style conflicts with the applied paragraph style, or even when a local character formatting change contradicts the paragraph style's specifications, even if no character style is explicitly applied.
The clearOverrides method in scripting offers powerful control, allowing for the selective removal of paragraph-only (OverrideType.PARAGRAPH_ONLY), character-only (OverrideType.CHARACTER_ONLY), or all overrides (OverrideType.ALL). Understanding these distinctions is key to maintaining a clean and predictable document.
Script Menu Actions and Customization
Scripts can also be integrated directly into InDesign's menus, creating custom commands that are readily accessible. This involves defining "Menu Actions" that execute specific scripts. Such menu items can be further customized, including their enabled state, checked status, and even their text. InDesign caches these script menu actions, allowing them to persist across application sessions and even be assigned keyboard shortcuts, further enhancing workflow efficiency.
By embracing the full spectrum of InDesign's style features and leveraging the power of scripting, you can transform your document design process, achieving greater consistency, efficiency, and professional polish.