Adobe InDesign, a powerhouse for page layout and design, offers a robust set of tools for creating and manipulating shapes. Whether you're a seasoned designer or just starting, understanding how to craft precise geometric forms, intricate paths, and unique graphical elements is fundamental to producing professional-quality publications. This tutorial will guide you through the essential techniques for creating and customizing shapes within InDesign, transforming simple lines and vectors into compelling visual components for your designs.
The Foundation of Shapes: Paths, Strokes, and Fills
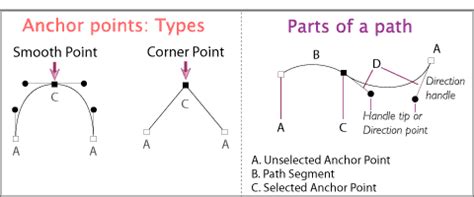
At its core, every shape in InDesign is defined by a path. A path is essentially a line that can be straight or curved, forming the outline of an object. These paths are comprised of anchor points and path segments. Anchor points are the points that define the beginning and end of a path segment, and they can be either "corner" points or "smooth" points. A corner point creates an abrupt change in direction, forming a sharp angle, while a smooth point creates a continuous curve.
The visual appearance of a path is determined by two key attributes: the stroke and the fill. The stroke refers to the path's outline, dictating its weight (thickness), color, and style (e.g., solid, dashed, dotted). The fill, on the other hand, is the color or pattern applied to the area enclosed by the path. InDesign allows you to control the characteristics of both the stroke and fill independently, offering immense flexibility in how your shapes appear.
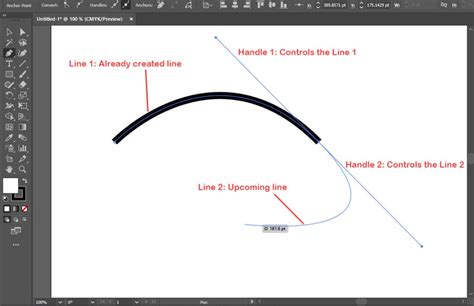
Understanding the anatomy of a path is crucial for precise control. When you select an anchor point that connects curved segments, or select the segment itself, you'll notice direction handles. These handles consist of direction lines that end in direction points. The angle and length of these direction lines dictate the curvature and form of the path segments. By manipulating these direction points, you can precisely reshape curves. A smooth point features two direction lines that move in unison, ensuring a continuous, flowing curve. In contrast, a corner point's direction lines can vary, maintaining the sharpness of the angle.
Essential Shape Creation Tools in InDesign
InDesign provides a suite of intuitive tools within its Tools panel for creating a variety of shapes directly on your page. These tools enable you to generate everything from basic geometric forms to more complex silhouettes.
- Rectangle Tool (M): This is your go-to for creating squares and rectangles. Simply click and drag on the page to draw. Holding down the Shift key while dragging constrains the proportions, resulting in a perfect square.
- Rounded Rectangle Tool (M): Similar to the Rectangle tool, but it allows you to create rectangles with rounded corners. You can adjust the corner radius by pressing the Up Arrow or Down Arrow keys while drawing.
- Ellipse Tool (M): Used for creating circles and ellipses. Clicking and dragging will draw an ellipse. Holding Shift while dragging constrains the proportions, creating a perfect circle.
- Polygon Tool (M): This versatile tool allows you to create polygons with any number of sides. Before drawing, you can specify the number of sides in the Control panel or Properties panel. You can also adjust the "Star Inset" value to create star shapes, where a higher percentage means the sides are inset farther toward the center. To create a regular polygon without star points, set the Star Inset to 0.
- Line Tool ( \ ): This tool is used for drawing straight lines. Clicking and dragging creates a line segment. You can adjust the line's weight, style, and color through the Stroke panel.
Learn How to Use the Basic Tools in Adobe InDesign CC | Dansky
Manipulating and Refining Shapes
Once a shape is drawn, InDesign offers powerful tools for refining and modifying it to achieve your desired outcome.
- Selection Tool (V): This black arrow allows you to select, move, and rescale entire objects. When you select an object, a bounding box appears, indicating its dimensions.
- Direct Selection Tool (A): This white arrow is invaluable for editing individual anchor points and path segments. You can click on an anchor point to select it and then drag it to reshape the path. You can also select entire path segments to move or delete them.
- Add Anchor Point Tool (+): This tool allows you to add new anchor points to an existing path. Simply click on the path where you want to add a point.
- Delete Anchor Point Tool (-): This tool enables you to remove anchor points from a path. Clicking on an anchor point will delete it, potentially altering the shape of the path.
- Convert Anchor Point Tool (Shift + C): This tool is crucial for changing the nature of an anchor point. You can click and drag on a corner point to convert it into a smooth point, creating curves. Conversely, you can click on a smooth point to convert it into a corner point, creating sharp angles.
These tools, akin to those found in Adobe Illustrator, provide a high level of control over your vector artwork within InDesign.
Precision Drawing and Precise Dimensions
While dragging on the page to create shapes is straightforward, achieving precise dimensions requires a slightly more methodical approach.
When using tools like the Rectangle or Ellipse tool, if you click once on the page instead of dragging, a dialog box will appear, allowing you to enter exact width and height values. This is particularly useful for creating elements that need to adhere to specific design specifications.
For the Polygon tool, clicking once on the page will bring up a dialog box where you can define the number of sides, the radius, and importantly, the "Star Inset." This allows for the creation of complex star shapes with precise spike lengths and depths. The "Star Inset" value directly influences the length of a star’s spikes and the depth of the depression between each spike, enabling you to create longer, thinner spikes or more rounded star points.
Advanced Shape Creation and Manipulation
InDesign's capabilities extend beyond basic geometric shapes. You can create intricate illustrations, logos, and patterns by combining and manipulating paths.
Creating Complex Paths with the Pen Tool (P): For ultimate control, the Pen Tool is indispensable. It allows you to draw custom paths by clicking to create straight line segments or clicking and dragging to create curved segments. Mastering the Pen Tool takes practice, but it offers unparalleled precision for creating unique shapes and illustrations.
Combining and Intersecting Shapes: You can combine and intersect existing shapes in InDesign to create new, editable shapes. By selecting multiple paths and using Pathfinder operations (often found in the Window > Object & Layout > Pathfinder panel, though InDesign's native shape combining is more akin to Boolean operations in other software), you can merge, subtract, or create intersections between shapes. This is a powerful technique for generating complex forms from simpler ones. For example, a wavy line can be created by manipulating the direction handles of a path.
Converting Shapes: InDesign allows you to convert existing shapes into other predefined shapes. For instance, you can convert a rectangle into a triangle, or an ellipse into a polygon. To do this, select the shape, go to Object > Convert Shape, and choose your desired new shape. The original path's anchor points generally remain the same for the new path, providing a foundation for the conversion.
Applying Color and Effects
Once your shapes are created and refined, the next step is to bring them to life with color and visual effects.
Coloring Shapes: There are several methods for applying color to your shapes:
- Swatches Panel: Ensure either the Fill or Stroke is selected (indicated by being the topmost icon in the Tools panel or Swatches panel). Then, choose a color swatch from the Swatches panel (Window > Color > Swatches).
- Color Panel: Select the Fill or Stroke, and then click on a color on the bar in the Color panel (Window > Color > Color).
- Double-Click Fill/Stroke Icon: Double-clicking the Fill or Stroke icon in the Tools panel opens a color picker. Here you can enter precise RGB or CMYK values, adjust a color bar, or select hexadecimal colors.
You can create custom color swatches by going to the Swatches panel, clicking the fly-out menu, and selecting New Color Swatch.
Applying Effects: InDesign's Effects panel (Object > Effects) offers a wide range of creative options to enhance your shapes. You can apply effects like drop shadows, glows, bevels, and more. For instance, to make a shape appear as if it's glowing, you can use the "Outer Glow" effect. Adjust the Mode to Screen, and then fine-tune the Size and Spread to achieve the desired luminous effect. Applying effects subtly, by adjusting the Effect Color to complement the background, can also create sophisticated visual depth.
Organizing and Reusing Shapes: Libraries
For frequently used shapes or custom elements, InDesign Libraries are an invaluable asset. You can create a new library (File > New > Library) and then simply drag any created shape into the Library panel. This saved shape can then be easily accessed and dragged into any InDesign document, promoting consistency and efficiency in your workflow. This feature is particularly useful for logos, icons, or recurring graphical elements.
Tips for Advanced Users and Further Exploration
- Grid and Guides: Utilize InDesign's grid and guides to align and distribute shapes with pixel-perfect accuracy.
- Copying and Pasting Elements: Copying and pasting elements and then slightly shifting their position can create interesting textures and layered effects, mimicking screen-printed or letterpress looks.
- Vector Resources: While InDesign is powerful, for highly complex vector graphics, you might still find it beneficial to create them in Adobe Illustrator and then copy and paste them into InDesign. InDesign's tools are generally sufficient for many drawing tasks, but Illustrator offers a broader spectrum of advanced vector manipulation capabilities.
- Sydney InDesign User Group: For those in the Sydney area, the Sydney InDesign User Group offers a free forum to discuss InDesign features, share tips, and learn from other designers. Such groups are excellent resources for staying updated on the latest InDesign advancements.
By mastering these tools and techniques, you can unlock the full potential of Adobe InDesign for creating visually compelling and precisely crafted shapes, elevating the quality and impact of your design projects.