Creating a perfect circle in Photoshop is a fundamental skill that every designer should master. Whether you're designing logos, creating illustrations, or simply need a precise circular element for your project, Photoshop offers powerful tools and techniques to achieve this with ease. This guide will walk you through various methods, from basic to advanced, ensuring you can draw perfect circles of any size and style.
Setting Up Your Canvas
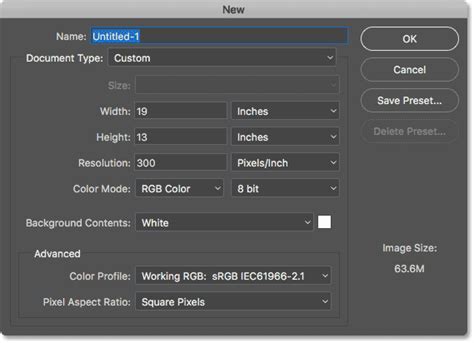
Before you begin drawing, it’s essential to set up your Photoshop document. To start a new project, navigate to "File" > "New" or use the keyboard shortcut Ctrl+N (Cmd+N on Mac). In the New Document dialog, you can define the width, height, resolution, and color mode of your canvas. You can also choose from preset sizes for common project types. Once your parameters are set, click "Create" to open your new document. Photoshop's workspace is highly customizable, allowing you to arrange panels like the Layers panel and the toolbar to suit your workflow.
The Ellipse Tool: The Straightforward Approach
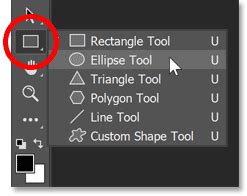
Photoshop offers two primary tools for creating perfect circles quickly and easily. The Ellipse Tool is the most straightforward way to create a circle in Photoshop. You can find it within the Rectangle tab in the Tools Bar, identifiable by a rectangle-shaped symbol. Click and hold on this symbol to reveal the Ellipse Tool.
Once selected, you can draw an ellipse by clicking and dragging on your canvas. To ensure you create a perfect circle, hold down the Shift key while dragging. This constrains the proportions, forcing a perfect circular shape.
For precise sizing, you can enter specific dimensions in the options bar located at the top of the screen. Next to "Width," notice how Photoshop measures the size of the document or shape. You can enter exact values for Width and Height to create a circle of a specific diameter. Remember, these values represent the diameter, so if you desire a specific radius, divide your desired radius by two and enter that value.
The Ellipse Tool creates vector shapes by default, meaning they are editable and can be resized without losing quality. In the options bar, you can choose to create a shape layer, path, or pixels. For shape layers, you'll find options for Fill and Stroke.
Customizing Fill and Stroke
The "Fill" option allows you to color the inside of your circle. You can choose a solid color, gradient, or pattern. To change the fill color, click the Fill Color box in the options bar. This opens Photoshop's Color Picker, where you can select a color by clicking within the color field or entering specific RGB or HEX values for precise control. The "Source to Fill" indicator asks how the object should be filled, allowing for foreground color or a pattern. The Gradient Tool allows multiple colors to be applied and blended together in one sequence, with a black to white gradient box often displayed at the top as a default.
The "Stroke" option defines the outline of your circle. You can set the stroke color, width, and style. To change the stroke color, click the Stroke Color box in the options bar. The stroke width determines how thick or thin your circle's outline appears. Look for the "Stroke Width" field and enter a value in pixels. Opacity, located next to Fill and Stroke, indicates how much of the color will be present; for example, if Opacity is set to 50%, the strength of the color will be over 50%.
For more complex stroke styles, such as dashed or dotted lines, you can access additional options by clicking the Stroke settings in the Properties panel or by adjusting the settings in the options bar. The "Color Midpoint" indicates where two colors merge in a gradient, and the numbered box next to the "Gradient Style" allows the angle of the style to be specified, which can also be indicated by the circle located in the numbered angle box.
To create an unfilled circle, simply select the Ellipse Tool, set the fill color to "None" (indicated by a red diagonal line), and then draw your circle while holding Shift.
Drawing from the Center
For more control over placement as you draw, you can start drawing your circle from its center. Select the Ellipse Tool. Then, hold down Alt (Option on Mac) and Shift simultaneously while clicking and dragging on the canvas. This will force the circle to expand outwards from your starting point, effectively creating a perfect circle centered where you began.
The Elliptical Marquee Tool: Selection-Based Circles
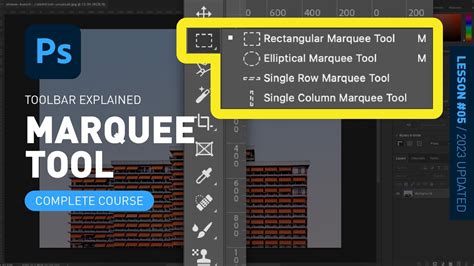
The Elliptical Marquee Tool offers another method to create a circle in Photoshop, focusing on creating a selection first. This tool is located within the Rectangular Marquee tab in the Tools Panel. You'll notice various square symbols representing different marquee modes: one square by itself, two merged together, etc. Each symbol represents how the marquee tool will interact with your selection. By hovering your mouse over each symbol, Photoshop will explain how it can add to, subtract from, or intersect with a selection.
Select the Elliptical Marquee Tool. To create a perfect circle, hold down the Shift key while dragging your mouse across the canvas. This creates a moving outlined selection of the created shape. Once you have your circular selection, you can then customize it by filling it with color, adding a stroke, or applying various effects.
To fill the selection, you can use the Paint Bucket Tool or go to "Edit" > "Fill" and choose your desired color or pattern. To add a stroke, go to "Edit" > "Stroke" and define the color, width, and position of the outline.
The Elliptical Marquee Tool creates a selection, which is a temporary outline. To make this selection permanent as a shape or fill, you'll need to create a new layer and then fill or stroke the selection on that new layer.
Advanced Techniques and Customization
Using Guides for Precision
While not strictly crucial for drawing a perfect circle, using guides can aid in precise placement and alignment. You can drag guides from the rulers at the top and left of the document window. If you don't see the rulers, go to "View" > "Rulers" or use Ctrl+R (Cmd+R on Mac).
The Brush Tool for Textured Circles
The Brush Tool in Photoshop allows for creative circle customization beyond simple shapes. Start by selecting a round brush and opening the Brush Settings panel (Window > Brush Settings). You can adjust brush size, hardness, and opacity. For creating dashed or dotted lines with the Brush Tool, experiment with the "Spacing" setting in the Brush Settings panel. Higher spacing values result in more pronounced dashes. For textured circles, choose a textured brush from the Brush Preset picker.
To draw perfect circles with the Brush Tool, you can still hold Shift while dragging from center to edge. However, for more artistic and less geometrically perfect circles, you can simply freehand draw and then refine the shape.
Cropping an Image into a Circle
You've all seen great images that are cropped to the perfect circle - but how is this done? After some googling a while back, I learned a few quick tricks in Photoshop to make this whole process extremely easy. You’ll be amazed at how simple this actually is once you learn.
- Select the Elliptical Marquee Tool: In your toolbar, if you see a square, click and hold down so that the window appears to the right. Then select the Elliptical Marquee Tool.
- Create the Circular Selection: Drag your mouse and create a circle. Photoshop has numeric guidelines so you can see how big it is.
- Invert the Selection: Go to "Select" > "Inverse" (or Ctrl+Shift+I / Cmd+Shift+I). A dashed box will appear around the rest of the image.
- Delete the Background: Hit the Delete key. Poof! The area outside your circle is now transparent.
- Crop to the Circle: Go back to your marquee tool and switch to the Rectangular Marquee Tool. Select the area right around your image. Then go to "Image" > "Crop."
- Save as PNG: Save the image as a .png format using "File" > "Export" > "Export As" to preserve transparency.

Stroke Path for Precise Outlines
Another method involves using the Pen Tool to create a "path" and then "stroking" that path to create a circle. This method offers a high degree of control.
- Select the Pen Tool: Choose the Pen Tool from the toolbar.
- Create a Closed Path: Click and drag to create anchor points that form a circular path. It might sound complicated to a newbie, but it’s actually not hard at all. For a perfect circle, it's often easier to use the Ellipse Tool and then convert the shape layer to a path if needed.
- Select "Stroke Path": Right-click somewhere on the path. Select "Stroke Path." You can choose from various tools to stroke the path, such as the Brush Tool.
- Delete the Path: Once stroked, you'll see the dotted line still in there, which is the path from before. To delete it, right-click again and click "Delete Path."
This method allows you to use the Brush Tool with specific settings to create unique outlines, such as fuzzy or textured circles.
How to Make a Circle in Photoshop
Working with Layers and Positioning
Creating circles in Photoshop involves using layers and shape tools effectively. It's best practice to create a new layer for each circle you draw. To create a new layer, click the "New Layer" button in the Layers panel or use the keyboard shortcut Ctrl+Shift+N (Cmd+Shift+N on Mac). Double-clicking on the layer name enables you to rename it, which is helpful for organization.
When working with multiple circles, you can adjust their stacking order by dragging layers up or down in the Layers panel. This determines which circle appears in front of another.
Positioning and Alignment
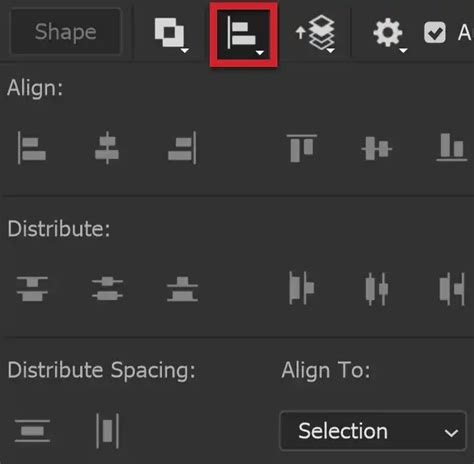
After creating your circle, you often need to position it precisely. Select the Move Tool from the toolbar or press V. Click and drag the circle to reposition it manually. To center the circle on the canvas, use Photoshop's alignment features. With the Move Tool active and the circle layer selected, look for the alignment options in the top toolbar (they appear when multiple objects or layers are selected). You can align centers horizontally and vertically. For precise positioning, you can also use the Properties panel.
Refining and Saving Your Circle
Once you've created your circle, a few final steps will polish and preserve your design.
Deselecting and Refining Edges
To finalize your circle, you need to deselect it. Go to "Select" > "Deselect" (or Ctrl+D / Cmd+D). This removes the marching ants outline, allowing you to see the shape clearly. If needed, use the Eraser Tool to clean up any rough spots or imperfections.
For a slightly softer edge on a filled circle, you can apply a subtle blur. Go to "Filter" > "Blur" > "Gaussian Blur" and apply a small radius, such as 0.5-1 pixel.
Saving Your Work
We'll now save your circle design in the most suitable format. For images with transparency, go to "File" > "Export" > "Export As" and choose PNG from the format dropdown. This format preserves transparency and is ideal for web use.
For a layered Photoshop file that you can edit later, go to "File" > "Save As" and select Photoshop (.psd) as the file format. If you need a vector version of your circle, convert it to a shape layer first. Right-click the layer and choose "Convert to Shape." This allows the circle to be scaled infinitely without losing quality, though it will be treated as a vector object rather than pixels.
By mastering these techniques, you'll be equipped to create perfect circles in Photoshop for any design need, from simple icons to complex illustrations.