Photoshop offers a versatile toolkit for graphic designers and artists, with its shape tools being fundamental for creating both simple and complex designs. Whether you're a beginner looking to understand the basics or an experienced user seeking to refine your workflow, mastering shapes in Photoshop is a crucial skill. This guide will walk you through the process of creating, manipulating, and saving custom shapes, ensuring you can bring any visual concept to life within the software. We will explore the intuitive Custom Shape Tool, the efficient Shapes panel, and delve into advanced techniques like combining and merging shapes, all while leveraging the power of Photoshop's vector capabilities.
Understanding Photoshop's Shape Tools
At its core, a shape in Photoshop is a vector-based object defined by its perimeter, creating a two-dimensional area with height and width. The primary advantage of using vector shapes is their scalability; you can resize them up or down without any loss of quality, making them ideal for logos, icons, and designs intended for various applications. To ensure your shapes are vector-based and editable, it's essential to set the "Tool Mode" to "Shape" in the Options bar. This setting is available for all shape tools, including the Rectangle, Ellipse, Polygon, and Custom Shape tools.
The Geometry of Shapes: Basic Tools
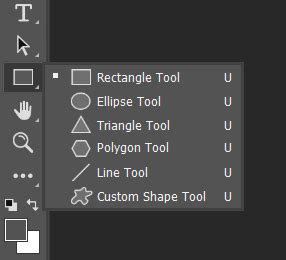
Photoshop provides a suite of basic shape tools, each designed for specific geometric forms. These tools are typically found grouped together in the toolbar, often accessible by clicking and holding the icon of the currently visible shape tool.
Rectangle Tool: This tool allows for the creation of rectangles and squares. You can draw a freeform rectangle by clicking and dragging, or hold the
Shiftkey while dragging to create a perfect square. The "Create Rectangle" window, accessible by clicking on the canvas with the Rectangle Tool selected, offers precise control over the shape's dimensions and corner radius. You can also choose to draw from the center.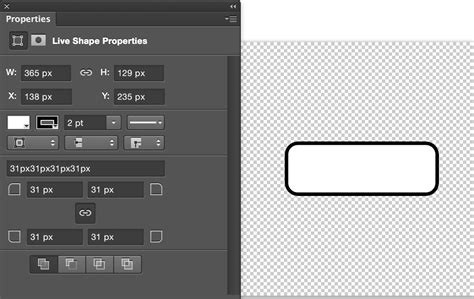
Ellipse Tool: Similar to the Rectangle Tool, the Ellipse Tool can create freeform ovals or perfect circles. Holding
Shiftwhile dragging constrains the proportions to create a circle. The "Create Ellipse" window provides options for fixed size, proportional scaling, and drawing from the center.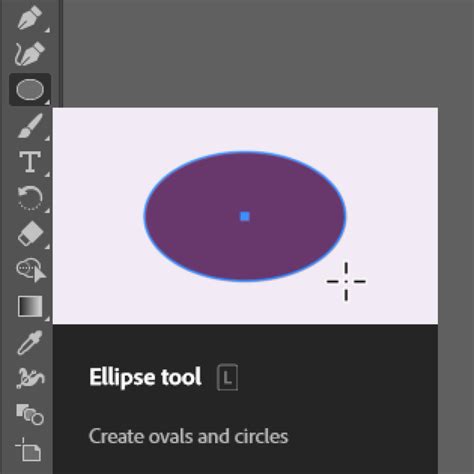
Polygon Tool: This tool is designed for creating polygons with a variable number of sides. By default, it creates a pentagon. You can adjust the number of sides in the Options bar. Clicking on the canvas opens the "Create Polygon" window, where you can specify the size, number of sides, corner radius, and even create star shapes with the "Star Ratio" and "Smooth Star Indents" options. The "Symmetric" option ensures all sides are equal.
Line Tool: While not a closed shape, the Line Tool is useful for creating straight lines of varying thickness and style. The "Weight" setting in the Options bar controls the line's thickness.
Custom Shape Tool: Unleashing Pre-made Designs
Beyond basic geometric forms, Photoshop offers the Custom Shape Tool, which grants access to a vast library of pre-made vector shapes. These shapes can represent anything from animals and symbols to icons and decorative elements.
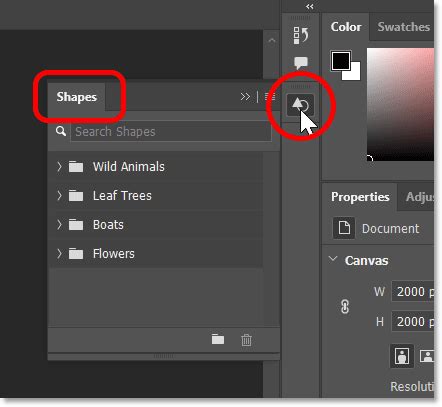
To access the Custom Shape Tool, click and hold the icon of the currently visible shape tool in the toolbar. This action reveals the "Custom Shape Picker," a panel displaying available shape categories. By default, only a few groups like "Wild Animals," "Leaf Trees," "Boats," and "Flowers" are visible. To access the hundreds of other shapes included with Photoshop, you'll need to load them.
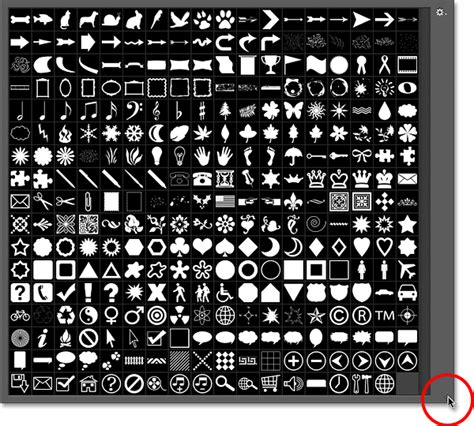
Loading Hidden Shapes
Photoshop includes a wealth of custom shapes that are hidden by default to keep the interface uncluttered. To reveal these shapes, follow these steps:
- Open the "Custom Shape Picker" by selecting the Custom Shape Tool.
- Click on the gear icon (Settings) in the top-right corner of the picker.
- From the dropdown menu, select "Legacy Shapes and More." This will load a comprehensive set of older shape libraries.
- You can also find newer shapes introduced in more recent Photoshop versions by looking for groups like "2019 Shapes" and similar.
Once loaded, these shapes are organized into thematic groups. You can twirl open a group by clicking the arrow next to its folder icon and then select a desired shape by clicking its thumbnail.
Drawing with the Custom Shape Tool
After selecting a custom shape, you can define its appearance before drawing:
- Fill: Choose a fill color using the icons at the top of the Options bar (No Color, Solid Color, Gradient, Pattern) and then select a specific color from the Color Picker.
- Stroke: By default, shapes have a 1-pixel black stroke. You can turn off the stroke, choose a custom color, set its width, style (solid, dashed, dotted), and alignment (inside, outside, centered) in the Options bar.
To draw the shape on your canvas:
- Click on the canvas to set a starting point.
- Hold down the mouse button and drag away from the starting point.
- To reposition the shape while drawing, press and hold the
Spacebarand drag. - To resize, drag the transform handles. Hold
Alt(Windows) /Option(Mac) while dragging a handle to resize from the center. - To rotate, hover just outside a transform handle until the cursor becomes a curved double-sided arrow, then click and drag.
How To Draw Shapes In Photoshop (The Shape Tool Explained!)
The Shapes Panel: A Streamlined Approach
For Photoshop versions 2020 and later, Adobe introduced a dedicated Shapes panel, offering a more integrated and efficient way to work with custom shapes. This panel provides direct access to all custom shapes without needing to open the Custom Shape Picker.
Accessing and Using the Shapes Panel
The Shapes panel is not part of the default workspace but can be opened via the Window menu (Window > Shapes). It typically appears in the secondary panel column.
- Open the Shapes Panel: Go to
Window > Shapes. - Browse Shapes: The panel displays shapes as large thumbnails, organized into groups. The "Recents" bar at the top provides quick access to recently used shapes. You can hide this bar by clicking the Shapes panel menu icon and selecting "Show Recents" to toggle it off.
- Add Shapes to Document: To draw a shape, simply click on the desired shape thumbnail in the Shapes panel. Photoshop will instantly draw the shape onto your canvas as a new shape layer.
- Aspect Ratio: Shapes added from the Shapes panel automatically maintain their aspect ratio, eliminating the need to hold
Shiftwhile resizing. - Resizing and Rotating: Use the transform handles to resize and drag just outside the handles to rotate, just as you would with the Custom Shape Tool.
- Repositioning: Click and drag the shape on the canvas to move it.
Modifying Fill and Stroke from the Shapes Panel
Once a shape is added to your document from the Shapes panel, you can easily modify its appearance:
- Fill and Stroke Options: With the shape layer selected in the Layers panel, use the options in the Properties panel to change the fill color (No Color, Solid, Gradient, Pattern) and stroke attributes.
- Color Pickers: You can also choose new fill colors directly from the Color Picker.
- Swatches, Gradients, and Patterns Panels: For even more convenience, you can drag and drop presets from the Swatches, Gradients, or Patterns panels directly onto your shape layer to apply them as fills.
Layering and Dropping Shapes
When adding shapes from the Shapes panel, their placement in the layer stack and their appearance can depend on where you drop them in the document:
- Dropping onto the Canvas: If you drop a shape onto the canvas, it will appear as a new layer above the currently selected layer.
- Dropping onto an Existing Shape: If you want a new shape to share the same fill and stroke as an existing shape, drag and drop the new shape directly onto the existing shape in the document. This will place the new shape on the same layer and adopt its styling.
Advanced Shape Manipulation
Photoshop offers powerful tools for combining, merging, and organizing your shapes, enabling complex graphic elements and efficient workflows.
Selecting and Editing Multiple Shapes
As you add more shapes, selecting individual ones from the Layers panel can become cumbersome. The Path Selection Tool (A) provides a more efficient method:
- Select a Single Shape: Click on the shape with the Path Selection Tool. A transform box will appear around it.
- Select Multiple Shapes: Hold down the
Shiftkey while clicking on additional shapes to select them simultaneously. A transform box will encompass all selected shapes. - Editing Multiple Shapes: When multiple shapes are selected, you can edit their properties (like Width and Height in the Properties panel) in unison. Holding the link icon ensures proportional scaling. You can also delete multiple shapes at once by selecting them and pressing the
Deletekey.
Combining and Merging Shapes
Photoshop allows you to combine vector shapes in various ways, leading to more intricate designs.
Adding Shapes to Existing Layers: To place multiple shapes on the same layer, hold the
Shiftkey while dragging a shape from the Shapes panel onto an existing shape layer. All shapes on the same layer will share the same fill and stroke properties.
Combining Shapes (Path Operations): When multiple vector shapes reside on the same layer, you can use the path operations in the Options bar to combine them. These operations include:
- Combine Shapes: Merges selected shapes into a single compound shape.
- Subtract Front Shape: Uses the front shape to cut a hole in the shape behind it.
- Intersect Shape Areas: Creates a new shape from the overlapping areas of selected shapes.
- Exclude Overlapping Shapes: Creates a shape where overlapping areas are removed.
- Merge Shape Components: Similar to combining, but with slightly different handling of subpaths.
For example, you can drag a butterfly shape onto a heart shape layer. Then, using the "Subtract Front Shape" operation, you can create a heart with a butterfly-shaped cutout.
Merging Shapes into a Single Path: When you're satisfied with the arrangement and combination of shapes on a layer, you can merge them into a single, non-editable path. Photoshop will warn you that this action converts live shapes into regular paths, meaning individual shape properties can no longer be adjusted in the Properties panel. To merge, select the shapes on the layer and use the "Merge Shape Components" option or a similar path operation. Once merged, the combined shape can be resized, rotated, and moved as a single unit. For precise resizing after merging, you can use
Edit > Free Transformor input specific dimensions in the Options bar.
How To Draw Shapes In Photoshop (The Shape Tool Explained!)
Saving Your Own Custom Shape Presets
Creating unique shapes and wanting to reuse them in future projects is a common need for designers. Photoshop allows you to save your custom creations as presets.
- Create Your Shape: Design your desired shape using any of the shape tools. Ensure it's on its own shape layer for easy selection.
- Create a New Shape Group: Open the Shapes panel (
Window > Shapes). At the bottom of the list, click on the icon to create a new group. Name this group descriptively (e.g., "My Custom Icons," "Project Logos"). - Save the Shape:
- Select the shape layer containing the shape you want to save.
- Click the gear icon in the Shapes panel and choose "New Shape."
- A dialog box will appear. Name your shape (e.g., "Stylized Star," "Unique Icon").
- Ensure the correct group is selected where you want to save the shape.
- Click "OK."
Your newly created shape will now appear as a thumbnail within your custom shape group in the Shapes panel, ready to be used in any Photoshop document. This feature is invaluable for maintaining consistency and efficiency in your design workflow, allowing you to quickly access and apply your frequently used custom elements.
Conclusion: Elevating Your Design Workflow
By mastering Photoshop's shape tools, from the fundamental geometric options to the extensive libraries of custom shapes and the powerful manipulation techniques, you unlock a new level of creative control. Whether you're crafting intricate illustrations, designing logos, or building UI elements, understanding how to create, edit, combine, and save shapes will significantly enhance your design process. The ability to work with scalable vector graphics ensures that your creations remain crisp and professional across all mediums. Experiment with the various tools and techniques discussed, and you'll find that even the simplest shapes can become the foundation for truly remarkable designs.