In the realm of digital design, Adobe Illustrator stands as a powerful tool for creating vector-based artwork. Central to its functionality are artboards, which serve as the fundamental canvases upon which your creative visions take shape. Understanding how to effectively manage and manipulate these artboards is crucial for streamlining your design process, from initial concept to final export. This guide delves into the intricacies of working with artboards in Illustrator, offering insights and practical techniques to enhance your workflow.
Understanding the Artboard vs. the Canvas
It's important to differentiate between an artboard and the canvas in Adobe Illustrator. The "artboard" is essentially a sheet of white paper that forms the base for your artistic work. It defines the boundaries of your design and what will be exported. The "canvas," on the other hand, refers to the broader workspace within Illustrator. You can think of the artboard as the printable or exportable area, while the canvas is the larger, potentially infinite space where you can arrange multiple artboards or work on elements that might not be part of the final output. A simple way to differentiate between them is to look at their default colors; the artboard typically has a distinct background color compared to the surrounding canvas.
Creating and Setting Up Artboards
When you create a new document or open a new file in Illustrator, you have the opportunity to select your artboard's preset and dimensions. This initial setup is critical for establishing the foundation of your project. Illustrator offers a range of presets for popular devices, which can be a great starting point for web, mobile, or print designs. Alternatively, you can create custom-sized artboards to precisely match the dimensions required for your artwork.
Utilizing the Artboards Panel
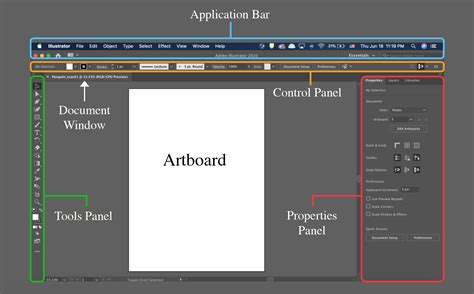
To begin working with artboards effectively, ensure that the Artboards, Properties, and Control panels are easily accessible. The Artboards panel is your central hub for managing all artboards within a document. To access it, navigate to the "Window" menu and select "Artboards." This panel lists all your artboards, allowing you to see their names, order, and dimensions.
Document Setup for Artboards
Another fundamental method to change the artboard size in Illustrator is through the Document Setup dialog. You can access this by going to "File" > "Document Setup." Within this window, you can adjust the overall dimensions of your document, which in turn affects your artboards. This is particularly useful when you need to make global changes to the page size.
Modifying Artboard Dimensions
Adobe Illustrator provides several straightforward methods to alter the size of an artboard to suit your evolving design needs.
The Artboard Tool
The most direct way to manipulate artboards is by using the Artboard Tool. You'll find this tool in the toolbar on the left side of the Illustrator document page. Once selected, you can click and drag the bounding box of an artboard to resize it interactively. This method offers immediate visual feedback as you adjust dimensions.
Within the Properties panel of the Artboard Tool, there's a "Presets" dropdown available for selection. This allows you to quickly switch to predefined sizes, which can be incredibly useful if you need to adapt your design for different screen resolutions or standard paper sizes.
Resizing to Selected Art
A powerful technique for fitting an artboard precisely to your artwork is the "Fit to Selected Art" option. First, select the object or group of objects you want the artboard to resize to using the Selection Tool. Then, from the menu bar, navigate to "Object" > "Artboards" and choose "Fit to Selected Art." This command automatically adjusts the artboard boundaries to encompass only the selected elements, ensuring no wasted space.
Working with Multiple Artboards
Illustrator's strength lies in its ability to handle multiple artboards within a single document. This is invaluable when you're working on a project that involves several distinct designs, such as an icon set, a series of website mockups, or different pages of a brochure.
Adding and Creating New Artboards
If you have more than one design to manage, you can add or create multiple artboards. Within the Artboards panel, you'll find an icon to create a new artboard. You can also duplicate an existing artboard by selecting it in the panel and then clicking the "New Artboard" button, or by holding the Alt (Windows) or Option (Mac) key and dragging the artboard in the document window.
Creating Individual Artboard Sizes for Icon Sets
A common scenario is the need to create individual artboards for each icon in a set, especially for efficient exporting. Here's how you can quickly create artboards sized to fit each icon:
- Click on the Artboard Tool to enter artboard editing mode.
- In the Artboards panel, you'll see your existing artboards.
- Go to the document window and resize an artboard by double-clicking on your artwork with the Artboard tool. This will snap the artboard to the bounds of the selected artwork. Repeat this for each icon.
Managing and Organizing Artboards
As your project grows and you incorporate more artboards, organization becomes paramount. Illustrator provides tools to manage their names, order, and arrangement.
Managing Artboard Names
By default, Illustrator names new artboards numerically (Artboard 1, Artboard 2, and so on). When the names are out of order with the artboard numbers, it can lead to confusion, especially when exporting.
Bulk Renaming Artboards
For a quick fix, you can bulk rename artboards:
- Click on the Artboard tool to enter artboard editing mode.
- In the Artboards panel, select all artboards by holding Shift and clicking on them.
- In the Control bar at the top of the Illustrator window, enter a common prefix (e.g., "icon") in the "Name" field and press Enter. This renames all the selected artboards sequentially, ensuring that your artboard names match their numerical order.
Individual Naming
While bulk renaming is fast, the best process for clarity is often to name artboards individually with descriptive names that reflect their content. This can be done directly in the Artboards panel by double-clicking on an artboard's current name.
Changing the Order of Artboards
The visual arrangement of artboards in your document window might not always match the order in which they appear in the Artboards panel. To synchronize them:
- In the Artboards panel, click on an artboard to select it.
- Move it up or down in the order by clicking the arrow buttons at the bottom of the panel. Alternatively, you can drag and drop artboards within the panel to change their sequence, much like you would in the Layers panel.
It's important to note that simply changing the order in the panel does not alter their visual placement in the document window.
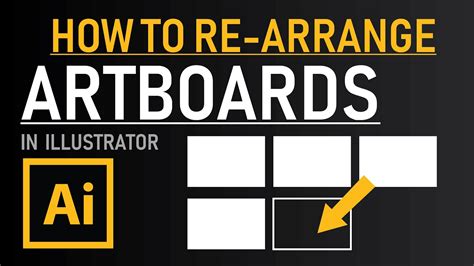
Rearranging Artboards
To make the visual arrangement of artboards in the document window match the order you've set in the panel, you need to use the "Rearrange All Artboards" function:
- In the Artboards panel, click the "Rearrange All Artboards" button.
- Adjust the layout settings such as the number of columns or rows, and the spacing between artboards.
- Ensure that "Move Artwork with Artboard" is checked if you want the content on each artboard to move with it.
- Click OK.
A quick tip: by default, artboards are positioned from the top-left corner. To change the reference point for rearrangement, adjust it in the Control bar using the reference point icon before clicking "Rearrange All Artboards." After rearranging, you may need to rename them again to ensure the numbers remain in order.
Advanced Artboard Techniques
Beyond basic management, Illustrator offers advanced features to refine your artboard workflow.
Creating a Margin for Art
To prevent design elements, such as icons, from being too close to the artboard edges, it's often beneficial to create a small margin. The "Transform Each" function is excellent for scaling multiple elements simultaneously.
- Exit Artboard mode by selecting the Artboard Tool again or pressing Enter.
- Select the icons you wish to scale.
- Go to "Object" > "Transform" > "Transform Each."
- Set the reference point (usually the center point) and the desired scale (e.g., 95%). Ensure proportional scaling is locked. Click OK.
A quick tip: if your artwork involves strokes, consider setting your stroke scaling in Preferences before performing this operation. Navigate to "Edit" > "Preferences" (Windows) or "Illustrator" > "Preferences" (Mac) and check "Scale Strokes and Effects" as needed.
Working with Large Banners
While you cannot create an artboard larger than 5800 mm in Illustrator, you can overcome this limitation for exceptionally large banners by using a scale of 1:10. This means designing at half the actual size and then scaling up the final output.
TourBox and Workflow Enhancement
For those seeking to further optimize their creative process, tools like TourBox can offer significant advantages. TourBox supports macro functions, providing greater flexibility and possibilities for your actions. Imagine using a device that resembles a game controller instead of a keyboard for your creative work, allowing for quicker access to commands and custom shortcuts. This can dramatically speed up repetitive tasks and allow you to focus more on the creative aspects of your design.
Streamlining the Design Process
Artboards are designed to streamline the entire design process. They allow you to work on multiple designs within a single document, manage different versions of a project, or prepare assets for various platforms efficiently. By mastering the techniques for creating, resizing, naming, ordering, and rearranging artboards, you can significantly enhance your productivity and deliver polished results with finesse.
A Note on Resizing Exported Image Files
While this guide focuses on artboards within Illustrator, a related challenge can arise when you need to downsize already exported image files. If you've made and exported your images in Illustrator (or Photoshop) at the maximum possible size you might need, and later need to resize them, there are methods outside of Illustrator. For instance, on macOS, you can use the terminal with a command like sips -Z xxxx < filename >, replacing < filename > with the name of your file and xxxx with the desired maximum dimension. The -Z flag maintains the aspect ratio. CAUTION: Tools like sips often modify files in place, so it's crucial to create copies of your images first if you wish to retain the originals.
By adding these extra tricks and understanding the core functionalities of artboards, you'll breeze through your Adobe Illustrator projects with greater efficiency and control.
30 Illustrator Secrets Graphic Designers MUST KNOW!
tags: #edit #artboard #illustrator