Welcome to the fascinating world of digital animation! This guide introduces the types of digital animation as well as tips for using 2D animation software like Clip Studio Paint. Digital animation uses computer software to create moving images digitally. New techniques are evolving all the time, starting from its beginnings in traditional methods such as cel animation. Animation has many genres with their own characteristics and creation techniques. There’s traditional hand drawn animation, stop motion animation, cutout animation, or 3D animation, which is the most popular form now. Commonly known as cel animation, this is a relatively old form of animation. This method creates movement with a sequence of 2D images using a combination of hand drawn techniques and computer software. 3D animation moves 3D models of characters and objects using dedicated software. Motion graphics is the animation of text, static images, and abstract elements. This involves using software to tween images and create smooth motion between keyframes. Motion capture animation is a technique of recording the movement of actors or props to enhance the realism of 3D animations. The real-life movement is applied to a 3D mesh and then refined by a 3D animator.
Setting Up Your Animation Canvas and Timeline
To get started on your first animation project, you first need a suitable app or software and a drawing tool. If you have a tablet like an iPad or Android tablet with pressure sensitivity, you don’t necessarily need a high-spec dedicated drawing tablet from the start. If you already draw illustrations, using an illustration app that includes animation features can make the transition easier with familiar tools. Online courses and tutorial videos can help you learn digital animation from other artists.
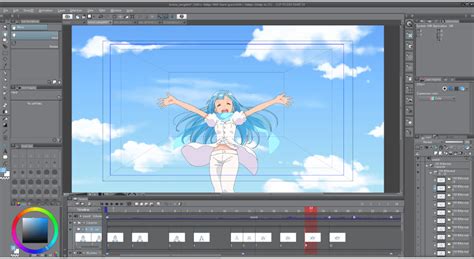
When creating a new project in Clip Studio Paint, you can choose the resolution that your canvas will have, both in width and height. The standard resolution for a monitor is 1920x1080 pixels. You have a small preview of how your canvas is looking right next to it. On the other hand, we also have the option for an overflow frame.
Now on to your timeline settings. Here is your scene's frame rate. This is so we can work on 'twos' and 'threes', which is one drawing every two or three frames respectively. The last several seconds instead of only one. We also have our playback time, which is measured in frames and tells us how long our animation scene will be.
The program may look different for you. Your Animation Timeline might be showing a thumbnail. If you started a file without using an animation preset, your timeline may be grayed out. You can go to the New Timeline button. Next to it, we have the play/stop button for the animation.
Understanding and Organizing Animation Layers
But what happens if I just create a new layer inside the folder? It's not showing up in the timeline! It does not matter what type of layer you're using. I will separate certain parts of the character on different folders. This is not mandatory. So I will go right here in the middle and press the new animation cel button. You will notice CSP adds an A. So it is now 2A. If I were to create another one between those two, it will be B. Let's say I want to create an in-between between 2A and to 2B. If I create it normally, it will name it Layer 1. But we can help the program by naming it 2A1. This might seem unnecessary, but when you start working with more complex scenes and a lot of animation folders, having different characters in the same scene, and coloring them, you'll see it starts getting a little confusing.
One recommendation I have to avoid getting your layers panel cluttered is to use the ‘change layer color’ button. This is just for color coding. Now I want to show you the secret to use an animation folder like a professional. This is how we do it in the anime industry. Animation Folders in Clip Studio can only show 1 element at a time. So, if we need to have a line art layer, and a shadow guidelines layer, showing at the same time, we will need 2 animation folders to show them both, right? We can introduce normal folders! In a normal folder, all layers are showing at the same time, and we can we can turn them on and off separately whenever we want. All we do is put the layers that we need inside of a normal folder, and then put that folder inside of the animation folder.
What if it starts getting confusing with all those layers inside? We will use the ‘change layer color’ button, to select what the ONLY color that layer will be able to draw, so if I set it to blue, no matter what color I pick, if I am drawing in that layer, I will always draw blue. When doing this, we don’t even have to change colors anymore. I will ALWAYS draw with a black line. I also keep the naming convention correctly for these ‘folder’ cels. So, if I’m drawing on the third key pose, I’ll name my folder ‘3’.
Advanced Animation Techniques: Squash, Stretch, and Interpolation
I can also duplicate layers to reuse parts of the drawing. Going to open my animation folder. Click on the drawing that I will duplicate, and drag it onto the new layer button. which is this button, and it will show a ghost of the previous drawing and the next drawing. Taking advantage of the fact that I can separate the hair from her base features, I can apply a bit of squash and stretch to the breakdowns. You can see that, but I also can add a couple more breakdowns between those poses to change how she goes up. I'm dragging some features here and there. And then when she's going down, we actually overshoot and then settle.
I'll also start defining the animation charts. They are the information that allows me to know where we will have acceleration and deceleration.
Finally, let's talk about interpolation in Clip Studio. We're going to switch scenes, to do a small camera movement. I'll just go to my background image, and click on the enable ’keyframes on this layer’ button. It allows me to set keyframes in all transform properties of this layer. Next to it we have the option that tells us what type of interpolation we are creating. Hold means there will be no change from one key frame, to the other. It will just show the keyframe. Linear means it has no acceleration or deceleration, as the spacing will be totally even. With the operation tool and the object mode, I have selected the background layer and I will set a key frame to all of these proportions. So position, scale and rotation. We can also animate opacity to generate effects like this. The lighting is changing. This is because I set different sets of layers.
Interpolation in 5 minutes
Color, Shading, and Effects in Animation
Having several color folders instead of one gives us more control in post-production. But you can also just fill every color in a single animation folder if you want. When using the fill tool make sure to turn on the close-gap function so the color doesn't escape through small openings in the drawing, and also the area scaling.
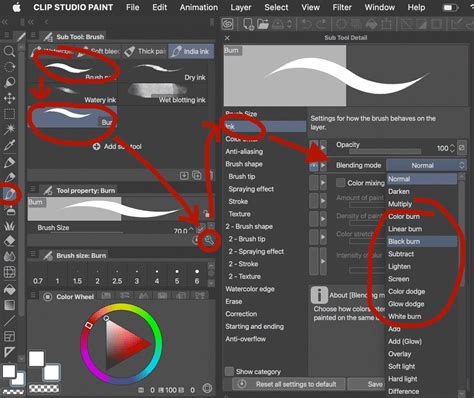
First of all, the order of the layers matters a lot. One of the things I did is having the pupil color, which is this red and the eye highlights to be on top of the line. We can play with the blending modes, which is a way to mix the colors of one animation folder or, for that matter, any other element in clip studio with another. I can also lower the opacity so it's not that overbearing. But now the shadow is working on top of the character. You can use the clip to layer below button to, for example, paint a texture for the golden letters.
Let's talk about exporting options. If you plan on doing post-production in another software, like I did. Export an animation image sequence as PNG. Just turn off everything (including that background paper) and just leave the layer you want to export.
Pen and brush settings differ depending on the software. Anti-aliasing smoothens the drawn line to avoid jagged lines.
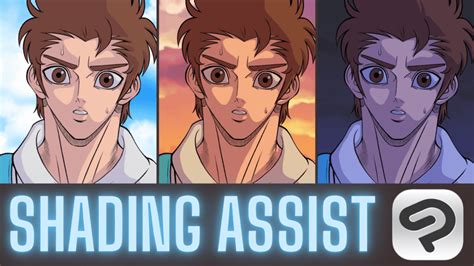
(3) On the clipped layer, use the painting pen to paint the shadows. (1) Use the same layer structure as anime-style painting. (3) Create another multiply layer above, and paint in darker shadows using the painting pen. (4) Create an overlay layer above and adjust the overall color. The faint colors of watercolor painting create the effect of traditional painting. (1) Paint roughly using the watercolor pen. (2) Then, create a layer above and use the airbrush to paint white color. (3) Repeat steps 1 and 2 to adjust the entire illustration. (2) Use the thick paint pen to paint roughly. (5) Repeat steps 2 to 4.
Essential Animation Principles and Software Features
Start from the basics in this beginner tutorial for animating a blink motion. Learn how to animate in a painterly style with this beginner’s tutorial by lemoncholy, covering how to design for animation as well as tips for adjusting the tempo of your animation for different results. Start with lower difficulty projects like short GIF or loop animations. As well as technical step-by-steps, take time to learn about theory, such as Disney’s 12 principles of animation to strengthen your projects. These are the fundamental elements necessary for creating impactful and charming animations. Some principles include squash and stretch, anticipation, and follow-through.
Onion skin is a tool for frame-by-frame animation that allows you to see the previous frames and the next frames at once on the screen in a different color. In animation projects, it’s essential to manage your layer folders to ensure the frames display correctly. In Clip Studio Paint, you can use a “layer color” setting to make anything you draw on a layer appear in that color. This helps keep each element of the animation separate and prevents accidentally drawing on the wrong layer or folder. Unlike other animation tools, Clip Studio Paint allows you to access the full suite of drawing features on your animation projects, with freedom to ink, color, and shade in your favorite brushes. Whether you're just starting out or looking to elevate your animation skills, Clip Studio Paint provides the perfect platform to unleash your creativity and bring your ideas to life.
Let's talk about the playback settings menu. Here you can choose between prioritizing playing the animation in real time, which means having its timing to be exact, even if it has to skip some drawings or to play all frames. This will force the program to do a little render, no matter what, before actually trying to play the animation. This way, it will always show old frames and also play it at the correct speed. Sometimes you can just select parts from cel and transform them.