Sunlight, with its inherent warmth and ability to sculpt form, is a powerful element in photography. It can transform an ordinary scene into something magical, evoking emotion and adding a dramatic flair. While capturing the perfect natural light during the "golden hour" is ideal, Photoshop offers a robust toolkit for replicating and enhancing these effects, allowing photographers and designers to add realistic light rays, sun flares, and subtle glows to their images. Whether you aim for a cinematic aesthetic or a softly illuminated portrait, understanding how to manipulate light within Photoshop is an invaluable skill.
The Foundation: Choosing the Right Image
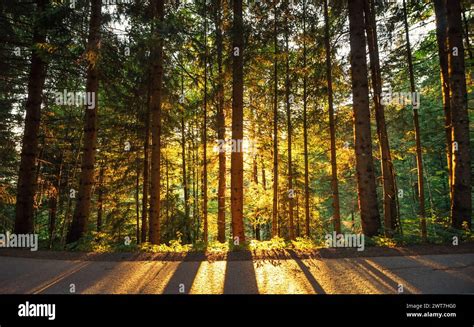
Before diving into the technical aspects of creating light effects, it's crucial to select an appropriate source image. For a truly realistic light ray or sun ray effect, an image that is already backlit by the sun or another large light source serves as the perfect starting point. Consider an example image featuring a subject in a forest, backlit by a setting sun; this environment is inherently conducive to generating believable light ray and sun ray effects. Once an image is chosen, meticulously analyze its existing lighting to gain a clear understanding of the direction(s) from which the light rays need to travel. This analysis is paramount for ensuring the added effects integrate seamlessly with the existing scene, rather than appearing artificial. For instance, if the highlights in an image are striking from the left, positioning a sun flare on the right side would undermine the realism, as the highlights and shadows would not correspond to the direction of the simulated light. Similarly, a GoPro image taken with the sun positioned on the right would benefit from a sun flare added to that same side for authenticity.
Method 1: Building Light Rays with Brush and Blur
A common and effective method for creating light rays involves a combination of the Brush Tool, Radial Blur, and adjustment layers. This approach allows for granular control over the direction, intensity, and color of the simulated light.
Establish the Ray Foundation: Begin by creating a new layer. Utilize the Brush Tool to paint relatively thin white strips along the paths where you envision the light rays appearing. Precision is not paramount at this stage; focus on establishing the general direction and flow.
Introduce Naturalism with Radial Blur: To imbue these initial strokes with a more organic quality, convert the layer containing the painted rays into a Smart Object. This crucial step ensures that subsequent filters are applied non-destructively, allowing for easy adjustments later. Open the Radial Blur dialog box. Set the "Blur Method" option to "Zoom." Then, define a single point from which the blur effect will originate. Apply the Radial Blur, observing its impact. Duplicating this effect multiple times can help fine-tune the desired amount of blur.

Coloring the Light: The painted and blurred areas now serve as a template for the light effect. To adjust the color, load this template into a Layer Mask of a Levels Adjustment Layer. First, select the light rays by creating a selection around the contents of their layer. Subsequently, create a Levels Adjustment Layer positioned above the light ray layer, and hide the original ray layer. Levels adjustment layers allow for precise control over highlight and shadow information, and importantly, enable targeting specific color channels. Adjusting the Red and Green color channels, for instance, can help to dial in the perfect hue for your simulated sunlight. Feel free to switch between these channels as needed to achieve the desired color temperature, ensuring the light effect integrates harmoniously with the overall image palette.
Adding Realism with Noise: Light rays in reality are rarely perfectly smooth. To further enhance the natural appearance, add a subtle amount of noise to the light rays. Select one of the Levels Adjustment Layers, navigate to the "Filter" menu, choose "Noise," and then "Add Noise." The key here is to set the noise level to closely match the existing noise profile of your original photograph. This subtle addition can significantly contribute to the illusion of authenticity.
Method 2: The Sun Flare Technique
Sun flares offer a different, often more dramatic, visual impact. They can be created with relative ease, but achieving a realistic result hinges on careful observation and placement.
Prepare Your Canvas: Open your chosen image in Photoshop and create a new, empty layer. This layer will house your sun flare effect.
Strategic Placement: Analyze your image to determine the optimal placement and strength of the sun flare. Consider the existing light sources and shadows within the scene. If the sun was setting in the top right of your image, that's where your flare should originate. A sun flare placed on the right side of an image where the natural light is clearly coming from the left will appear anachronistic and detract from the overall realism.
The Brush Stroke: Select the Brush Tool with an opacity and flow set to 100%. Opt for a soft brush with a hardness of 0% for seamless blending. Use the Eyedropper Tool (shortcut: I) to sample a color directly from your image, ideally from a bright, luminous area that complements the existing light. Alternatively, select a suitable warm color like yellow or orange from the color palette. To create the flare, make a single, large brush stroke on your new layer.
Blending Mode Magic: Change the blending mode of the layer containing the brush stroke from "Normal" to "Screen." The Screen blending mode, by its nature, inverts both layers, multiplies them, and then inverts the result, effectively creating a luminous effect that interacts with the underlying image.
Transform and Refine: Select the layer with the sun flare and press CTRL/CMD+T to initiate the Free Transform command. A bounding box will appear around your brush stroke. Drag the corners of this box to resize the flare, making it larger or smaller as needed to fit your image and desired effect. The size and intensity are subjective and depend entirely on the context of your photograph.
Opacity and Duplication: If the effect appears too strong, reduce the opacity of the layer. Conversely, if it lacks sufficient impact, duplicate the layer to amplify its presence. The key to a convincing sun flare is subtlety; an overpowering effect can quickly appear artificial.
How to Create a Sun Flare Effect in Photoshop (Easy Tutorial)
Method 3: Utilizing Plugins for Advanced Effects
For those seeking more sophisticated and often more easily controlled lighting effects, specialized plugins offer a streamlined workflow. Boris FX Optics, for instance, provides a dedicated "Light" tab with various presets and customizable options.
Launch and Integrate: Open your image in Photoshop and launch the Optics plugin via the "Filter" menu. Optics will automatically load your open image.
Select and Apply: Navigate to the "Light" tab within Optics and choose an effect that best suits your image. The "S_Rays" effect, for example, is well-suited for generating light rays. Upon selection, you will immediately observe the effect applied to your image.
Intuitive Manipulation: A significant advantage of plugins like Optics is their user-friendly interface, which allows for manipulation not only through numerical adjustments but also by directly moving indicators on the image preview. You can reposition radial indicators to precisely control the origin of the light rays.
Parameter Customization: Once the position is set, fine-tune various parameters in the right-hand panel. This might involve changing the mode (e.g., from "Light Rays" to "Dark Rays"), adjusting parameters like "Length Blue," or adding a touch of blur. Experimentation is encouraged, as the optimal settings will vary depending on the specific image.
Finalize and Apply: Once satisfied with the adjustments, click the "Apply" button within the plugin to commit the changes to your Photoshop document. You can then export your image or create variations for comparison.
Advanced Techniques and Considerations
Beyond the core methods, several advanced techniques can elevate the realism and impact of your light effects:
Layer Masks for Precision: Layer masks are indispensable for controlling where light effects appear. They allow you to selectively hide or reveal parts of a layer, ensuring that light rays or flares only illuminate specific areas of your image and interact realistically with foreground elements. Painting with black on a layer mask conceals the effect, while painting with white reveals it.
Adjustment Layers for Color and Tone: Beyond basic color correction, adjustment layers like "Color Balance," "Hue/Saturation," or "Photo Filter" can be used to seamlessly integrate the simulated light with the existing color temperature and tonal range of your photograph. For instance, a "Warming Filter (85)" with adjusted density can effectively warm up artificial sunlight to match the mood of a sunset.
Gaussian Blur for Diffusion: To soften and diffuse harsh light, applying a Gaussian Blur to the layers containing the lighting and highlights can achieve a more naturalistic look. The radius of the blur should be adjusted until the desired level of softness is reached.
Smart Objects and Smart Filters: As mentioned, converting layers to Smart Objects before applying filters is a cornerstone of non-destructive editing in Photoshop. This allows you to revisit and re-edit filter settings at any time without degrading image quality.
Consider the "Magic Hour": If you're aiming for the most naturalistic results, remember the power of shooting during the "magic hour" â the period shortly after sunrise or before sunset. The light during this time is soft, warm, and directional, providing a superior foundation for any post-processing enhancements.
Lighting Effects Filter (Older Versions): While the "Lighting Effects" filter has been retired in recent Photoshop versions, it was once a powerful tool for simulating various light sources, including sunlight. For users with older Photoshop versions or those running Photoshop in 32-bit mode on a 64-bit Mac OS, this filter can still be utilized. It offers options for light type (spotlight, infinite, directional), intensity, gloss, material, exposure, and ambience, allowing for detailed control over simulated light.
Gradient Overlays for Atmosphere: For creating broader atmospheric effects like sunrises or sunsets, a gradient overlay can be highly effective. By setting a gradient from a warm yellow or orange to transparent, and then applying a "Screen" blending mode, you can introduce a gentle, encompassing glow that mimics the ambient light of dawn or dusk.
By mastering these techniques, from the fundamental brush strokes to the sophisticated use of plugins and adjustment layers, you can effectively craft compelling sunlight effects in Photoshop, adding depth, drama, and an ethereal quality to your photographic work.