Bolding text in Adobe InDesign is a fundamental skill for designers, enabling them to draw attention to specific words, phrases, headings, or crucial information within a layout. While seemingly straightforward, InDesign offers multiple approaches to achieve this effect, catering to various font functionalities and design needs. This comprehensive guide will explore these methods, from the simplest character formatting to more intricate workarounds for fonts lacking a dedicated bold weight, ensuring you can confidently emphasize text like a seasoned professional.
The Direct Approach: Using Font Weights in the Character Panel
The most common and recommended method for bolding text in InDesign is by utilizing the font's built-in weight variations. Many typefaces are designed with a range of weights, such as Light, Regular, Medium, Semibold, Bold, and Black. When a font includes these variations, selecting the appropriate bold weight is the most effective way to achieve a clear, consistent, and typographically sound bold appearance.
To bold text using this method:
- Select the Text: Begin by selecting the specific text you wish to make bold using the Type Tool (T). This could be a single word, a phrase, or even an entire paragraph.
- Access the Character Panel: The Character panel is your primary tool for manipulating font attributes. You can open it by going to
Window > Type & Tables > Character. - Choose the Bold Weight: Within the Character panel, locate the "Weight" dropdown menu. Click on it and select the desired bold variant of your font. If your font has a direct "Bold" option, that is usually the most appropriate choice. For instance, if you were working with the "Olive Display" font and wanted to emphasize "Wander Are Lost," you would highlight this text, open the Character panel, and select "Bold" from the Weight dropdown.
This direct method ensures that the bolding is an integral part of the font's design, maintaining its intended proportions, spacing, and overall aesthetic. It's the cleanest and most professional way to achieve bold text, provided the font supports it.
InDesign: Type Basics with the Character and Paragraph Panels
Simulating Boldness: The Stroke Method for Font Deficiencies
Occasionally, you might encounter a font that lacks a dedicated bold weight. In such scenarios, you can simulate a bold appearance by applying a stroke to the text. This technique essentially adds a visible outline or thickness to the existing characters, making them appear bolder. While this method can be a lifesaver, it's important to understand its limitations.
To apply a stroke for simulated bolding:
- Select the Text: Use the Type Tool (T) to highlight the text you want to make appear bold.
- Reset to Regular Weight: Ensure the text is set to its regular font weight in the Character panel. This is crucial so that the stroke is applied to the original character shape.
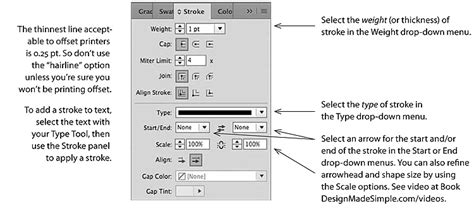
- Access the Stroke Panel: Open the Stroke panel by going to
Window > Stroke. - Increase Stroke Weight: In the Stroke panel, locate the "Weight" setting. Increase this value incrementally until the text appears sufficiently bold for your design. You will also need to ensure that the "Stroke" color is set to black (or your desired color) and that the "Fill" color is set to white or paper color, or that the text color is set to black and stroke color is set to black.
- Consider Stroke Alignment: Within the Stroke panel, pay attention to the stroke alignment options. For text, you generally want the stroke to align to the "center" or "inside" of the character path to avoid distorting the original letterforms excessively.
Important Considerations for the Stroke Method:
- Typographical Integrity: This method does not truly increase the font's weight; it adds an external element. This can sometimes lead to uneven thickness, especially in intricate letterforms, and may not perfectly mimic a true bold font.
- Production Issues: In some printing processes, strokes applied to text can lead to registration issues or appear thicker than intended.
- Screen Preview: The appearance on screen might not perfectly translate to print.
- Alternative to Character Styles: While you can apply a stroke directly, it becomes tedious for repeated use. If you're using character styles, you can add a stroke attribute to a character style. However, it's crucial to note that in the Character Style Options dialog, the "Font Weight" option is disabled. Instead, you would alter the "Character Color" item, which can be set to apply a stroke. This does not "increase the font's weight" but rather adds a stroke.
This method is a workaround and is generally less preferred than using a font with a native bold weight. However, for situations where no bold variant exists, it provides a functional solution.
Advanced Text Formatting in InDesign
Beyond simply bolding, InDesign offers a rich set of tools for comprehensive text formatting. Understanding these can help you refine your bolding efforts and manage text attributes efficiently.
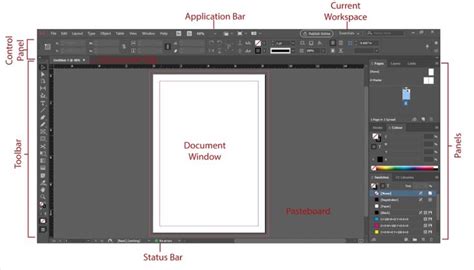
The Control Panel: A Quick Access Toolbar
The Control panel, typically located at the top of your InDesign workspace, provides quick access to common text formatting options, including font family, size, leading, and crucially, font weight. When text is selected, the Control panel updates to show the attributes of that text. You can change the font weight directly from the "Weight" dropdown in the Control panel, mirroring the functionality of the Character panel but in a more immediately accessible location.
Paragraph and Character Styles for Consistency
For documents with extensive text, manually applying formatting to each instance of bold text is inefficient and prone to errors. InDesign's Paragraph and Character Styles are designed to address this.
- Character Styles: These are applied to specific ranges of text within a paragraph. They are ideal for applying attributes like bolding, italics, or specific font choices to individual words or phrases that appear inline with regular text. As mentioned, you can create a Character Style to simulate bolding using a stroke if necessary, though the "font weight" option is disabled within the character style's color settings.
- Paragraph Styles: These apply to entire paragraphs, dictating all their formatting attributes, from alignment and indentation to font family and weight. While you typically wouldn't apply a bold style to an entire paragraph unless it's a heading, understanding paragraph styles is key to overall document structure.
The user's experience with indexing highlights a common challenge: inconsistencies in formatting, particularly with bold page numbers. They describe using GREP searches to identify bold words (\b\w+\b) and recolor them, but struggled to select "bad" page numbers that were only partially bolded. The solution provided involved a GREP search for digits (\b\d+\b), first replacing them with a regular font, and then re-applying bolding. This demonstrates how GREP can be a powerful tool for targeted text manipulation when dealing with complex formatting issues, especially when native styles are not consistently applied or when working with fonts that lack proper bold weights.
The Eyedropper Tool: Copying and Pasting Attributes
The Eyedropper tool is invaluable for quickly applying formatting from one piece of text to another. By default, the Eyedropper tool copies all type attributes. You can load it by clicking on text with the desired formatting. Then, click on other text to apply those attributes. To clear the formatting attributes currently held by the Eyedropper tool, press Alt (Windows) or Option (macOS) while the Eyedropper tool is loaded; it will reverse direction and appear empty, ready to pick up new attributes. This is incredibly useful for ensuring consistent bolding across different parts of your document without having to manually reapply styles.
Quick Apply: Streamlining Style Application
The Quick Apply feature (accessible by pressing Ctrl+Enter on Windows or Cmd+Return on Mac OS) allows you to search for and apply Paragraph and Character Styles by typing their names. You can narrow your search by typing prefixes like m: for menu items or p: for paragraph styles. This is a rapid way to apply a predefined "Bold" character style or any other formatting you've set up.
Beyond Bolding: Related Text Formatting Options
While focusing on bolding, it's beneficial to be aware of other text formatting controls that complement this function and contribute to effective typography.
- Baseline Shift: This feature allows you to move selected characters up or down relative to the baseline of the surrounding text. It's useful for fine-tuning the vertical position of characters, often used with superscripts, subscripts, or decorative elements.
- Superscript and Subscript: These options, found in the Character panel or Control panel, reduce the size of selected text and position it either above (superscript) or below (subscript) the normal baseline. They are commonly used for footnotes, mathematical exponents, and chemical formulas.
- Underline and Strikethrough: These options apply lines to text for emphasis or to indicate deletion. You can control the thickness and offset of these lines from the baseline.
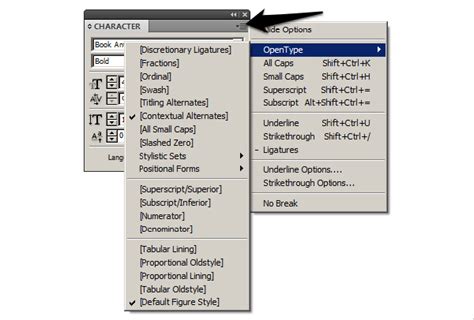
- Change Case: InDesign's Change Case command is a powerful tool for automatically converting selected text to uppercase, lowercase, title case, or sentence case. This is particularly useful for ensuring consistency in headings or for correcting capitalization errors. For instance, using "Change Case" to apply "All Caps" is generally preferred over manually typing in uppercase, as it allows for easier modification and ensures that the formatting is treated as a style attribute rather than literal characters. OpenType fonts offer enhanced versions like "OpenType All Small Caps," which create more elegant small caps than the standard version.
- Ligatures: OpenType fonts can include ligatures, which are character combinations (like "fi" or "fl") that are designed to fit together more harmoniously. You can enable ligatures through the Character panel menu or Control panel menu to improve the visual flow of text.
- Language Settings: Correctly setting the language for your text is vital for accurate spelling and hyphenation. You can select text and choose the language from the Character panel menu or by going to
Edit > Spelling > Language. This ensures that InDesign uses the appropriate dictionaries for proofreading and word breaks, which is particularly important when dealing with technical terms or different language characters. For example, a word like "Glockenspiel" would be handled differently in English versus Traditional German.
Conclusion
Mastering the art of bolding text in Adobe InDesign involves understanding the direct application of font weights, employing creative workarounds for fonts without bold variants, and leveraging powerful tools like Character Styles and the Eyedropper tool for efficiency and consistency. By integrating these techniques into your workflow, you can enhance the visual hierarchy of your designs, guide your readers' attention effectively, and produce polished, professional layouts. Remember that while simulating bold with strokes can be a useful fallback, always prioritize using fonts with native bold weights when possible for the best typographic results.