Understanding how to effectively merge layers in graphic design software is an essential skill for any digital artist, whether a budding designer or a seasoned professional. Layer merging can significantly enhance the quality and efficiency of your design process, enabling the creation of complex compositions and the management of file sizes. For those new to Procreate, a popular digital illustration app for iPad, mastering layer merging techniques is a key step in unlocking its full potential. This guide will explore the fundamental reasons for merging layers in Procreate and detail three straightforward methods for achieving this.
The Strategic Advantages of Merging Layers in Procreate
Merging layers within your Procreate designs is a practical and powerful approach to managing and editing your digital artwork. There are several compelling reasons why artists choose to consolidate their layers, each contributing to a more streamlined and effective creative process.
Crafting Immersive Backgrounds
One of the most fundamental applications of merging layers in Procreate is the creation of intricate and cohesive backgrounds. By combining various layers, artists can seamlessly integrate diverse elements such as colors, textures, and patterns into a unified whole. This technique is particularly vital in digital art and illustration, where backgrounds play a crucial role in establishing the overall tone and atmosphere of a piece. Merging ensures that background elements are harmoniously integrated, providing a solid and polished foundation upon which foreground elements can stand out with greater impact. This consolidation prevents the background from becoming a chaotic collection of individual elements and instead transforms it into a deliberate and supportive component of the artwork.
Optimizing File Size and Performance
Each layer added to a Procreate design contributes to its overall file size. An excessive number of layers can lead to slower performance, making the canvas sluggish to navigate and edit, and can also present challenges when sharing or exporting your work. Merging layers effectively reduces the file size, rendering your projects more manageable. For instance, when creating graphics intended for a blog post, where file size is a critical factor for web performance, you might initially build the visuals with distinct layers for gradients, textures, or specific elements. By merging these layers, you consolidate them into fewer, larger elements, resulting in a smaller file that is easier to move around and prevents artboards from experiencing slow loading times. This optimization is crucial for maintaining a fluid workflow, especially when dealing with detailed projects or when preparing assets for web deployment.
Elevating Project Organization
As your Procreate projects increase in complexity, so too does the number of layers within the layer panel. Managing dozens, or even hundreds, of individual layers can become an overwhelming and confusing task, hindering efficient navigation and editing. Merging related layers simplifies the layer panel, transforming a cluttered workspace into an organized and easily navigable one. This clarity allows you to quickly locate and adjust specific elements without having to sift through a labyrinth of layers. For example, if you have multiple layers contributing to a single character's clothing, merging them into one "Clothing" layer group or even a single merged layer can drastically improve your ability to manage that character's design. This organizational benefit is paramount for maintaining focus and efficiency, particularly in longer-term or collaborative projects.
Streamlining the Creative Workflow
Merging layers in Procreate is a powerful tool for optimizing your overall workflow. By consolidating disparate layers into fewer, more substantial ones, you minimize the time spent toggling between numerous elements, a process that can be particularly time-consuming in highly detailed projects. This optimization fosters a more focused approach to your design, allowing you to concentrate on refining and enhancing your artwork without getting bogged down by the technicalities of managing an extensive layer stack. A streamlined workflow not only enhances efficiency but also leads to faster completion times, a significant advantage for professionals operating under tight deadlines. The ability to quickly group, merge, and flatten elements means less time spent on administrative tasks and more time dedicated to the creative act of making art.
Understanding the Building Blocks: Layer Types in Procreate
To effectively merge layers in Procreate, it's essential to grasp the different types of layers available and how they behave when combined. Procreate primarily deals with raster graphics, but understanding its layer types is crucial for predictable merging outcomes.
The Ubiquitous Pixel Layer
Pixel layers are the workhorses of Procreate, forming the foundation for the vast majority of digital art created within the app. These layers are composed of pixels - minute squares of color that collectively form your image. When you paint, sketch, or draw in Procreate, you are typically adding information to a pixel layer. These layers are raster-based, meaning that their quality is dependent on the number of pixels they contain. Consequently, they can lose sharpness and detail if resized significantly. Merging two or more pixel layers is a straightforward process, resulting in a single pixel layer. This is highly beneficial for reducing layer count and seamlessly blending elements together, ensuring they become a unified part of the artwork.
The Scalability of Vector Layers (with Caveats)
Unlike pixel layers, vector layers utilize mathematical equations to define shapes and lines. This mathematical basis allows vector graphics to be resized infinitely without any loss of quality, making them ideal for elements like logos, text, or any design component that might need to be scaled up or down. However, it's important to note that Procreate's primary strength lies in raster graphics. Its vector capabilities are somewhat limited when compared to dedicated vector software. Crucially, when you merge vector layers with other layers in Procreate, or when they are exported in certain formats, they are converted into pixel layers. This conversion means that any scalability inherent in the original vector data is lost; the resulting merged layer will behave like any other pixel layer and will degrade if scaled up excessively.
Non-Destructive Power of Adjustment Layers
Adjustment layers in Procreate offer a powerful way to apply non-destructive edits to your artwork. These layers allow you to make changes such as color adjustments, brightness/contrast modifications, and other visual effects without altering the original pixel data of the layers beneath them. This flexibility is invaluable, as it permits you to experiment with different looks and easily revert changes. However, when you merge an adjustment layer with the layers below it, the adjustments become permanent on those underlying layers. This is a critical step to perform when you are satisfied with the applied adjustments and wish to consolidate them into the artwork, effectively baking the effects into the pixel data.
Essential Layer Management Tools in Procreate
Beyond the fundamental layer types, Procreate offers several built-in features that significantly influence how layers interact and how merging operations behave. Understanding these tools is key to mastering layer management.
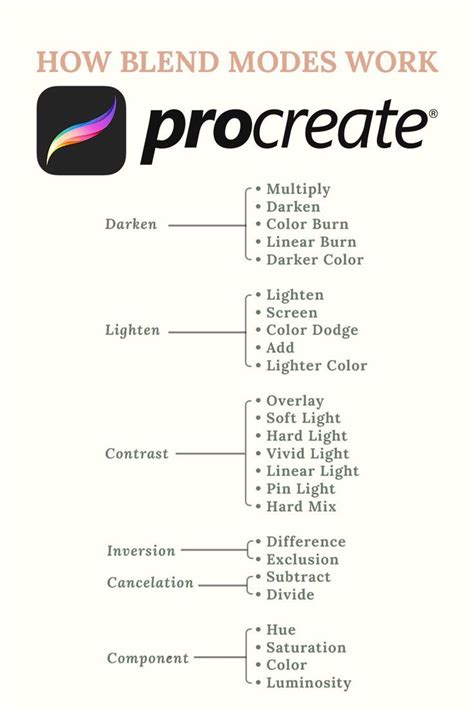
The Art of Blend Modes
Blend modes dictate how a layer interacts with the layers positioned beneath it in the layer stack. They can produce a wide array of effects, ranging from subtle textural blending to dramatic color transformations. Each blend mode employs a distinct algorithm to calculate how the pixels of the active layer should combine with the pixels of the layers below. For example, the 'Multiply' blend mode tends to darken colors by simulating the effect of layering transparencies, while the 'Screen' blend mode lightens colors by inverting and multiplying the color values. Experimenting with the diverse range of blend modes available in Procreate can lead to unique, unexpected, and visually rich results, greatly enhancing the depth, complexity, and overall aesthetic appeal of your artwork.
The Nuances of Opacity Control
The opacity setting in Procreate is a fundamental control that determines the transparency of a layer. By adjusting a layer's opacity, you can make its contents partially or fully see-through, allowing the layers underneath to become more visible. This feature is exceptionally useful for creating subtle transitions, soft shadows, atmospheric effects, and sophisticated overlay effects. Lowering the opacity of a layer can also be a strategic way to gradually build up colors and textures, granting you finer control over the intensity and blending of your visual elements. It's a tool that allows for delicate layering and nuanced visual contributions from individual layers.
The Importance of Layer Order
Layer order, essentially the arrangement of layers within the layer stack, plays a critical role in the composition of your artwork. In Procreate, layers are stacked vertically, with the topmost layer in the stack appearing visually in front of all other layers. You can easily rearrange this order by tapping and dragging layers within the Layers panel. This manipulation of layer order directly impacts how different elements interact with each other, especially when employing blend modes and opacity adjustments. Understanding and strategically managing layer order is essential for controlling which parts of your artwork are visible, how they overlap, and how they contribute to the final image.
Navigating Layer Limits
Procreate imposes a limit on the maximum number of layers that can be present in a single canvas. This limit is not static; it varies depending on the device's available Random Access Memory (RAM) and the dimensions (resolution and DPI) of your canvas. Higher-resolution canvases, which require more memory for each layer due to a greater number of pixels, will consequently have fewer layers available. This inherent layer limit serves as a practical encouragement for artists to engage in efficient layer management and to merge layers thoughtfully when necessary, ensuring they can complete their artwork without being constrained by these technical boundaries. It's wise to plan your layer usage, particularly in complex projects, to avoid reaching this limit prematurely.
Crucial Note on Merging: It is vital to remember that merging layers in Procreate is generally an irreversible action once you close the app or if you move too far back in your undo history. To safeguard your work and retain the flexibility of individual layers, it is highly recommended to save your artwork in your Procreate gallery before closing the app or performing significant merging operations. This ensures you can always revert to an earlier, unmerged state if needed.
Three Principal Methods for Merging Layers in Procreate
With a solid understanding of why and how layers function, let's delve into the practical techniques for merging them within Procreate.
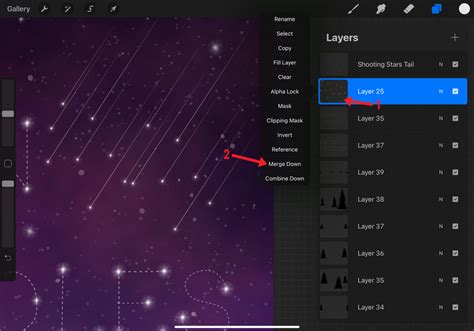
Method #1: Merge Down - The Direct Approach
The "Merge Down" function is perhaps the most direct and commonly used method for combining layers.
- Access the Layers Panel: Begin by opening the 'Layers' panel, typically located in the top-right corner of the Procreate interface.
- Select the Target Layer: Tap on the layer you wish to merge. This action selects it and makes it the active layer.
- Access Layer Options: Tap the selected layer again. This will bring up the 'Layer Options' menu, a contextual menu containing various actions applicable to that layer.
- Execute "Merge Down": From the 'Layer Options' menu, select 'Merge Down.' This action will combine the currently selected layer with the layer situated directly beneath it in the layer stack. The two layers will become a single, unified layer.
Method #2: Pinch - The Gesture-Based Consolidation
The "Pinch" gesture offers a quick and intuitive way to merge multiple selected layers simultaneously.
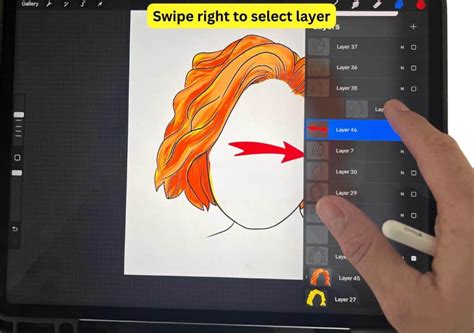
- Access the Layers Panel: Open the 'Layers' panel.
- Select Multiple Layers: To select multiple layers for merging, tap on each desired layer individually. Selected layers will typically be highlighted.
- Perform the Pinch Gesture: With two fingers (your thumb and index finger, for example), place them on the screen over the selected layers you intend to merge. Then, perform a pinching motion, moving your fingers together as if to "pinch" the layers into one.
- Observe the Merge: Procreate will consolidate the selected layers into a single layer. This method is particularly efficient when you have several adjacent or related layers that you wish to combine swiftly. If you accidentally merge the wrong layers, remember that the immediate 'Undo' gesture (a two-finger tap on the canvas) can quickly reverse the action.
Method #3: Flatten - Consolidating Groups for a Unified Whole
The "Flatten" method is an excellent technique when you need to combine a significant number of layers, often after organizing them into groups.
- Organize Layers into a Group: If your layers are not already grouped, select all the layers you wish to merge. Then, tap on the 'Group' option (often found in the Layer Options menu or as a gesture). This will bundle your selected layers into a single folder or group.
- Access Group Layer Options: Tap on the newly created group to expand it and reveal its contents. Then, tap on the group itself again to bring up its 'Layer Options' menu.
- Execute "Flatten": Within the 'Layer Options' menu for the group, select 'Flatten.' This action will merge all the layers contained within that group into a single, consolidated layer. This is a powerful way to reduce complexity and finalize a section of your artwork before proceeding.
Grouping and Flattening Layers | Procreate | Digital Art Process
Unleashing Your Procreate Potential
Merging layers in Procreate is not merely a technicality; it's a strategic approach that significantly enhances your design process, making it more efficient, organized, and creatively fluid. Whether you are meticulously crafting intricate backgrounds, managing the complexity of large projects, or simply aiming to optimize your workflow for faster output, understanding and proficiently utilizing layer merging techniques is indispensable in the realm of digital design. By mastering these methods, you can elevate your artwork, improve your workflow, and unlock new levels of creative expression within Procreate.
Beyond merging, Procreate offers a suite of layer management tools that further empower artists. Default layer titles are sequential numbers, but tapping a layer in the Layers panel brings up Layer Options, including 'Rename.' This allows for clear, descriptive naming, which is crucial for organization. The 'Select' option in Layer Options bases its selection on the alpha channel (opacity level) of the layer content; higher opacity means more selection. While useful, it's not recommended for simply moving or copying all layer content. Image data copied to the clipboard can be pasted into another layer or canvas. 'Fill Layer' with the currently selected color will fill the entire layer, or only existing artwork if Alpha Lock is enabled. 'Clear' removes the layer's contents entirely.
Layer Masks, accessed via Layer Options, use greyscale values to non-destructively hide or reveal layer content. Brighter values reveal more, darker values hide more, and varying grey values modify opacity. Clipping Masks function similarly to Alpha Lock but act as separate, linkable layers, allowing for non-destructive modifications that can be easily removed or moved between base layers.
Advanced settings can enable strokes to 'snap' to guides or perspective grids, and canvas reflection can mirror strokes across the canvas. 'ColorDrop' fills can be applied to any layer. As mentioned, 'Merge Down' combines the active layer with the one below. Multiple groups can be merged using the Pinch gesture on the top and bottom layers of the desired group. Importantly, merging layers applies any active blending mode to the pixels below. If the layer limit is reached, reviewing and merging layers becomes a necessity. The 'Undo' gesture (two-finger tap) is your immediate recourse if a merge is unintentional. Merging a layer directly above a Layer Group will combine it with the group itself.