Creating effective page layouts in Adobe InDesign often hinges on the strategic use of columns. Whether you're designing a new document or refining an existing template, understanding how to add, manipulate, and customize columns is crucial for enhancing clarity, balancing visual presentation, and achieving dynamic designs. This guide delves into the intricacies of column creation in InDesign, exploring both standard approaches and advanced techniques for achieving unique layouts, such as the specific scenario of an A5, two-fold brochure with an intentionally uneven column width.
The Foundation: Understanding Page Columns in InDesign
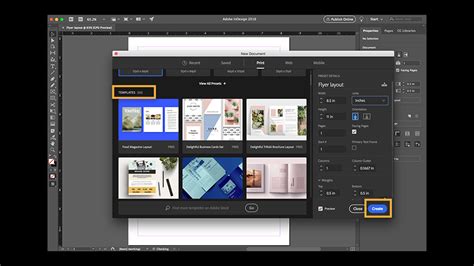
InDesign provides robust tools for managing columns, primarily through the "Layout" menu. When initiating a new document, the "New Document" dialog box offers a straightforward way to define the initial column structure. Here, you can specify the desired number of columns and the gutter width - the space between them. This fundamental step sets the stage for your page's grid system.
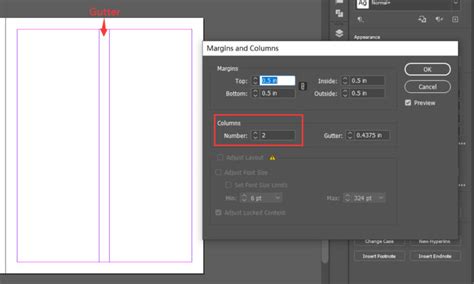
For existing documents, the process involves navigating to the "Layout" menu and selecting "Margins and Columns." This panel allows you to modify the number of columns and their associated gutters. It's important to note that when working with the standard "Margins and Columns" dialog, gutters are typically uniform, ensuring a consistent visual rhythm across the page.
Beyond Uniformity: Achieving Unequal Column Widths
The user's specific need for an A5, two-fold template measuring 441mm wide, with three columns intended for a folded brochure, highlights a common design challenge: the requirement for unequal column widths. The template is designed to accommodate a 3mm overlap for folding, resulting in two columns of 148mm and one central column of 145mm. This precise measurement is key to the physical integrity of the folded document.
While the "Margins and Columns" dialog usually enforces uniform gutters, InDesign offers a more flexible approach for creating dynamic layouts with varying column sizes. This is achieved by directly manipulating the column guides. When you select "Layout" > "Margins and Columns," and the "Number" field indicates 'Custom,' it signals that non-standard adjustments have been made.
The primary method to create unequal column widths involves directly interacting with the column guides on your page. This often requires temporarily disabling the "Snap to Guides" feature, which can be found under the "View" menu or by using a keyboard shortcut. By turning off snapping, you gain the freedom to drag and reposition column guides with greater precision.
To achieve the specific 148mm and 145mm widths for the A5 brochure, a designer would typically:
- Establish Initial Columns: Set up the document with the desired number of columns (in this case, three) and a standard gutter width.
- Disable Snap to Guides: Temporarily turn off the "Snap to Guides" function.
- Manually Adjust Guides: Select the column guides and drag them to their precise, intended positions. This is where the mathematical understanding of the folded brochure's dimensions becomes critical. The designer would manually adjust the guide for the folding column to be 145mm wide, while the outer columns remain at 148mm.
- Re-enable Snap to Guides (Optional): Once the guides are in their final positions, you can re-enable "Snap to Guides" for subsequent layout work, ensuring that elements align accurately with these custom guides.
This manual adjustment is the most probable method by which the user set their odd column width, as it bypasses the automatic uniformity enforced by the standard dialog boxes.
Text Frames: The Building Blocks of Content
It's important to distinguish between page columns and text frames, as InDesign's flexibility extends to how content is organized within these containers. Text frames are the fundamental "containers" where text resides. There are two primary types:
- Plain Text Frames: These are the standard frames created using the Type tool. They are ideal for flowing horizontal or vertical text.
- Frame Grids: These specialized frames display character emboxes and spacing as grids, offering precise control over typography, particularly for Asian languages.
Text frames can be created manually by dragging with the Type tool or automatically generated. A significant feature is the ability to "thread" text frames, meaning text can flow sequentially from one frame to another, regardless of how many frames it occupies. This entire sequence is referred to as a "story."
Crucially, text frames themselves can be configured to have multiple columns, independent of the overall page column setup. This means you can have a single page with its own column grid, and within that page, a specific text frame can be divided into, say, two or three further columns.
To create a text frame with multiple columns:
- Create a Text Frame: Use the Type tool to draw a text frame on your page.
- Access Text Frame Options: With the text frame selected (using the Selection tool), go to "Object" > "Text Frame Options."
- Define Columns: Within the "Text Frame Options" dialog, navigate to the "Columns" tab. Here, you can specify the number of columns within that specific frame and adjust their gutter widths. This is a powerful way to create localized column structures within a broader page layout.
Auto-Sizing Text Frames in InDesign | Adobe 2 Minute Tip
Primary Text Frames and Smart Text Reflow
For documents where content needs to flow consistently across multiple pages, the "Primary Text Frame" option is invaluable. When creating a new document, selecting this option places a page-sized text frame on the document's default parent page. This frame acts as a placeholder, and any text added to it on a document page will automatically flow within this primary frame.
You can also add text frames to parent pages to serve as placeholders for content that will appear on every page of that parent. When you need to type directly into a primary text frame on a document page, you'll typically need to hold down modifier keys (Ctrl+Shift on Windows, Command+Shift on Mac OS) while clicking the frame.
The "Smart Text Reflow" feature further enhances text management. When enabled, InDesign can automatically add or remove pages as you type and edit text. For instance, if you're typing at the end of a threaded text frame based on a parent page, a new page might be automatically generated to accommodate the overflow of text.
Advanced Typography: Baseline Grids and Language Settings
Beyond the structural layout of columns, InDesign offers sophisticated tools for typographic control. The Baseline Grid is a fundamental feature that ensures text aligns horizontally across columns and pages, creating a harmonious baseline rhythm. You can set the spacing for this grid in the "Grids Preferences" and ensure it's visible by selecting "View" > "Grids" > "Show Baseline Grid." Frame-based baseline grids can also be applied to individual text frames, offering more localized typographic control.

Furthermore, InDesign provides robust language support. Assigning the correct language to your text is crucial for accurate spell-checking and hyphenation. For designers working with specific language families, InDesign offers specialized versions:
- Asian Languages: Dedicated versions for Japanese, Simplified Chinese, Traditional Chinese, and Korean.
- Middle Eastern Languages: Support for right-to-left text formatting, essential for languages like Hebrew, Arabic, Farsi, and Urdu.
These features, from precise column manipulation to advanced typographic controls and language support, empower designers to create sophisticated and visually appealing layouts in Adobe InDesign. Whether you're working with a standard grid or a custom-engineered layout for a unique folding brochure, InDesign provides the tools to bring your vision to life with clarity and precision.