Adding a lens flare effect to your photographs can be a powerful technique to dramatically enhance their visual appeal, creating a palpable sense of depth and dimension. This guide will walk you through the process of effortlessly imbuing your images with a sun-kissed glow, transforming them into more dynamic and captivating visual narratives. The objective is to achieve a naturalistic integration of the flare, making it appear as though it was captured organically during the photography process.
Understanding the Fundamentals of Lens Flare
Lens flare occurs when bright, directional light enters a camera lens and bounces off the internal elements. This internal reflection can manifest as circular or polygonal shapes, streaks of light, or an overall haze across the image, often referred to as "ghosting" or "veiling." While traditionally lens flare has been an effect photographers strive to avoid, its intentional use in post-production has become a popular stylistic choice, often referred to as the "lens flare look." This effect can reduce contrast and saturation, and introduce distinctive artifacts.
The phenomenon is particularly pronounced with zoom lenses due to their greater number of internal glass elements, which provide more surfaces for light to reflect off. In photography and videography, lens hoods are commonly employed to mitigate or prevent unwanted lens flare. Similarly, in studio settings, flags are used to precisely control direct light from striking the lens. However, there are specific artistic intentions where lens flare is not only tolerated but actively sought after and created, either on set or through digital manipulation in software like Adobe Photoshop.
The "lens flare look" has permeated modern photography, with many visual artists now intentionally composing shots to capture this effect. It's crucial to understand that lens flare has two primary visual impacts: it can decrease the overall contrast and saturation of an image, and it can produce distinct artifacts such as circles and lines.
The "Line of Sight" Principle for Realistic Flares
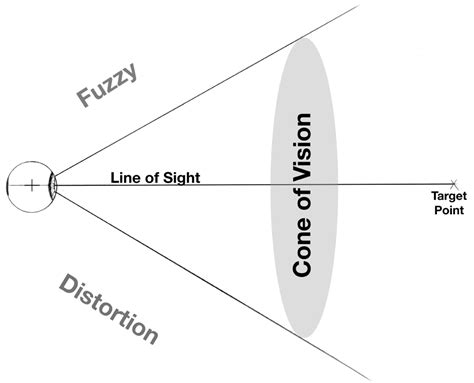
A fundamental rule for creating believable lens flares in post-production is to ensure that the added flare makes sense within the context of the image's lighting. You cannot simply place a lens flare anywhere; it must appear where it logically would originate from. This means the flare must align with a "line of sight" between the simulated light source and the camera lens. Therefore, if your image features a visible light source - be it the sun, a studio light, a flashlight, a candle, or any other illumination - this becomes the anchor point for your lens flare. The placement must reflect this direct relationship to appear authentic.
Leveraging Photoshop's Lens Flare Filter
Photoshop offers a built-in Lens Flare filter, a powerful tool for simulating these optical effects. While it's possible to apply this filter directly to an image, this method results in a destructive edit, permanently altering the original pixels. A more sophisticated and non-destructive approach involves applying the filter on a separate layer, allowing for greater control and flexibility.
Step-by-Step: Non-Destructive Lens Flare Application
The most effective workflow begins with creating a new layer. This layer will serve as the canvas for our lens flare. Photoshop's Lens Flare filter cannot be applied to a blank, transparent layer. Consequently, the first step after creating the new layer is to fill it with a solid color. Black is typically the preferred choice for this initial fill. This black layer will later be made invisible, allowing the lens flare to shine through.
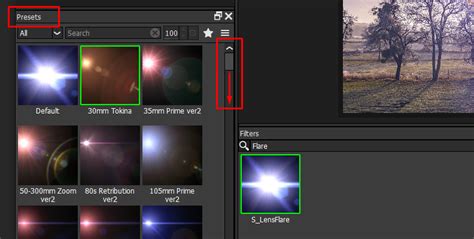
Once the layer is filled, you can access the Lens Flare filter. The filter dialog box presents several options, including four distinct lens types: 50-300mm Zoom, 35mm Prime, 105mm Prime, and Movie Prime. Each lens type imparts a different visual characteristic to the flare. The 50-300mm Zoom is often the default and a popular choice due to its versatility. The 105mm Prime can produce a more natural-looking flare, often with a blueish tint, while the Movie Prime is known for generating distinct streaks of light, reminiscent of those seen in cinematic productions, a style famously employed by director J. J. Abrams to lend a modern or futuristic aesthetic to his films.
Within the preview area of the Lens Flare dialog box, you can position the simulated light source by clicking and dragging. The point you select becomes the center of the flare, indicated by a target symbol. Once you've determined the optimal placement, click "OK."
The Power of Blend Modes: Screen and Beyond
The crucial step to revealing the lens flare and integrating it with your image is by changing the blend mode of the lens flare layer. Setting the blend mode to "Screen" is highly effective because it renders all black pixels transparent, allowing the brighter pixels of the lens flare to show through and blend seamlessly with the layer below. This technique effectively hides the solid black fill while preserving the generated flare.
Experimenting with other blend modes, such as "Overlay" or "Hard Light," can yield different artistic results. "Hard Light," for instance, can make the gray areas of the flare appear transparent, creating unique interactions with the underlying image.
Refining the Flare: Positioning, Transformation, and Color Adjustment
After applying the lens flare to its dedicated layer and setting the blend mode, you gain the ability to further refine its appearance. The Move Tool (shortcut "V") allows you to reposition the flare with precision. Furthermore, the Free Transform command (Ctrl/Cmd+T) enables scaling, rotating, and flipping the flare horizontally if necessary, ensuring it aligns perfectly with the scene's perspective and lighting.
To fine-tune the color of the lens flare to better match the existing palette of your photograph, you can utilize adjustment layers. A Hue/Saturation adjustment layer is particularly useful. By manipulating the Hue slider, you can shift the colors of the flare around the color wheel until they harmonize with the image. For a warm, sun-kissed effect, increasing the color temperature and adding a touch of magenta can be highly effective.
Softening and Intensity Control
The edges of a digitally generated lens flare can sometimes appear too sharp and artificial. To achieve a more natural look, applying a subtle Gaussian Blur can soften these harsh lines. Adjust the Radius slider in the Gaussian Blur dialog box until the flare appears integrated rather than superimposed. The amount of blur required will depend on the resolution and size of your image.
The overall intensity of the lens flare can also be adjusted. If the flare appears too strong, reducing the opacity of the lens flare layer in the Layers panel is a straightforward solution. A setting around 80% opacity often provides a more subtle and natural integration. Conversely, if the flare is not bright enough, duplicating the lens flare layer (Layer > New > Layer via Copy) will double its intensity, as both layers are set to the Screen blend mode.
Creative Applications and Considerations
Beyond the Basic Filter: Gradient and Adjustment Layers
While the Lens Flare filter is a primary tool, other techniques can enhance the effect. For instance, creating subtle haze effects can be achieved by adding additional radial gradients. These can be used to simulate atmospheric diffusion or softer light scattering.
The "lensflare look" can also be a distinct stylistic choice, going beyond the basic filter application. This often involves combining the lens flare effect with other adjustments to create a more stylized and dramatic outcome. For example, darkening an image with a Curves adjustment layer before applying the flare can enhance its impact. Masking out specific areas, such as a subject's face, ensures the darkening effect is localized and doesn't detract from the main focus.
QUICKEST WAY to make SUNBURST Background (Adobe Photoshop)
Lens Flare in Different Genres
The application of lens flare is versatile and can benefit various photographic genres.
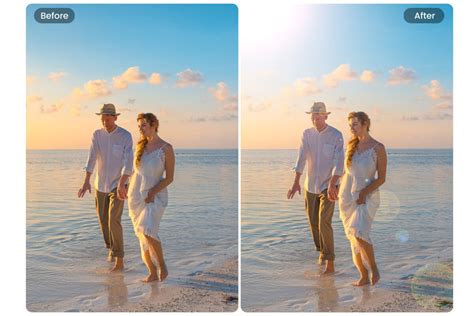
- Portraits: Lens flare can add a dreamy, romantic atmosphere to portraits, particularly when used as a backlight. It can create a soft, ethereal glow around the subject, enhancing their presence. However, care must be taken to ensure the flare does not distract from the subject's face or overpower the composition.
- Urban Landscapes: In urban photography, lens flares can add drama and visual interest, particularly when simulating light from streetlights or car headlights. Converting the background layer to a Smart Object before applying the Lens Flare filter allows for editable Smart Filters, offering further non-destructive refinement.
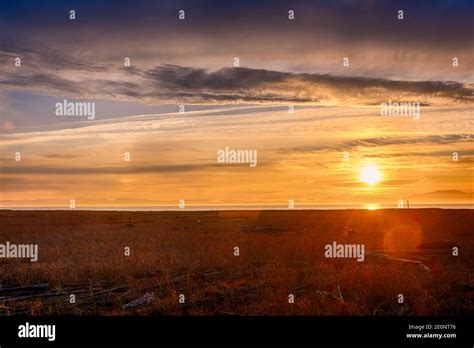
- Landscapes: Lens flares can define landscape shots, especially during the "golden hour" (sunrise and sunset) when the sun is lower in the sky. This natural lighting is softer and easier to incorporate into the scene, enhancing the feeling of a sun-drenched vista.
Understanding Real-World Lens Flare
To effectively simulate lens flare, understanding its real-world causes is beneficial.
- Aperture: The aperture setting plays a significant role in the appearance of starburst effects. Shooting with a smaller aperture (e.g., f/11 or f/16) can create distinct starburst patterns as light rays diffract around the aperture blades. However, this requires balancing the exposure triangle (shutter speed and ISO) to maintain proper exposure.
- Lens Type and Condition: Older lenses or those without anti-reflective coatings may produce more pronounced flares. Zoom lenses, with their multiple elements, are also prone to generating more flare. A clean lens is paramount; dirt or smudges can introduce unwanted artifacts that mimic or interfere with intentional flares.
- Light Source Angle and Intensity: The angle and intensity of the light source are critical. Shooting directly into the sun or a strong artificial light is necessary. Experimenting with various angles can help discover the most visually appealing flare. In studio settings, precise control over light intensity, color, and height offers greater predictability.

Advanced Techniques and Alternatives
Smart Objects for Editable Flares
For those working with complex edits or wanting maximum flexibility, applying the Lens Flare filter to a Smart Object is highly recommended. When a layer is converted to a Smart Object, any applied filters become "Smart Filters," which can be re-edited, re-positioned, or even removed at any time without degrading the original image data. This allows for iterative adjustments to the flare's position, type, and intensity.
Mimicking Flare with Brushes and Overlays
For users who prefer a more manual approach or desire unique flare characteristics, Photoshop brushes and pre-made flare overlays offer alternatives. Custom brushes can be designed to mimic specific flare shapes, while overlay images can be imported and blended using layer modes. This method provides granular control over the placement and appearance of each light element, allowing for highly customized and artistic results.
Color Grading and Mood Enhancement
Lens flare is not merely an optical effect; it's a tool for mood enhancement. A subtle flare can evoke a dreamy or romantic atmosphere, while a more pronounced, bright flare can convey energy and vibrancy. By carefully considering the desired emotional impact, editors can use lens flares to deepen the storytelling within their images. Adjusting the color temperature and saturation of the flare can further refine the mood, whether it's a warm, golden-hour glow or a cool, cinematic blue.
Judicious Use and Avoiding Overprocessing
While lens flares can significantly enhance an image, overuse can lead to an unnatural, overprocessed appearance. The key is subtlety and integration. The flare should complement the existing lighting and composition, rather than dominate the scene. It's essential to evaluate whether the added flare genuinely improves the image's aesthetic and narrative, or if it merely serves as a distracting embellishment.
Conclusion: Embracing the Flare
Mastering the art of lens flare in Photoshop involves understanding its optical origins, employing non-destructive techniques, and applying the effect with artistic intention. By leveraging Photoshop's Lens Flare filter, blend modes, adjustment layers, and potentially brushes or overlays, you can imbue your images with a captivating sense of depth, drama, and realism. Whether you aim for a subtle sun-kissed glow or a dramatic cinematic effect, judicious application of lens flare can elevate your photography from ordinary to extraordinary. The process, while requiring practice and experimentation, is accessible to both beginners and seasoned professionals, offering a powerful avenue for creative expression.