Adding an outline, or "stroke," to text in Photoshop is a fundamental yet powerful design technique. This feature plays a significant role in design by enhancing the visual impact of text, making it bolder and more prominent. For instance, in a poster design, adding a stroke to the headline text can ensure it catches the viewer's attention more effectively. Similarly, a neon sign-inspired design can utilize a vibrant colored stroke to mimic the glow of real neon lights, adding a dynamic and eye-catching effect. When you want your text to stand out against the background, adding an outline is often the answer. Outlining text makes it easier to read and effortlessly more eye-catching. In Photoshop, there are several ways to add a text outline, depending on the look you're after and how much control you want over the final result.
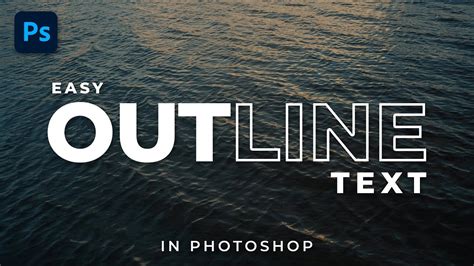
Setting Up Your Canvas and Text
To begin this tutorial, you'll need to open the Photoshop software. Once Photoshop is running, create a new canvas. For standard tutorial purposes, dimensions of 1280x720 pixels are a good starting point, offering ample space for design experimentation.
Next, locate the Text Tool in the left toolbar of Photoshop. This tool is typically represented by an icon resembling the letter "T." Click on the Text Tool, and then drag out a text box on your canvas. By default, Photoshop's Text Tool is set to the Horizontal Type Tool, which allows you to input text from left to right. Type your desired text within this box.
Method 1: Using Layer Styles for Simple Outlines
This method is the easiest and most straightforward way to add a clean, adjustable outline for titles, thumbnails, social media graphics, or any instance where you just need a basic stroke.
Select the Text Layer: In the Layers panel, which is usually located at the bottom right of the Photoshop interface, select the layer containing your text. If you haven't created a text layer yet, do so now using the Text Tool.
Access Layer Styles: There are a couple of ways to open the Layer Style window:
- Click the "FX" icon at the bottom of the Layers panel and select "Stroke" from the dropdown menu.
- Alternatively, you can double-click the text layer itself (but not on the text thumbnail). This action will also open the Layer Style window.
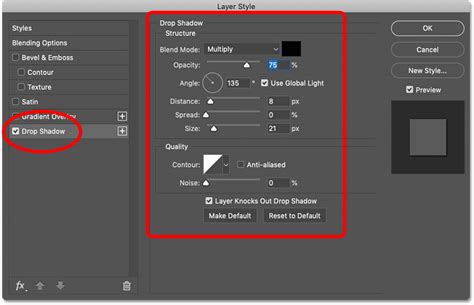
Apply the Stroke: On the left side of the Layer Style window, locate and check the "Stroke" option. This will apply a default stroke to your text.
Customize the Stroke: Once the Stroke option is checked, further options will appear below it, allowing you to customize the outline:
- Size: This slider controls the thickness of the outline. Increase or decrease the value to achieve your desired width.
- Position: You can choose whether the stroke is applied to the outside of the text (Outside), inside the text (Inside), or centered on the text's edge (Center). For most basic outlines, "Outside" is a common choice.
- Color: Click the Color Picker swatch to open a color selection dialogue. Here, you can choose any color for your outline. For example, a neon sign-inspired design can utilize a vibrant colored stroke to mimic the glow of real neon lights.
- Blend Mode: This controls how the stroke interacts with the text and any layers below it. "Normal" is usually the default and most appropriate for simple outlines.
- Opacity: Adjust the transparency of the stroke.
Method 2: Converting Text to a Vector Shape for Advanced Control
Compared to using Layer Styles, this method works by turning your text into a vector shape. Once converted, each letter becomes an editable path that you can adjust point by point. This offers a higher degree of control, especially if you need to fine-tune the shape of the outline or individual letters.
Select the Text Layer: As before, select the text layer you wish to convert in the Layers panel.
Rasterize or Convert to Shape:
- Rasterize Type: Right-click on the text layer and choose "Rasterize Type." This converts the text into pixels. While not strictly vector, it allows for more direct manipulation with drawing tools.
- Convert to Shape: For true vector paths, right-click on the text layer and select "Convert to Shape." This transforms the text into vector shapes, which are resolution-independent and can be scaled without losing quality.
Adjust Fill and Stroke: Once converted to a shape, you can use the top Options bar (or the Properties panel, which can be opened via Window > Properties) to set Fill and Stroke properties.
- Fill: You can set a fill color for the inside of the text or remove it entirely by setting the fill to "no color" (a transparent swatch).
- Stroke: Here, you can define the color, thickness, and other properties of the outline. This is where you can directly control the stroke of the vector path.
Edit Paths (Advanced): With the text converted to a shape, you can select the Direct Selection Tool (the white arrow) to manipulate the individual anchor points and path segments that make up each letter. This allows for intricate customization of the outline's shape.
Method 3: The Hollow Text Effect (Transparent Inside)
This effect is often referred to as the "Hollow Text" effect, where the inside of each letter becomes transparent, leaving only the outline visible. This is achieved by manipulating the Blending Options within the Layer Style.
Select the Text Layer: Ensure your text layer is selected in the Layers panel.
Open Layer Styles: Double-click the text layer or click the "FX" icon and select "Blending Options."
Apply Stroke: In the Layer Style window, check the "Stroke" option and configure its size, color, and position as desired.
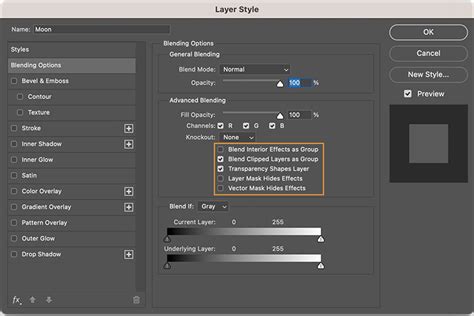
Adjust Fill Opacity: The key to the hollow text effect lies in the "Advanced Blending" section within the Blending Options. In the left list, click on "Blending Options: Default." Look for the "Fill Opacity" slider (not the regular "Opacity" slider, which affects the entire layer including the stroke). Drag the "Fill Opacity" slider all the way down to 0%. Leave the main "Opacity" slider at 100% to ensure the stroke remains fully visible.
- Tip: It is crucial to use "Fill Opacity" and not the general "Opacity." Fill Opacity controls the transparency of the layer's content (the text fill in this case), while Opacity controls the transparency of the entire layer, including any effects like strokes.
Enhancing Text Outlines with Texture
For an extra touch of creativity and to move beyond flat colors, you can enhance the text stroke by adding texture. This adds depth and a more sophisticated look to your outlined text.
Create a New Layer: Create a new layer above your text layer in the Layers panel. This new layer will be used for your texture.
Clip the Texture Layer: To ensure the texture only affects the text's outline, you need to "clip" this new layer to the text layer below. Right-click on the new texture layer and select "Create Clipping Mask." Alternatively, hold down the Alt (Option on Mac) key and click on the line between the texture layer and the text layer in the Layers panel.
Choose a Textured Brush: Select the Brush Tool (B). In the Brush Settings panel (Window > Brush Settings), choose a textured brush preset. Photoshop offers various built-in textures, or you can download and import custom brushes. Think about the kind of texture you want - gritty, speckled, or something else entirely.
Set Brush Color: Select a color for your texture. This could be a lighter or darker shade of your outline color, or a complementary color, depending on the desired effect.
Paint on the Texture Layer: With the texture layer clipped and the textured brush selected, "paint" over your text on the canvas. Since the layer is clipped, the brush strokes will only appear where the text outline exists. Experiment with different brush sizes and opacities to achieve the desired textured effect.
Beyond Static Designs: Adding Motion with Wondershare Filmora
While Photoshop is ideal when you're focusing on graphic design or static visuals like posters or social media banners, sometimes you want to add a dynamic element to your outlined text. For this, you can leverage video editing software like Wondershare Filmora. Filmora can help you create basic stroke effects and also add dynamic path animations with just a few clicks, breathing life into your designs.
Filmora 13 | Smooth TEXT Effect Like AE
Using Filmora for Animated Text Outlines:
- Start a New Project: Open Filmora and start a new project.
- Import Media: Import the video you want to edit by dragging it into the Media tab or clicking "Import Media."
- Add Titles: Go to the "Titles" tab at the top and browse through the available presets. You can pick from simple default titles or explore more creative templates that already have some animation built-in.
- Edit Text: Click on the title in your timeline to open the Text Editing panel on the right side.
- Enable Outline: To simply outline your text, find and enable the "Outline" option within the text editing controls.
- Adjust Outline Properties: Adjust the opacity, blur, and thickness sliders to control how bold or soft the outline appears.
- Custom Outline and Animation: For more advanced customization, you can design and create custom outline text using tools within Filmora, or even import text created in Photoshop. Filmora's Pen Tool allows you to carefully trace over your text as a visual guide in the Preview Window.
- Note: Clicking from one point to another with the Pen Tool creates a straight line. While tracing, refine your outline by adjusting the anchor points for smoother curves.
- Add Glowing Effects: If you want to add a glowing effect like neon and fire around the path, you can choose from the available presets within Filmora's effects library.
- Animate Path: To animate the appearance of the outline, you can utilize keyframing. Move the playhead to the time where you want the animation to finish. Change the relevant animation parameter (e.g., "End" for path drawing) to 100%. A second keyframe will be added automatically, creating a dynamic animation where the outline is drawn onto the text. After choosing the object and animation, click "Apply."
Streamlining Your Workflow with Specialized Tools
While working with Photoshop, you may have noticed the limitations and inconveniences of traditional keyboard and mouse operations, especially when performing repetitive tasks like adjusting brush sizes, zooming, or navigating layers. Thankfully, there are innovative tools available to streamline your workflow and boost your productivity.
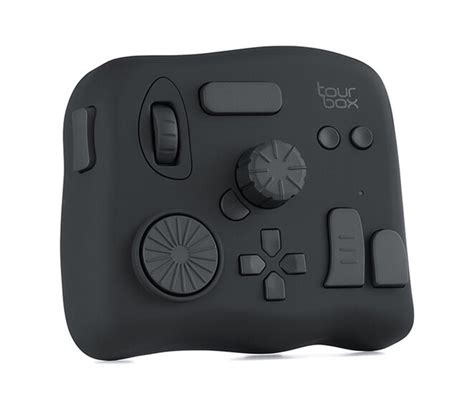
One such game-changing device is the TourBox. Designed specifically for creative professionals, TourBox offers a tactile and intuitive way to control your software. With TourBox, you can easily adjust brush sizes, zoom in and out, pan across your canvas, and navigate through layers with precision and speed, all without constantly reaching for your keyboard. This allows for a more fluid and focused creative process, reducing the time spent on tedious manual adjustments and freeing you up to concentrate on the artistic aspects of your design.
Conclusion: The Impact of Outlined Text
Outlining text in Photoshop is one of those simple techniques that can completely change how you design your text, making it more legible and impactful. Whether you need a subtle enhancement for a minimalist design or a bold statement for a headline, the methods discussed provide flexibility and control. If you want to take things up a notch, try adding some motion to your outlined text. You can do it all inside video editing software like Filmora, or even bring in text you've meticulously crafted in Photoshop and animate it there for dynamic presentations or video content. When you want your text to truly stand out against the background, adding an outline is often the most effective answer, ensuring your message is not only seen but also remembered.