DaVinci Resolve has rapidly ascended from a specialized color grading application to a formidable all-in-one solution for video editing, visual effects, motion graphics, color correction, and audio post-production. Its robust capabilities, coupled with a remarkably powerful free version, have captured the attention of both seasoned professionals and burgeoning hobbyists. Whether you're a complete novice to video editing software or seeking to transition from another platform, this tutorial will guide you through the essential steps to get you up and running quickly with this exceptional program. You'll progress from the initial launch of the software to sharing your completed video project, focusing on solo editing techniques to set you on your path.
Getting Started: Project Creation and Workspace Familiarization
The journey into DaVinci Resolve begins with the creation of a new project. Upon launching the application, you'll be presented with the Project Manager. Here, you can either select an existing project or initiate a new one by clicking the "New Project" button.
Creating and Naming Your Project
To create a new project, simply click on "Untitled Project" or the "New Project" button. You'll then be prompted to give your project a name. After naming it, click "Create."
Understanding Project Settings
Before diving into media import and editing, it's highly recommended to adjust your project settings. Access these by navigating to "File" > "Project Settings" or by clicking the gear icon located at the bottom-right of the interface. For beginners, many of these settings can be left at their default. However, it's crucial to ensure that your "Timeline frame rate" and "Timeline resolution" align with the video files you intend to import. These settings are typically found under the "Master Settings" section. If you're unsure, don't worry; you'll have another opportunity to adjust the frame rate when you import your footage.
Navigating the DaVinci Resolve Workspace
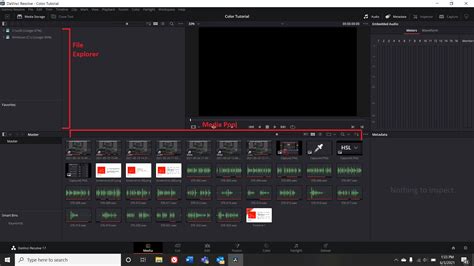
DaVinci Resolve is intelligently organized, with each stage of the editing workflow represented by a dedicated workspace, accessible via the tabs located at the bottom of the screen. These seven distinct pages are: Media, Cut, Edit, Fusion, Color, Fairlight, and Deliver. For this foundational tutorial, we will concentrate on the Media, Cut, and Edit pages.
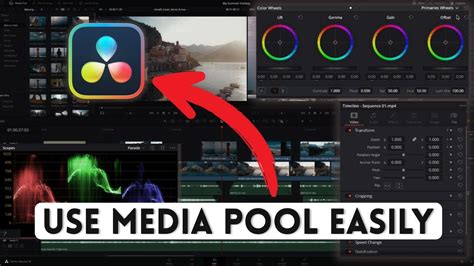
- Media Page: This is the default page upon opening DaVinci Resolve. It serves as your central hub for importing footage, organizing it into bins (folders), and creating new timelines.
- Cut Page: Designed for speed and efficiency, the Cut page offers a simplified editing environment. It's ideal for creating a first, rough cut of your project and is excellent for quickly scrubbing through footage to identify the best takes or B-roll clips.
- Edit Page: This is the comprehensive, Swiss Army knife of DaVinci Resolve's workspaces. Most editors will spend the majority of their time here, utilizing its extensive tools for fine-tuning footage, applying transitions, managing effects, and accessing video clips with ease.
- Fusion Page: For advanced visual effects and motion graphics, the Fusion page provides an incredibly powerful node-based compositing environment. While it has a steeper learning curve, it offers unparalleled creative control.
- Color Page: DaVinci Resolve's renowned color grading and correction capabilities reside here. It's a dream for colorists, offering a vast array of tools to sculpt the look and feel of your footage.
- Fairlight Page: Dedicated to audio post-production, the Fairlight page is equipped with advanced tools for mixing, editing, and mastering audio.
- Deliver Page: This is where you prepare your finished project for export to various platforms, including your local drive or social media.
It's beneficial to experiment with each workspace to discover which best suits your workflow. You can also customize your layout and create saved presets for quick access.
Importing and Organizing Your Media
With your project set up, the next logical step is to import your video and audio assets. DaVinci Resolve supports a wide array of file formats, making this process straightforward.
Importing Media Files
There are several ways to import your media:
- Drag and Drop: The most intuitive method is to simply drag and drop your video and audio files directly from your computer's file explorer into the "Media Pool" within the "Media Page."
- Import Menu: Alternatively, you can navigate to "File" > "Import" > "Import Media." On Mac, the shortcut is Command + I (⌘I), and on Windows/Linux, it's Control + I (CTRL + I).
- Right-Click within Media Pool: You can also right-click within the "Media Pool" (on the Media, Cut, or Edit pages) and select "Import Media."
Once imported, your media will appear in the "Media Pool." To maintain an organized workflow, it's highly recommended to create "bins" (folders) within the "Media Pool" to categorize your footage, audio, graphics, and other assets. Logical naming conventions for both bins and timelines are also essential. For instance, naming timelines with an iteration and version number, such as "Ride A Bike_V01_01," aids in managing complex projects.
Marking In and Out Points
Before adding clips to your timeline, you can mark specific sections to work with. In the "Source Viewer" (on the Media or Edit pages), hover over a clip's thumbnail or double-click it to preview. Use the "I" key to set an "in-point" and the "O" key to set an "out-point." This allows you to select only the desired portion of a clip for editing, which is particularly useful for B-roll footage.
Crafting Your Narrative: Editing in the Timeline
The core of video editing takes place in the timeline. DaVinci Resolve offers flexible tools for arranging, cutting, and refining your footage.
Creating and Working with Timelines
To create a new timeline, right-click within the "Media Pool" and select "Timelines" > "Create New Timeline" (⌘N on Mac, CTRL + N on Windows). You can also go to "File" > "New Timeline." A pop-up window will allow you to configure your timeline settings, such as resolution and frame rate, or you can choose to "Use Project Settings."
Once your timeline is created, you can drag and drop clips from the "Media Pool" onto it. The "Edit Page" provides a dual-timeline system: an upper timeline for an overall project view and a lower timeline for detailed editing.
Essential Editing Tools
The "Edit Page" features a toolbar above the timeline with several crucial tools:
- Selection Mode (Hotkey A): This is your primary tool for selecting, moving, and arranging clips on the timeline. You can also shorten or lengthen clips by dragging their ends.
- Blade Tool (Hotkey B): This tool allows you to make precise cuts within your footage. Click on the clip where you want to make a cut, and a line will appear, dividing the clip.
- Trim Mode (Hotkey T) / Dynamic Trim Mode (Hotkey W): These modes offer more advanced ways to adjust the start and end points of clips without affecting adjacent clips or the overall timeline structure.
Refining Your Edits
Editing is an iterative process. You'll want to arrange your footage to tell a compelling story, cutting out unnecessary pauses, questions, or unwanted segments. For interviews, use the audio waveforms as a guide: large, sustained waveforms typically indicate spoken answers, while gaps suggest questions or pauses.
- Cutting Interview Footage: Drag your interview clip to the timeline. You'll notice multiple audio tracks. You can unlink these (right-click and select "Unlink Audio Clips") to delete unwanted audio, such as the interviewer's questions.
- Rearranging the Narrative: Once clips are cut, you can drag them to different positions on the timeline to restructure your narrative.
- Jump Cuts: A jump cut occurs when footage abruptly shifts due to an intervening segment being removed. While sometimes used stylistically, they can be jarring.
- Hiding Jump Cuts: Adding B-roll footage over a jump cut is an excellent technique to smooth out the transition and enhance visual interest.
Edit like a Pro for FREE! Davinci Resolve Beginners tutorial
Enhancing Your Project: B-roll, Music, and Text
To elevate your video from basic footage to a polished production, incorporating B-roll, music, and text elements is key.
Incorporating B-roll
B-roll footage, which can be clips you've shot yourself or stock footage, is invaluable for adding visual depth and context. It can illustrate points made in the interview, provide establishing shots, or, as mentioned, hide jump cuts. DaVinci Resolve allows you to easily layer B-roll footage over your main clips on the timeline.
Adding Music and Audio
Audio is as crucial as video. You can import music and sound effects similarly to video files. On the "Edit Page," you can adjust clip volumes. For more sophisticated audio editing, the "Fairlight Page" offers a comprehensive suite of tools.
- Keyframing Audio: To precisely control music or sound effects, you can use keyframes to adjust volume levels at specific points in time. This allows music to swell or fade according to your editing decisions.
- Audio Waveforms: Utilize audio waveforms on the timeline to visually identify audio events and make precise cuts.
Adding Text and Titles
Text overlays are essential for introducing subjects, providing context, or displaying information.
- Text Tool: DaVinci Resolve offers two primary text tools:
- Text: This is for quickly generating 2D titles. You can modify fonts, add drop shadows, and even include background shapes.
- Text+: Based on DaVinci Resolve Fusion, Text+ offers more advanced customization and animation possibilities but can be more resource-intensive.
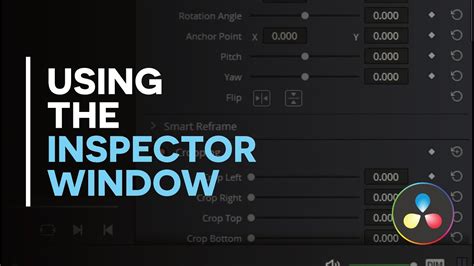
- Applying Text: Access the "Effects Library" (magic wand icon), navigate to "Titles," and drag your desired text effect onto the timeline above your video track. You can then customize the text, font, size, color, and position in the "Inspector" panel.
Polishing Your Production: Color Grading and Audio Enhancement
Once the core edit is in place, refining the visual and auditory aspects of your video will significantly enhance its professional appeal.
Basic Color Grading
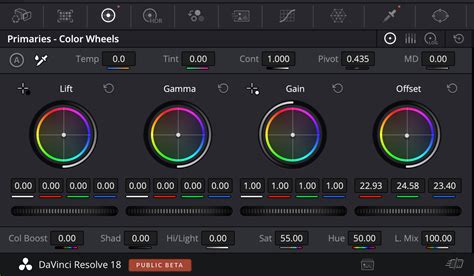
The "Color Page" is where you'll perform color correction and grading. While a deep dive into color grading is extensive, basic adjustments are accessible.
- Color Wheels: The primary color wheels (Lift, Gamma, Gain, Offset) allow you to adjust the shadows, mid-tones, highlights, and overall image.
- Saturation: The "Sat" value controls the intensity of colors in your image.
- Grab Still: To apply a consistent look across multiple clips, grade one clip to your satisfaction, then right-click it and select "Grab Still." This saves a thumbnail in the "Gallery" (top-left of the Color page). You can then drag this still onto other clips to apply the same grade. Individual tweaks can be made afterward.
- Scopes: Tools like the "Waveform" and "Vectorscope" provide objective visual data about your image's exposure and color balance, aiding in accurate adjustments.
Audio Sweetening
Even with good audio recording, a little enhancement can make a big difference.
- Dialogue Processor: On the "Edit Page," you can find audio effects in the "Effects Library." The "Dialogue Processor" is a convenient preset that can significantly improve the clarity and richness of spoken audio. You can apply presets or tweak individual settings.
- Fairlight Page: For more advanced audio manipulation, the "Fairlight Page" offers a professional-grade mixing environment with extensive effects and control over individual audio tracks.
Finalizing Your Project: Exporting
The final step is to export your completed video project.
The Deliver Page
Navigate to the "Deliver" page. Here, you'll find a comprehensive set of export settings.
- Custom Export: You can configure custom settings for resolution, frame rate, codec, and more.
- Presets: DaVinci Resolve offers numerous presets for various platforms (e.g., YouTube, Vimeo) and devices, simplifying the export process.
- Render Queue: Once your settings are finalized, click "Add to Render Queue." Your project will be added to a queue on the right side of the screen. You can queue multiple renders if needed.
- Rendering: Click "Render All" to begin the export process. A status window will display the progress.
Once rendering is complete, your video is ready to be shared with the world.
Beyond the Basics
This tutorial has provided a foundational understanding of DaVinci Resolve. The software's versatility means there's always more to learn. Explore the advanced features of the Fusion and Color pages, delve deeper into Fairlight for audio mixing, and experiment with multicam editing. DaVinci Resolve's continuous development, with new features being added regularly, ensures it remains a powerful and relevant tool for creators of all levels. For those looking to further their skills, numerous resources, including official Blackmagic Design training and extensive online tutorials, are available.