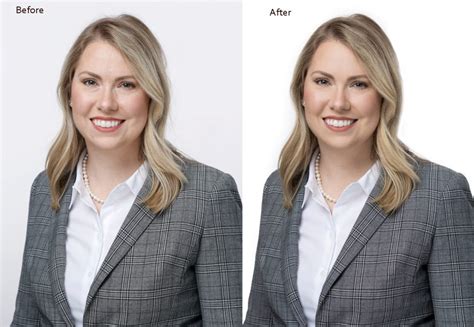
In today's visually driven world, a compelling headshot is an essential tool for professionals across myriad industries. From corporate executives and influential entrepreneurs to actors and aspiring models, a well-crafted headshot serves as a crucial first impression, representing individuals within their respective communities. This has propelled headshot photography into a prominent and specialized niche within the broader photography landscape. However, the reality of raw headshot photographs often includes imperfections that necessitate retouching before they can be presented to clients or the public. These flaws can range from common skin concerns like acne and blemishes to the appearance of dark spots and under-eye bags. Consequently, headshot retouching has become an indispensable step in the post-production process, leading many photographers to either outsource this service to professional photo editing companies or to develop their own in-house editing skills. This tutorial aims to equip photographers who prefer a do-it-yourself approach with the knowledge and techniques to effectively retouch headshots using Adobe Photoshop.

Headshot photography, by its nature, focuses on the head and shoulders of the subject. This close-up perspective means that any imperfections on the face, such as acne, blemishes, red-eye, eye bags, dark circles, or even rough skin texture, are captured in fine detail. Therefore, editing headshots in Photoshop is not merely an aesthetic choice but often a necessity for presenting a polished and professional image.
The Foundational Steps: Preparing Your Image in Photoshop
The journey of headshot retouching begins with the fundamental act of opening your chosen photograph within the Photoshop environment. This can be accomplished through the conventional File > Open menu, or more swiftly by simply dragging and dropping the image directly onto the Photoshop canvas. Upon opening, the Layers panel, typically located on the right side of the interface, will display a default layer named "Background." The immediate and crucial next step is to create a duplicate of this background layer. This is best done by right-clicking on the "Background" layer and selecting the "Duplicate Layer" option from the context menu. A pop-up window will then appear, allowing you to rename the newly created layer. It is advisable to rename this duplicated layer to "Retouch" for clarity and organizational purposes.
Tackling Imperfections: The Spot Healing Brush and Frequency Separation
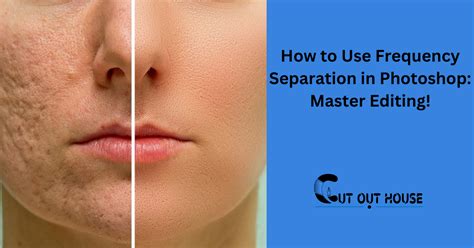
With the "Retouch" layer established, the focus shifts to addressing minor skin imperfections. The Spot Healing Brush tool, activated by pressing the "H" key on your keyboard, is an invaluable asset for this task. This intuitive tool allows you to effortlessly click on and remove blemishes, acne, and other small spots, rendering the skin smooth and clear. After meticulously working through the "Retouch" layer to eliminate these visible flaws, the next phase involves a more sophisticated technique known as frequency separation, which helps to preserve natural skin texture while smoothing out larger areas.
To initiate this process, create another copy of the "Retouch" layer and rename it to "Blur." With the "Blur" layer selected, navigate to Filter > Blur > Gaussian Blur. This will open a new tab where you can adjust the blur radius. Experiment with different values until you achieve a subtle blur that smooths out the skin without completely obliterating its natural texture. The precise amount of blur will depend on the resolution and detail of your original image.
Following this, duplicate the "Retouch" layer once more, this time naming it "Texture." Select the "Texture" layer and go to Edit > Apply Image. In the "Apply Image" dialog box, choose the "Blur" layer from the "Layer" dropdown menu and ensure the "Blending" mode is set to "Subtract." This operation will effectively isolate the texture information from the blurred layer. After applying the image, you will need to modify the blending mode of the "Texture" layer. Changing it to a mode like "Linear Light" or "Overlay" will allow you to see the effect of the texture layer working in conjunction with the layers below.
Now, to refine the application of this texture, add a Layer Mask to the "Texture" layer. Select the Brush Tool, ensuring it has a soft edge, and reduce its opacity to around 40%. Begin painting over the areas of the face where you want to smooth out rough patches or uneven skin tone. As you paint, you will observe the skin becoming progressively smoother while retaining its natural detail. This method of separating frequency (color and tone from texture) is fundamental to achieving natural-looking retouching.
Enhancing Contrast and Color: Curves and Beyond
Once the skin has been addressed, the final touches involve enhancing the overall impact and appeal of the headshot. A Curves adjustment layer, applied on top of all existing layers, is an excellent tool for improving the image's contrast and overall aesthetic. By selecting the Curves adjustment layer and subtly dragging the curve upwards from its midpoint, you can introduce a pleasing contrast that makes the subject's features pop and adds depth to the image.
Beyond the core Photoshop techniques, other editing programs and online tools offer accessible ways to refine headshots, particularly for those who prefer a more streamlined or beginner-friendly approach. Programs like Adobe Lightroom, while professional-grade and offering advanced capabilities, can also be complex for newcomers. For those seeking a free, yet effective, alternative, online platforms and mobile applications like BeFunky provide a suite of tools suitable for DIY headshot editing.
DIY Headshot Editing with BeFunky: A Step-by-Step Approach
When embarking on the DIY headshot editing journey, several key considerations can elevate your results. The first step often involves Cropping. It's essential to eliminate any extraneous background elements that might detract from the subject, focusing the viewer's attention on the expression and the individual. A more dynamic composition can often be achieved by intentionally placing the subject off-center, adhering to the rule of thirds, rather than centering their head.
The Rotate Tool offers a simple yet effective way to correct any slight tilts or to introduce a subtle angle for visual interest. Following this, the Color adjustments play a significant role in bringing a photograph to life. Experimenting with the Hue slider can help neutralize any unwanted green or magenta casts, while the Temperature slider (often referred to as "warmth") allows for fine-tuning the overall color balance to create a more pleasing and natural look.
The Exposure Tool is fundamental for managing the brightness of the image. Adjusting the overall brightness, highlights, and shadows allows you to balance the light and ensure that no crucial details are lost in overly bright or dark areas. Critically, when it comes to Skin Smoothing, the aim is to appear natural, not artificial. Over-smoothing can lead to a plastic-like appearance. A subtle approach, combined with the ability to selectively remove smoothing from areas that should remain sharp (like eyes or lips), is paramount. The Blemish Fix tool is straightforward for removing individual imperfections, but it's wise to zoom in to ensure the fix is seamless and doesn't leave any noticeable artifacts. Finally, the Teeth Whiten tool can provide a subtle enhancement, ensuring a bright and confident smile.
Advanced Techniques and Professional Considerations
For those who delve deeper into headshot retouching, advanced techniques can yield even more refined results. Enhancing the eyes, for instance, is a crucial aspect of portraiture. Using a Radial Filter to boost contrast and color within the iris can make the eyes appear more vibrant and engaging. Careful use of the Brush tool to erase the outer parts of the filter ensures the effect is contained within the iris.
Addressing skin texture with tools like the High Pass filter, followed by a Gaussian blur and judicious use of layer masks, is a more advanced manifestation of frequency separation that allows for precise control. When dealing with "hot spots"âareas of the image that are excessively bright and can make the skin appear oilyâthe Patch tool is highly effective. By making rough selections around hot spots and dragging them to clearer areas, these distractions can be seamlessly removed.
Sharpening is another area where nuanced application can make a difference. Sharpening solely on the red channel, for example, can target texture without over-emphasizing skin grain. This can be further refined by creating custom Actions in Photoshop to automate repetitive sharpening tasks, saving significant time.
Dodging and burning, a classic photographic technique, can be replicated in Photoshop to selectively lighten (dodge) and darken (burn) specific areas of the face, sculpting features and adding dimension. This is achieved by creating a new layer set to an "Overlay" blend mode and painting with black or white to adjust luminosity. Applying a Gaussian blur to this layer can soften the brushstrokes for a more natural integration.
Even seemingly minor issues like frizzy hairs can be addressed with tools like the Spot Healing Brush or Clone Stamp tool, though patience and precision are required. For overall skin tone refinement and to ensure natural texture, using the Patch tool with the "Normal" setting and adjusting layer opacity can be highly effective.
It is important to remember that while DIY editing can significantly improve a headshot, professional photographers often leverage the full power of sophisticated software like Lightroom and Photoshop, combined with their expertise in lighting and composition. The results achieved with professional tools and a seasoned retoucher can often surpass even the most diligent DIY efforts, offering a level of polish and impact that is ten times greater. However, for those in a pinch or who wish to take control of their image, practicing these editing techniques will undoubtedly elevate their headshots to a more professional standard. The beauty of digital editing lies in its iterative nature; mistakes can be undone, and adjustments can be revisited, allowing for continuous improvement and exploration of different looks.
The demand for high-quality headshots is driven by the pervasive influence of social media and the need for individuals to present a polished online persona. This has made DIY headshot photo editing an accessible and popular option for many. The key is to approach editing with the goal of enhancing natural features rather than creating an artificial representation. By mastering these techniques, individuals can ensure their headshots accurately and effectively represent them in the digital age.