Adobe Photoshop, a cornerstone of digital artistry and design, offers a rich tapestry of tools and features designed to empower creators. Among these, the concept of patterns plays a significant, albeit sometimes overlooked, role. At the heart of this functionality lies the .PAT file, a specialized format that unlocks a world of seamless textures and repeating designs. Understanding what a .PAT file is and how to leverage its potential can dramatically enhance your creative workflow, from brush creation to intricate layer styling.
The Essence of .PAT Files: More Than Just Textures
A .PAT file, in the context of Adobe Photoshop, is a file format specifically designed to store multiple seamless patterns or textures. Unlike common image formats like .JPG or .PNG that typically store a single image, a .PAT file can house a collection of these repeating designs. These patterns are meticulously crafted to tile seamlessly, meaning they can be repeated endlessly without visible seams or interruptions. This characteristic makes them invaluable for creating backgrounds, filling areas, and adding consistent texture across larger design elements.
When you encounter patterns for download from the internet, it's crucial to identify files with the .PAT extension. These are the files that Photoshop recognizes and can load directly into its Pattern list. Other texture file extensions, such as .JPG, while containing visual information, do not possess the inherent tiling capabilities or the specific structure required for Photoshop's pattern management system.
Importing and Managing Your Pattern Library
Integrating custom patterns into your Photoshop workflow is a straightforward process, primarily revolving around the .PAT file.
Direct Loading via Double-Click
The most immediate way to add a .PAT file to your Photoshop patterns is through a simple double-click. With Adobe Photoshop open, locate the downloaded .PAT file on your system and double-click it. This action typically triggers Photoshop to load the patterns contained within the file directly into your Pattern list.
The Preset Manager: A Central Hub for Patterns
For more comprehensive management of your pattern library, the Preset Manager is the indispensable tool. To access it, navigate to Edit > Presets > Preset Manager. Within the Preset Manager, open the "Preset Type" dropdown menu and select "Patterns." This reveals all the patterns currently loaded into your Photoshop.
From here, you gain several powerful options:
- Adding New Patterns: Click the "Load" button to browse your system and import additional
.PATfiles. Alternatively, you can click the small cog icon in the upper right corner of the Preset Manager to access Photoshop's built-in pattern sets, which are quite extensive. These pre-loaded sets include categories such as "Artist Surfaces," "Canvas," "Color Paper," "Erodible Textures," "Grayscale Paper," "Legacy Patterns," "Nature Patterns," "Patterns 2," "Patterns," "Rock Patterns," "Texture Fill 2," "Texture Fill," "Watercolour Patterns," and "Web Patterns." The sheer variety available can be quite astonishing, offering a wealth of creative starting points. - Organizing Patterns: You can drag and drop pattern presets within the Preset Manager to reorder them according to your preference, making your most-used patterns easily accessible.
- Saving Custom Sets: While not explicitly detailed in the provided information, the Preset Manager also allows for saving custom sets of patterns, which can be incredibly useful for project-specific workflows.
The Patterns Panel: A Modern Approach
In more recent versions of Adobe Photoshop (specifically, CC 2019 and later), the Patterns panel offers a more streamlined interface for managing and applying patterns. To access it, go to Window > Patterns. This panel provides a visual preview of your patterns and allows for direct application. If you are using older versions of Photoshop, the Preset Manager remains the primary method for pattern management.
Where Patterns Shine: Applications Across Photoshop
The utility of .PAT files extends far beyond a simple fill. Patterns are intricately woven into various Photoshop features, empowering designers to add depth, texture, and visual interest to their work.
Pattern Fill and Adjustment Layers
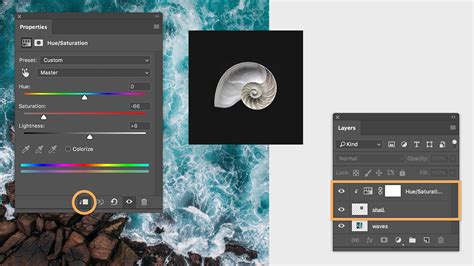
One of the most direct applications of patterns is through the Pattern Fill adjustment layer or the Pattern Fill dialog. When you select "Pattern Fill" from the New Fill or Adjustment Layer icon at the bottom of the Layers panel, a dialog box appears with a Pattern dropdown menu. Clicking the small cog icon in the upper right of this dropdown is another way to add patterns, mirroring the functionality within the Preset Manager. This allows you to quickly apply any loaded pattern as a new layer, which can then be adjusted in terms of scale, angle, and other properties.
Content-Aware Fill
The "Content-Aware Fill" feature, accessible via Edit > Fill, offers a "Pattern" option within its "Contents" dropdown. This allows Photoshop to intelligently fill a selected area with a chosen pattern, taking into account the surrounding content to create a more seamless integration.
Layer Styles: Adding Dimension and Detail
Patterns are integral to several Layer Styles, enabling sophisticated visual effects:
- Pattern Overlay: This is perhaps the most direct application within layer styles. The Pattern Overlay option allows you to fill the content of a layer with a selected pattern. You can control the blend mode, opacity, scale, and even the angle of the pattern.
- Bevel and Emboss: Within the "Texture" section of the Bevel and Emboss layer style, patterns can be used to define the surface texture of the embossed or debossed effect. This adds a tactile quality to otherwise flat shapes.
- Stroke: The Stroke layer style, when set to "Fill Type: Pattern," allows you to apply a pattern as the outline of a shape or text. This offers a more decorative and textured alternative to solid color strokes.
Brush Creation and Textures
The concept of patterns is intrinsically linked to brush creation in Photoshop, particularly when utilizing the "Texture" section of the Brush Settings panel. When you add a texture to a brush, you are essentially incorporating a pattern. This .PAT file, even though it's used as a grayscale representation within the brush engine, significantly influences how the brush applies its stroke.
Several Brush Tools leverage this texture capability, allowing for more dynamic and nuanced brushwork:
- Mixer Brush Tool
- Pencil Tool
- Eraser Tool
- History Brush Tool
- Art History Brush Tool
- Clone Stamp Tool
- Dodge Tool
- Burn Tool
- Sponge Tool
The Pattern Stamp Tool is a dedicated tool that directly utilizes patterns for painting. It allows you to paint with a pattern directly onto your canvas, offering precise control over application.
Tools with Pattern Options in the Options Bar
Beyond dedicated tools, several other commonly used tools offer pattern selection in their Options Bar:
- Paint Bucket Tool: In the Foreground dropdown menu, you can select "Pattern." This allows you to "pour" a pattern directly onto a layer, much like filling with a solid color. This feature is often a delightful surprise to users who might not expect such a direct pattern application.
- Healing Brush Tool: While seemingly counterintuitive, the Healing Brush Tool can also utilize patterns, contributing to more complex retouching and texturing tasks.
- Shape Tools: When a Shape Tool is set to "Shape" and you click on the "Fill" swatch in the Options Bar, you'll find a pattern list available. This enables you to create shapes filled with patterns directly.
The sheer ubiquity of pattern application across Photoshopâs toolset is a testament to their importance in adding detail and visual richness to designs.
Creating Your Own Patterns: From Image to Seamless Design
Transforming your favorite textures or images into reusable Photoshop patterns is a valuable skill that expands your creative arsenal.
Steps to Define a Pattern:
- Open the Source Image: Open the texture or image you wish to convert into a pattern. This can be a
.JPG,.PSD, or any other compatible image file. - Select the Area (Optional but Recommended): For optimal results, it's often best to select the portion of the image you want to use as your repeating tile. This ensures you have a defined area for your pattern.
- Define as Pattern: Navigate to
Edit > Define as Pattern. - Name Your Pattern: A dialog box will appear prompting you to name your new pattern. Choose a descriptive name that will help you easily identify it later.
- Confirmation: Once named, click "OK." Your newly created pattern will now appear at the bottom of your Pattern list, ready for use.
For a pattern to be truly seamless, the edges of your selected area must align perfectly. This often involves careful editing, such as using offset filters or cloning to blend the edges.
Advanced Techniques: Patterns for Specific Effects
The application of patterns extends to more nuanced techniques, particularly in achieving specific artistic effects.
Adding Noise and Grain with Pattern Adjustment Layers
A sophisticated technique involves using Pattern Adjustment Layers to add realistic noise or grain to an image, a method championed by some retouchers for its ability to unify composite images and impart a vintage feel.
Steps for Creating a Noise Pattern:
- Create a New Layer: In the Layers panel, click
SHIFT + CTRL + N(orSHIFT + CMD + Non Mac) to create a new layer. Name it "Noise." - Set Blend Mode and Color: Set the layer's blend mode to "Overlay" and check the "Fill with overlay-neutral color (50% Gray)" option. This neutral layer serves as a base for the noise effect.
- Apply Noise Filter: Go to
Filter > Noise > Add Noise. Experiment with the amount (e.g., 3, 5, or 8) and distribution (Uniform or Gaussian) to achieve your desired grain. - Convert to Pattern: With the noise layer active, go to
Edit > Define as Patternand name it appropriately (e.g., "SJ Add Noise 5-Gaus .3-Desat -50" to remind you of the settings). - Create a Pattern Adjustment Layer: At the bottom of the Layers panel, click the Adjustment Layer icon and select "Pattern."
- Select Your Noise Pattern: In the Pattern Fill dialog, navigate to the bottom of the Patterns list and select the noise pattern you just created.
- Adjust Scale: Use the "Scale" slider to control the intensity of the noise.
- Save to Library: Open the Library panel (
Window > Libraries) and drag the newly created Pattern Adjustment Layer into it. This allows you to quickly reapply this specific noise effect to any image.
This method offers incredible flexibility, as you can create various noise patterns using different filter settings, blurs, and saturation adjustments, saving each as a distinct pattern in your Library for quick access.
Texturing Specific Elements with Clipped Patterns
Patterns can be precisely applied to specific elements within an image using clipping masks. This is particularly useful for adding texture to isolated objects or figures without affecting the rest of the composition.
Example: Texturing Birds in an Image
Imagine adding a flock of birds to a beach scene. To give these birds more definition and visual interest, you can apply a textured pattern specifically to them.
- Add Birds: Import or paint your bird elements onto a new layer.
- Add Pattern Fill Layer: Create a new Pattern Fill Adjustment Layer above the bird layer.
- Select Pattern: Choose a suitable textured pattern (e.g., a brown texture with beige lines).
- Clip the Pattern: With the Pattern Fill layer selected, press
ALT + click(orOption + clickon Mac) between the Pattern Fill layer and the bird layer in the Layers panel. This creates a clipping mask, ensuring the pattern only affects the pixels in the layer directly below it â in this case, the birds. - Adjust Scale and Position: Use the "Scale" slider and drag within the image to reposition the pattern to achieve the desired effect, adding subtle definition to the birds' wings and bodies.
This technique makes a significant difference in the perceived quality of an image, elevating it from a simple composite to a more finished and polished piece.
21 PHOTOSHOP TIPS – Easy Through Advanced!
Patterns and Cross-Platform Compatibility: A Word of Caution
While .PAT files are a Photoshop standard, their compatibility with other software can be a point of confusion. Some users have inquired about using .PAT files in GIMP, an open-source image editor. While GIMP can handle .PAT files to some extent, it's important to exercise caution. The .pat extension is not exclusive to Photoshop and can be used by other programs for different purposes. Therefore, GIMP's ability to interpret a .PAT file is dependent on the specific program that generated it. User experiences with GIMP's .PAT import functionality have been mixed, with some finding it unreliable or the user interface cumbersome. For seamless cross-platform pattern usage, it's often best to define patterns within the target software or use more universally compatible image formats for textures.
Conclusion: A Fundamental Element of Creative Design
In essence, .PAT files are the key to unlocking a versatile and powerful pattern system within Adobe Photoshop. From enhancing brushes and styling layers to creating intricate backgrounds and adding subtle textures, patterns offer endless possibilities for creative expression. By understanding how to import, manage, create, and apply these seamless designs, you can significantly elevate the quality and depth of your digital artwork. The seemingly simple .PAT file is, in fact, a cornerstone of sophisticated design, empowering artists to infuse their creations with rich detail and visual complexity.