The Content-Aware Scale tool in Photoshop stands as a remarkably powerful, yet often underutilized, feature for photographers and designers. Its primary function is to intelligently adjust the composition and alter the aspect ratio of an image without introducing the undesirable distortions that plague traditional scaling methods. This tutorial will delve into the intricacies of this tool, providing a step-by-step guide to harnessing its capabilities for a variety of editing scenarios.
Understanding the Core Concept of Content-Aware Scale
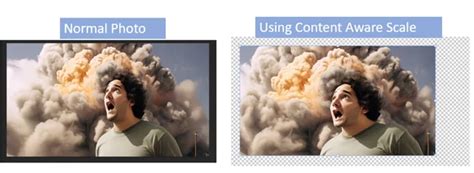
At its heart, Content-Aware Scale (CAS) is designed to help you resize and reshape your photos intelligently. Unlike standard scaling, which stretches or compresses every pixel equally, CAS analyzes the scene, attempting to identify and protect the most important areas - typically your main subject - while allowing less critical elements to be compressed or expanded. This preserves the integrity of your focal points, preventing them from appearing distorted, pinched, or unnaturally stretched.
The usual way to change a photo's aspect ratio is to simply crop it using the Crop Tool, but that often means throwing away parts of the image you wanted to keep. CAS offers an alternative, allowing you to change the photo into a different aspect ratio without getting rid of pixels and having to crop the edges. For instance, if you have a photo shot in a 2:3 ratio but need to change it to a 1:1 (square) for a print, CAS can help achieve this without sacrificing crucial parts of the image.

The Fundamental Workflow: Getting Started with Content-Aware Scale
To begin using Content-Aware Scale, you'll need to unlock your background layer. Navigate to the Layers Panel (usually located in the bottom right corner of your workspace) and click the lock icon to unlock the layer. Once unlocked, the layer will typically be renamed to "Layer 0".
Next, you'll need to select the Content-Aware Scale tool. This can be found by going to Edit > Content-Aware Scale. Upon activation, you should see a light blue border and anchor points appear around your image, indicating that the tool is ready for use.
Now, click and drag on the edge of your photo to pull the image inwards or outwards, effectively changing its aspect ratio. As you drag, you'll notice that Photoshop is attempting to protect your subject while the rest of the image warps inwards or outwards. You can click and drag on any edge of the image to adjust the aspect ratio in any direction.
Once you've achieved the desired aspect ratio, you may find that transparent pixels (represented by a checkerboard pattern) have appeared around the edges of your image. To crop these out, you can use Photoshop's Trim feature. Go to Image > Trim, and select "Transparent Pixels" to remove these areas.
When Content-Aware Scale Excels: Ideal Scenarios
Content-Aware Scale doesn't work on just any image. Its effectiveness is largely dependent on the content of the photograph. It works best on photos where the importance of different areas is obvious. Think of images with large areas of low detail, such as blue skies, oceans, or expansive, uncluttered backgrounds. These low-detail areas are easily blended and manipulated when CAS moves them around because they don't contain intricate details that can become messy when compressed or stretched.
For example, consider a landscape photographer like Austin James Jackson, who often needs to adjust compositions. If a photographer has a wide landscape and wants to make it more square for a particular layout without losing the trees on the edges, CAS can be invaluable. It looks for areas that don't have too much detail and compresses those while preserving areas with more detail.

Addressing the Limitations: When CAS Struggles
Oftentimes, Content-Aware Scale will struggle to produce desirable results. Since Photoshop has to decide which parts of your image are important, it can falter on images with complex compositions or subjects that are not clearly distinguishable from their surroundings.
If you try to reshape an image with significant detail in the areas being manipulated, things can quickly turn into a jumbled mess. For instance, if you have a photo with intricate patterns or textures in the background, CAS might distort these elements unnaturally. The tool wasn't made to work on every single photo, and on most images, you won't achieve a perfect result without further intervention. Don't expect to be able to turn a beautiful panorama into a vertical photo that looks great on social media without some compromises.
Advanced Techniques: Protecting Your Subject with Precision
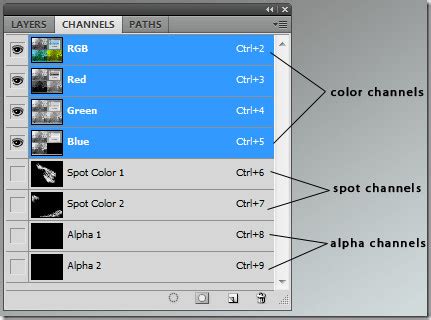
When Photoshop's automatic analysis isn't sufficient, you can take a more proactive approach by telling Photoshop which areas to protect. This is where selections and alpha channels become invaluable.
Protecting Skin Tones
For images where your subject is a person and their face is visible, you can try using the "Protect Skin Tones" option. This tells Photoshop to protect any warm skin tones, which in theory helps to ensure that people in your photo blend smoother after scaling. However, this tool's effectiveness varies, and you'll need to experiment to see how it works in each instance. This option tends to work best when your subject takes up at least one-third of the frame.
How To Use CONTENT-AWARE SCALE in Photoshop - ADVANCED Methods
Using Selections and Alpha Channels for Greater Control
One of the most powerful ways to use Content-Aware Scale is to combine it with alpha channels. This involves creating a precise selection around the areas you want Photoshop to preserve during the scaling process.
- Make a Selection: Use Photoshop's selection tools, such as the Lasso Tool (shortcut L) or the Object Selection Tool, to draw around your subject or any other critical elements you want to protect. Be somewhat loose with the selection; it doesn't need to be perfectly precise at this stage.
- Feather the Selection: To ensure a seamless blend, feather your selection. Click on the "Select and Mask" button in the Options Bar at the top of the screen. In the Select and Mask workspace, navigate to the right side of the screen and increase the "Feather" value. A feathering of between 3-10 pixels is often a good starting point, but you'll want to preview the results on your image.
- Save the Selection as an Alpha Channel: Navigate to the Channels window (usually found next to the Layers Panel). Click on the "Save Selection as Channel" icon at the bottom of the Channels panel. This will create a new alpha channel (e.g., "Alpha 1") that stores your selection.
- Apply Content-Aware Scale: Go back to your Layers Panel. Select the Content-Aware Scale command again (Edit > Content-Aware Scale). In the Options Bar at the top, you'll see a "Protect" dropdown menu. Select the alpha channel you just created (e.g., "Alpha 1") from this menu.
- Scale Your Image: Now, when you click and drag the transform handles, Photoshop will use your alpha channel to protect the areas you've selected, preventing them from distorting. You can scale horizontally, vertically, or both.
- Accept the Transformation: Once you're satisfied with the results, press Enter (Win) or Return (Mac) to accept the transformation.
Refining the Process: Tips for Better Results
While CAS is a powerful tool, achieving optimal results often requires a bit of finesse and understanding of its limitations.
Keep Expectations Realistic
No matter how carefully you protect important areas, you can only compress or expand an image so far before things start to look unnatural. The amount of reshaping you can do is entirely dependent on the image itself. Pushing the tool too far, especially on images with a lot of detail, will inevitably lead to artefacts and distortions.
Break Down Large Adjustments
Rather than trying to reshape the image all at once, break down the process into smaller steps. Select Content-Aware Scale, drag a transform handle only part of the way, and then press Enter/Return to accept it. Repeat this process, making incremental adjustments until you've achieved the desired aspect ratio. This allows Photoshop to re-analyze the image at each stage, leading to more natural-looking results.
Understanding the "Amount" Slider
When Content-Aware Scale is active, you'll find an "Amount" slider in the Options Bar. By default, this is set to 100%, giving you the full power of CAS. However, if you lower this value down to 0%, the command behaves like the standard Free Transform tool, scaling all pixels uniformly. Setting the "Amount" to a value between 0 and 100% provides a blend of both commands, offering a middle ground for controlling the degree of distortion.
How To Use CONTENT-AWARE SCALE in Photoshop - ADVANCED Methods
Combining with Other Tools
For particularly tricky images where CAS might introduce unwanted artefacts in detailed areas, consider using Content-Aware Fill or Generative Fill on a new layer before or after using CAS. If you're extending an area with detailed texture, filling it first with Content-Aware Fill can provide a more uniform base for CAS to work with. A small stretch of 5-10% using CAS usually looks quite natural.
Practical Applications and Use Cases
Content-Aware Scale is ideal for a wide range of subjects, including landscapes, wildlife, and portraits.
- Landscapes: Easily extend the width or change the size of the sky or foreground to add more breathing room or to better fit a specific canvas.
- Wildlife: If your subject is close to the edge of the frame, CAS can add a few millimeters of breathing room without distorting the animal.
- Portraits: While requiring careful use, CAS can help adjust compositions where a person is too close to the edge, by intelligently expanding the background.
- Design and Layouts: Need a wider header image for a website or space for text on a print? CAS can adjust the aspect ratio or resize your image to exact print dimensions.
- Correcting Compositional Issues: Sometimes, a photo is technically perfect but the composition is slightly off. CAS can subtly shift elements to improve the balance and flow of the image.
Content-Aware Scale vs. Other Tools
It's important to distinguish Content-Aware Scale from other related tools in Photoshop:
- Crop Tool: The most straightforward way to change aspect ratio, but it always involves discarding pixels.
- Free Transform: Scales all pixels uniformly, leading to predictable distortion.
- Content-Aware Fill: Primarily used to replace missing areas of an image by analyzing surrounding pixels. It doesn't scale the image as a whole.
- Content-Aware Move Tool: Allows you to move objects within an image, with Photoshop attempting to fill the vacated space intelligently.
While other tools have their place, Content-Aware Scale offers a unique solution for resizing and reshaping images while attempting to preserve critical compositional elements.
By understanding its strengths, limitations, and employing the advanced techniques for protection, Photoshop's Content-Aware Scale becomes an indispensable tool in your editing arsenal, capable of solving common compositional problems and adding that crucial bit of breathing room where you need it most, without compromising the integrity of your key pixels.