Lightroom offers powerful tools for photographers looking to expand their creative horizons beyond single exposures. Within the application itself, users can seamlessly merge multiple photos to achieve advanced edits, producing stunning panoramas and High Dynamic Range (HDR) images. This guide delves into the intricacies of Lightroom's Photo Merge feature, exploring its capabilities, customization options, and best practices for creating professional-quality results.
The Power of Photo Merge in Lightroom
Previously, advanced photo merging techniques like creating panoramas or HDR images were primarily confined to Adobe Photoshop or specialized third-party software. However, modern versions of Lightroom have integrated these capabilities directly, streamlining the workflow and making them accessible to a wider audience. Whether you're using Lightroom Classic or the cloud-based Lightroom CC, the core photo merge functionalities remain consistent, although the user interface may differ slightly. Lightroom CC, in particular, offers a more streamlined and visually intuitive interface, making the process even more user-friendly.
The fundamental principle behind Lightroom's Photo Merge tool is its ability to perform automatic photo stitching. This process allows you to combine a series of photographs into a single, cohesive image. The tool is remarkably flexible, enabling the creation of expansive panoramas that capture a wider field of view than a single lens can provide, or HDR images that reveal detail in extreme highlights and shadows.
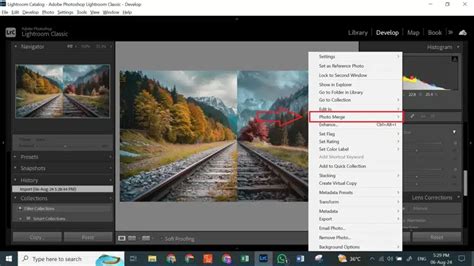
To initiate the photo merge process, the first step is to select all the images you intend to combine. Once highlighted, a simple right-click will reveal the "Photo Merge" option in the contextual menu. Selecting this will then present you with the specific merge choices: HDR, Panorama, or the combined HDR Panorama. A dedicated dialog box will then appear, offering a range of customization options to fine-tune the merge to your specific needs and artistic vision.
Creating High Dynamic Range (HDR) Images
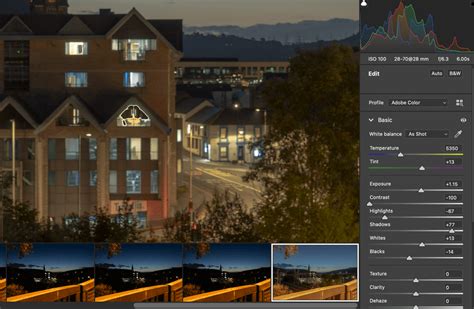
HDR photography is a technique employed to capture scenes with a high dynamic range - essentially, scenes where the difference between the brightest and darkest areas is so significant that a standard camera struggles to capture detail in both simultaneously. This often occurs in scenes with bright skies and deep shadows, such as landscapes at sunrise or sunset.
The Photo Merge HDR tool in Lightroom allows you to combine multiple exposures of the same scene, each captured at a different exposure level. By blending these exposures, the software can reconstruct a wider range of tones, revealing details that would otherwise be lost in pure white highlights or black shadows.
Key HDR Customization Options:
- Auto Align: This crucial feature ensures that your images, even if shot without a tripod, align perfectly. If there was any subtle camera movement between exposures, Auto Align corrects for these discrepancies, preventing ghosting or misalignments in the final HDR. This is particularly beneficial if you're shooting handheld.
- Auto Settings: This option provides an excellent starting point for the overall tonal and color balance of your HDR image. It automatically applies adjustments to create a well-exposed and visually pleasing result, which can then be further refined in the Develop module.
- Deghost Amount: During the HDR merge process, particularly when there's movement within the scene (e.g., blowing leaves, moving clouds, or people walking), the software might create semi-transparent areas that appear unnatural. The Deghost Amount tool allows you to control how much the software intervenes to correct these anomalies. It typically offers options like None, Low, Medium, and High. For the cleanest results, it's often best to start with "None" or "Low" to minimize digital intervention. You can use the "Show Deghost Overlay" box to visualize the areas the software is modifying, which will be highlighted in red.
- Create Stack: This convenient option tidies up your Lightroom library by grouping the original source images and the newly created HDR image into a single stack. This keeps your catalog organized, with the merged HDR file conveniently located at the top of the stack.
When shooting for HDR, it's ideal to use a tripod to ensure perfect alignment between exposures. Aim for at least three bracketed exposures (e.g., -2, 0, +2 stops) to capture a sufficient dynamic range. However, if your bracketing range is less than 3 stops, you might only need the darkest and brightest exposures, as the middle exposure might be redundant and could even introduce alignment issues if there's slight movement. Lightroom produces a 16-bit HDR in Adobe DNG raw format, offering excellent flexibility for further editing. For those requiring a 32-bit HDR, Photoshop's Merge to HDR feature can be utilized.
It's important to note that adjustments made to individual files before merging (like local adjustments, spot healing, or transform settings) will likely be discarded during the HDR merge process. Therefore, it's best to perform such edits after the merge has been completed.
Stitching Expansive Panoramas
Panoramas are an excellent way to capture a sweeping vista, a grand cityscape, or any scene where your camera's or lens's field of view is insufficient. Before the advent of integrated tools like Lightroom's Photo Merge, stitching panoramas was often a laborious process in Photoshop.
Lightroom's Panorama Merge tool simplifies this by automatically aligning and blending multiple overlapping images into a seamless wide-angle view.
Panorama Projection Styles:
When you select the Panorama option, you'll be presented with three projection styles, each affecting how the images are stitched and the resulting perspective:
- Spherical: This is often considered the most natural projection. It stitches the images together as if they were mapped onto the inside of a sphere. This method is excellent for most panoramas, especially those aiming for a realistic, immersive feel.
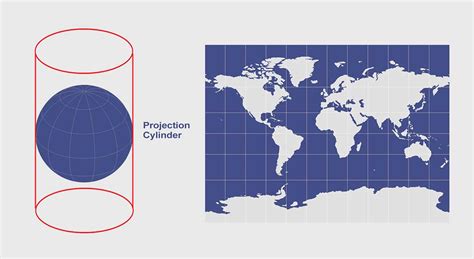
- Cylindrical: In this projection, the images are treated as if they were mapped onto the inside of a cylinder. This is particularly effective for very wide panoramas, as it can help correct for bowing that might occur between frames in the Spherical projection.
- Perspective: This projection maps your images onto a flat surface. It attempts to maintain straight lines, making it an ideal choice for architectural photography where preserving the integrity of vertical and horizontal lines is crucial.
Panorama Customization Options:
- Boundary Warp: This powerful slider allows you to fine-tune the panorama by warping the edges to fill the canvas. It's a great tool for minimizing the need for cropping and retaining as much of the captured scene as possible.
- Fill Edges: If you choose not to use Boundary Warp extensively, or if it doesn't yield satisfactory results for open spaces, the "Fill Edges" option can help. It attempts to intelligently fill in the transparent areas around the panorama. However, its effectiveness can vary, especially in large, featureless areas.
- Auto Crop: This tick box automatically crops the panorama to remove any excess empty space around the stitched image. This ensures a clean, well-framed final output.
- Auto Settings: Similar to the HDR merge, Auto Settings provides automatic tonal and color adjustments, offering a good starting point for further editing. It's particularly helpful if your source images were not perfectly exposed.
- Create Stack: As with HDR, this option groups the source images and the resulting panorama into a single stack within your Lightroom library, promoting organization.
A key consideration for panoramas is the potential for parallax error, especially when shooting with lenses that have a distinct nodal point. This occurs when objects close to the camera appear to shift relative to distant objects as the camera rotates. To minimize this, it's best to rotate the camera around the lens's nodal point rather than swinging the entire camera.
Lightroom panoramas have a size limitation of 65,000 pixels along the long side, or 512 megapixels, whichever comes first. For highly complex stitching tasks or if you require more advanced control, dedicated panorama stitching software like PTGui might be considered.
The Combined HDR Panorama
Lightroom also offers a powerful combined HDR Panorama feature, allowing you to merge bracketed exposures into a panorama in a single step. This is incredibly useful for scenes that possess both a high dynamic range and a wide field of view, such as expansive landscapes at dawn or dusk.
To successfully create an HDR Panorama, certain requirements must be met:
- Consistent Exposure Bracketing: Each set of bracketed exposures within your selection must have the same number of images and the same exposure offsets. For instance, if one set uses offsets of (0, -1, +1), all other sets must follow the same pattern.
- Contiguous Capture: Each set of bracketed exposures must be captured consecutively without significant gaps in time.
HDR Panoramas in Lightroom Classic
When creating an HDR Panorama, the Spherical, Cylindrical, and Perspective projection options are also available, allowing you to choose the best perspective for your scene. The Boundary Warp and Fill Edges options also function similarly to their panorama-only counterparts, helping to refine the final stitched image.
Best Practices and Considerations for Photo Merging
Regardless of whether you're creating an HDR or a panorama, several general best practices will enhance your results:
- Shoot in RAW: Always shoot your source images in RAW format. RAW files contain significantly more tonal and color information than JPEGs, providing greater flexibility for merging and subsequent editing. Lightroom produces a 16-bit DNG for HDR merges, offering a high-quality foundation.
- Use a Tripod: For both HDR and panoramas, a tripod is highly recommended. It ensures maximum alignment between your source images, significantly reducing the chances of ghosting or stitching errors, especially for HDR where precise alignment is critical.
- Adequate Overlap: For panoramas, ensure sufficient overlap between adjacent images - typically around 25-30% is recommended for successful stitching. For HDR, the overlap is usually much higher, approaching 100%, as you're essentially capturing the same scene at different exposures.
- Avoid Pre-Merge Adjustments: As mentioned, many adjustments made to individual source files before merging will be discarded. Focus on capturing the best possible exposures and composition, and save your detailed editing for the merged file.
- Understand the Limitations: While Lightroom's Photo Merge tools are powerful, they are not infallible. For extremely challenging stitching scenarios or if you require absolute precision, dedicated software might offer more advanced control.
- Post-Merge Refinement: The merged HDR or panorama is often just the starting point. Utilize Lightroom's Develop module to fine-tune tones, colors, contrast, and make any necessary local adjustments to bring out the full potential of your merged image. This is where you can truly make the image shine.
By understanding and applying these techniques, photographers can leverage Lightroom's Photo Merge capabilities to create images that go beyond the limitations of a single shot, opening up a world of creative possibilities for capturing breathtaking landscapes and high-contrast scenes.
tags: #how #to #photomerge #in #lightroom