Adobe InDesign is a powerful tool for graphic designers, publishers, and production artists worldwide, offering sophisticated features to manage text flow and layout. Among its most crucial functionalities is the ability to link text boxes, a technique that allows for the creation of continuous, flowing text across multiple frames and pages. This capability is fundamental for producing professional documents, from multi-page magazines and brochures to intricate reports, ensuring that content is presented cohesively and without interruption. Understanding how to effectively link and manage these text frames is key to unlocking the full potential of InDesign for sophisticated document design.
The Fundamentals of Linking Text Boxes
Linking text boxes, also referred to as threading text or linking text frames, is the process of establishing a connection between text frames so that text flows sequentially from one frame to another. This is an essential feature for any document requiring more space than a single text frame can accommodate, or when designing layouts with multiple columns or pages.
To begin linking text boxes, you first need to create them. This is achieved by selecting the Type Tool (T) or by clicking and dragging on the document workspace to create a text frame. Once you have your initial text frame, you can establish a link to another.
- Initiating the Link: Select the first text box you wish to link. Observe the small square located at the bottom-right corner of this frame; this is known as the "out port." Click directly on this out port. Your cursor will transform into a loaded text cursor, visually indicating that it's ready to establish a link.
- Connecting to the Next Frame: Navigate to the next text frame where you want the text to flow. Click inside this second frame with the loaded text cursor. The text from the first frame will now flow into the second, and the two frames are officially linked.
When linking text boxes, it is imperative to ensure that the order of the linked chain precisely matches the intended flow of your text content. This means linking frames in the sequence they should appear in the final document.
Advanced Text Flow Techniques: Autoflowing and Primary Text Frames
Beyond simple one-to-one linking, InDesign offers more advanced methods for managing text flow, particularly when importing large amounts of content or when setting up documents with consistent layouts.
Autoflowing Text During Import
When importing text from an external document, such as a Microsoft Word file, InDesign's "Place" function can be utilized to automatically create and link frames as needed. This is incredibly useful for documents with a predetermined number of pages or when you need to quickly populate a layout.
To autoflow text:
- Go to
File > Place. - Select the external document containing your text.
- Crucially, hold down the
Shiftkey before clicking into the first text frame on your InDesign document. - If you are placing text into an empty document, holding
Shiftwhile clicking on the page will prompt InDesign to automatically create and link additional pages and text frames to accommodate the entire imported text. This process is often referred to as "Smart Text Reflow."
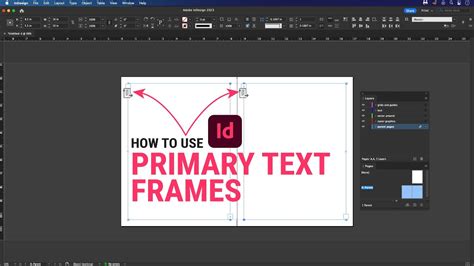
Utilizing Primary Text Frames
Primary text frames are special text frames that reside on Parent Pages (formerly Master Pages). These frames serve as templates for text that appears on multiple pages, such as chapter text or recurring articles. When a document uses primary text frames, text placed within them can automatically reflow and generate new pages as needed.
To leverage primary text frames:
- Set up your Parent Page with primary text frames. These are typically identified by a special icon indicating their primary status.
- When placing text onto a document page that has a primary text frame, the text will automatically flow into this frame.
- The "Smart Text Reflow" feature, when enabled in
Type Preferences, can then automatically add or remove pages as you type or edit text within these primary frames. This allows InDesign to function almost like a word processor, managing page breaks and flow dynamically. TheCtrl+Shift(Windows) orCommand+Shift(Mac OS) key combination, when used with the primary text frame, can override it and trigger this reflow behavior.

Managing and Visualizing Text Threads
Once text boxes are linked, it's important to be able to manage and visualize these connections to ensure the layout remains intact and the text flows as intended.
Viewing Text Threads
InDesign provides visual cues to help you see how your text frames are connected.
- Show Text Threads: To visualize the entire chain of linked text boxes, select one of the text boxes in the chain. Then, navigate to
View > Extras > Show Text Threads. A blue line will appear, graphically connecting the linked frames and indicating the direction of the text flow. This is invaluable for troubleshooting or understanding complex layouts.

The Story Editor
For detailed editing of text within linked frames, the Story Editor is an indispensable tool.
- Accessing the Story Editor: Select a text frame and go to
Edit > Edit in Story Editor. This opens a separate window that displays the text content of all linked frames within a single, continuous editor. This view allows you to edit text without being constrained by the visual layout of the frames, making it easier to proofread and make substantial edits to an entire story.
Modifying and Unlinking Text Boxes
Circumstances often require adjustments to existing links, whether it's to change the flow, rearrange content, or break a connection entirely.
Unlinking Text Boxes
To break a link between two text boxes:
- Select the second text box in the chain (the one that is receiving text).
- Locate the small square at the top-left corner of this frame - this is the "in port," indicating where text enters the frame from a previous one.
- Double-click on this "in port." This action severs the link between the preceding frame and the selected frame. You may then see an "overset text" error in the first frame if it contains more text than it can now hold.
Alternatively, if you need to remove a frame from a thread:
- Select the frame you wish to remove from the thread using a selection tool.
- Press
Command + Option + Shift + K(Mac OS) orCtrl + Alt + Shift + K(Windows). This will break the link without deleting the frame or its content, though it might result in overset text.
Adjusting Text Frame Options
InDesign offers detailed control over how text behaves within frames through the Text Frame Options dialog.
- Accessing Text Frame Options: Select a text frame and go to
Object > Text Frame Options(shortcutCmd+Bon Mac,Ctrl+Bon Windows). - Inset Spacing: Within this dialog, you can adjust various properties, including the "Inset Spacing." This setting controls the padding between the text and the edges of the text frame. Adjusting this can help improve readability and visual appeal, especially when dealing with tightly packed layouts or narrow columns.
Text frame options | Professional Indesign Course
Organizing and Maintaining Linked Text
Effective management of linked text frames is crucial for maintaining a clean and efficient workflow, especially in complex projects.
Using Styles for Consistency
As highlighted by many experienced users, the consistent application of styles is paramount.
- Paragraph Styles and Character Styles: Define and consistently use Paragraph Styles for block text formatting and Character Styles for specific text treatments (like bolding or italics within a paragraph). This not only ensures visual consistency throughout your document but also makes global style changes significantly easier, updating all instances of a style automatically.
Leveraging Parent Pages for Structure
For documents with recurring elements such as headers, footers, page numbers, or consistent layout structures, Parent Pages are indispensable.
- Setting Up Parent Pages: Design your repeating elements on a Parent Page. Any text frames or other objects placed on a Parent Page will appear on all document pages to which that Parent Page is applied. Linking text frames between frames on a Parent Page can create a consistent flow across all associated document pages, simplifying the management of long documents like books or serial publications. For instance, linking a text frame on the left page of a master spread to one on the right page will ensure text flows sequentially from one page to the next.
Layer Management and Duplication
Keeping your document organized is vital for efficient editing and collaboration.
- Layer Panel Organization: Group your text frames logically within the Layers panel. You can name layers according to their purpose (e.g., "Body Text," "Headlines," "Captions") or by page number. This allows you to easily show, hide, or lock specific sets of frames.
- Duplicating Text Boxes: To quickly duplicate a text box while retaining its formatting and linking properties, use the Selection Tool (V). Hold down the
Alt(Option on Mac) key while dragging the text box. This creates an exact copy, including its place in a text thread if it was part of one.
Advanced Considerations and Troubleshooting
While linking text boxes is generally straightforward, certain scenarios and advanced techniques can further enhance your workflow.
Named Text Frames on Master Pages
When working with complex layouts involving multiple text frames on master pages, naming them can be extremely helpful.
- Identification: If you have, for example, a top text frame and a bottom text frame on each page of your master spread, you can name them uniquely in the Layers panel (e.g., "Top Frame," "Bottom Frame").
- Scripting Potential: This naming convention becomes particularly powerful when combined with scripting. A script could be written to identify a specific named frame on a master page, override it on a document page, place text, and if the text is overset, automatically add a new page, override the same named frame on that new page, and link it to the previous frame. This automates complex multi-page text flow management.
Linking to Existing Frames
Sometimes, you might need to link a newly created text frame to an existing one that is already part of a thread.
- Breaking and Re-linking: To achieve this, you may first need to break the existing link of the frame you want to connect from. Then, you can use the out port of that frame to link to the desired existing frame. Alternatively, you can click an existing in port to establish a new thread, potentially replacing the previous one.
Handling Overset Text
Overset text occurs when a text frame contains more content than it can display. InDesign clearly indicates this with a small red plus sign (+) in the out port of the frame.
- Managing Overset Text: When linking frames, InDesign attempts to manage overset text by flowing it into subsequent linked frames. If there are no more linked frames or available pages, the red plus sign will remain visible. The Story Editor is the best place to view and manage all overset text within a story.
Equitable Language in Adobe Products
It's worth noting that Adobe is committed to inclusivity. Starting with InDesign version 17.0 (2022), the company has been replacing non-inclusive language within its software, reflecting core Adobe values. While this doesn't directly impact the mechanics of linking text boxes, it signifies a broader commitment to modernizing and improving user experience.
Mastering the art of linking text boxes in InDesign is a fundamental skill that elevates the creation of professional-looking documents. By understanding the basic linking process, utilizing autoflow and primary text frames, and employing organizational strategies like styles and layer management, users can achieve seamless text flow and sophisticated layouts. The ability to visualize threads, edit in the Story Editor, and adjust frame options provides the granular control necessary for complex design challenges. Continuous exploration and practice with these features will undoubtedly lead to greater proficiency and mastery in InDesign.