Are Layers in Photoshop confusing you? Do you feel you are not using all the benefits Layers can bring in Photoshop? Well, you’re not alone, as layers are arguably one of the most complex yet fundamental aspects to master in Photoshop for ultimate control. This tutorial aims to be the most in-depth, ultimate guide to Layers in Photoshop, demystifying their power and functionality. We’ll explore everything layers have to offer, from creating and manipulating multiple layers to applying sophisticated effects and masks, empowering you to elevate your image editing and graphic design work.
Understanding the Core Concept of Photoshop Layers
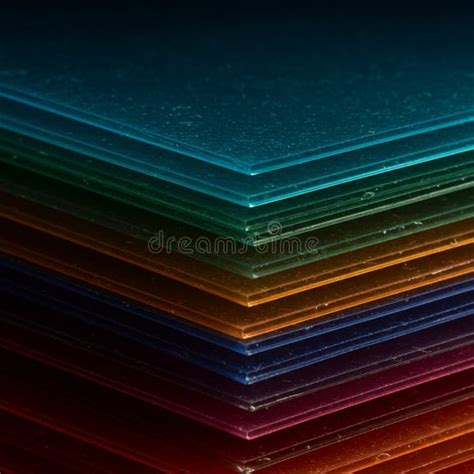
At its heart, a layer in Photoshop is akin to a transparent sheet of acetate stacked with other sheets. Where a layer has no image or content, you can see through it to the layers beneath. This fundamental principle allows you to work on one element of an image without affecting any other part. Think of it like building an image from scratch, piece by piece, on separate transparent sheets. In contrast, traditional image editing software or word processors often apply changes directly to the entire image, making it difficult to isolate and modify specific elements without impacting the rest. Photoshop’s layers, however, provide an unparalleled level of granular control.
When you open an image in Photoshop, it is typically placed onto a "Background" layer. Similarly, when you create a new document, the background is usually filled with white by default. However, this background layer has limitations; it's always locked and cannot have layer effects applied directly to it. Any new layer you create will be transparent and will sit above the background layer until you add content to it, such as text, shapes, or other images. A Photoshop document can contain numerous layers, and their order in the Layers Palette dictates their visibility. The layer at the top of the list is visible before any others beneath it. Any element in a layer will obscure anything in the layers below it, unless its opacity is reduced or blend modes are utilized.
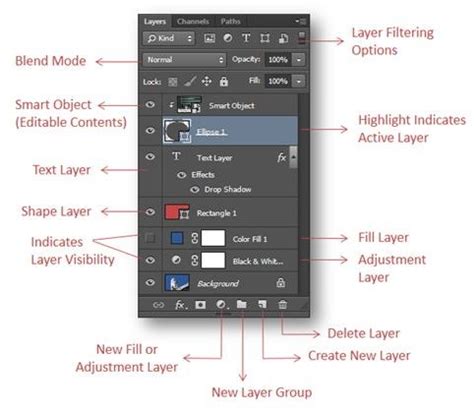
The Layers Panel is your central command center for managing these transparent sheets. Usually located at the bottom right of your Photoshop workspace, this panel is vital for understanding and controlling your image's composition. It lists all layers in an image, from the top layer to the Background layer at the bottom. The active layer, the one you are currently working on, is highlighted for easy identification. Always check which layer is active to ensure your adjustments and edits affect the correct element.
Key Layer Management Basics
Before diving into advanced techniques, it's crucial to grasp the foundational layer operations. These are the building blocks for effective layer-based editing:
- Moving: Selecting and repositioning layers to alter their placement within the composition.
- Resizing: Adjusting the dimensions of layer content using transformation tools.
- Renaming: Assigning descriptive names to layers for better organization, especially in complex projects.
- Smart Objects: Understanding and converting layers into Smart Objects, which preserve original image data and allow for non-destructive transformations.
- Reorganizing: Changing the stacking order of layers by clicking and dragging them within the Layers Panel.
- Grouping: Consolidating related layers into folders (Layer Groups) to declutter the Layers Panel and manage multiple elements as a single unit.
- Hiding: Temporarily making layers invisible by clicking the eye icon next to them, allowing you to assess the impact of specific elements or edits.
- Deleting: Removing layers that are no longer needed, typically by dragging them to the trash icon at the bottom of the Layers Panel.
The best way to learn these basics is through hands-on practice. Using the Move Tool (keyboard shortcut 'V') and the Free Transform tool (Ctrl/Cmd + T) in conjunction with the Layers Panel allows you to rearrange, convert to Smart Objects, hide, and delete layers efficiently. For a deeper understanding and practical demonstration, exploring video tutorials that walk through these fundamental actions step-by-step is highly recommended.
Layer Panel Deep Dive - Photoshop 2021 Beginner's Guide - Pt. 7
Essential Layer Features for Enhanced Editing
Photoshop offers a rich set of features that leverage the power of layers to achieve sophisticated and non-destructive editing workflows.
Layer Styles: Adding Flair and Dimension
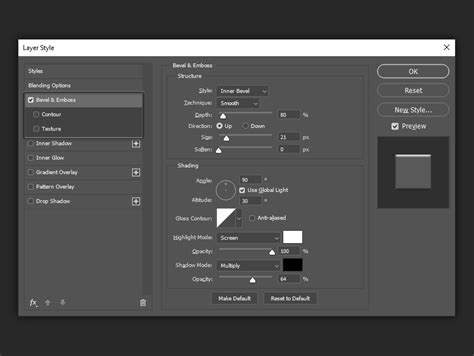
Adding Layer Styles is a fantastic way to inject further design elements and visual interest into your layers, particularly effective with text. To apply a layer style, you can either double-click on the blank area of the layer in the Layers Palette or right-click on the layer and select ‘Blending Options’.
Layer styles encompass a wide range of effects, such as ‘Bevel and Emboss’ to create a sense of depth, ‘Drop Shadows’ for realism, ‘Outer Glows’ for illumination, and ‘Color Overlays’ to change a layer's hue. The beauty of these styles is that they are non-destructive. This means you can revisit and modify them at any time without permanently altering the original layer content, provided you save your image as a .psd (Photoshop Document) file. These applied effects will appear indented beneath the layer in the Layers Panel and can be independently toggled on or off by clicking the eye symbol next to their name. You can also hide the entire layer by clicking the eye icon next to the layer name itself.
Layer Masks: Non-Destructive Visibility Control
Layer masks are a cornerstone of non-destructive editing in Photoshop. They allow you to selectively reveal or conceal parts of a layer without permanently erasing pixels. This is achieved by painting with black, white, or shades of gray on the mask.
- Black on a layer mask hides the corresponding pixels on that layer, making them transparent.
- White reveals the pixels, making them fully visible.
- Shades of gray create semi-transparent areas, allowing the underlying layers to show through to varying degrees.
To add a Layer Mask, select the layer you wish to apply it to and click the "Add Layer Mask" icon (a rectangle with a circle inside) located at the bottom of the Layers Panel. To remove a Layer Mask, simply drag it to the trash icon at the bottom of the panel.
The Brush Tool is a primary method for interacting with layer masks. By selecting the Brush Tool and choosing black or white as your foreground color, you can paint directly onto the mask to control its visibility. The ‘Opacity’ setting of the brush controls the transparency of the paint being applied (100% is solid, 10% is very transparent), while ‘Flow’ regulates the rate at which the paint is applied. This allows for subtle transitions and precise control over which parts of a layer are visible.
Layer Panel Deep Dive - Photoshop 2021 Beginner's Guide - Pt. 7
Adjustment Layers: Global and Targeted Image Enhancements
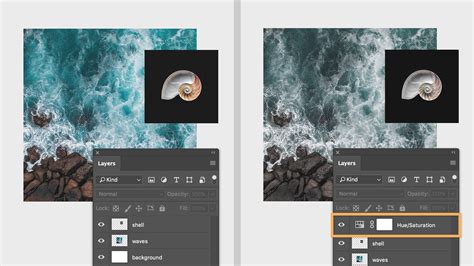
Adjustment Layers are special types of layers that apply color and tonal adjustments to all the layers below them in the stacking order. For instance, adding a Black and White Adjustment Layer will convert all the layers beneath it to grayscale. This provides a powerful way to alter the overall mood and appearance of your image non-destructively.
You can also constrain the effect of an Adjustment Layer to affect only a single layer below it. This is achieved by "clipping" the adjustment layer to the layer directly beneath it. To do this, place the Adjustment Layer directly above the target layer in the Layers Panel. Then, move your pointer to the line between the adjustment layer and the layer directly beneath it. Hold down the Alt (Windows) or Option (Mac) key, and you'll see a symbol appear indicating a clipping mask. Click to establish the clipping mask, and the adjustment will now only affect that one layer.
Like layer masks, Adjustment Layers come with their own mask, which functions identically. Painting black on the adjustment layer's mask will hide the effect from that area, while painting white will reveal it. This allows for localized adjustments even when using global adjustment layers.
Adjustment Layers are inherently non-destructive because they don't alter the original pixel data of the layers beneath them. They simply overlay their effect. This means you can adapt, refine, or delete these adjustments at any time without damaging the source image, as long as you save your work as a .psd file. The most straightforward way to add an Adjustment Layer is by clicking the "Create new fill or adjustment layer" icon (a half-filled circle) at the bottom of the Layers Panel and selecting the desired adjustment.
Curves Adjustment Layer: Fine-Tuning Tones
A particularly popular and powerful Adjustment Layer is ‘Curves’. The Curves tool offers unparalleled control over the tonal range of an image. It allows you to precisely boost shadows, lift highlights, and fine-tune the midtones to achieve smooth, natural-looking transitions.
The Curves interface displays a graph where the horizontal axis represents the input tonal values (from black on the left to white on the right) and the vertical axis represents the output tonal values. By clicking and dragging on the curve, you can manipulate these values:
- Lifting the curve in the highlights area brightens those tones.
- Lowering the curve in the shadows area darkens those tones.
- Creating an "S" curve (lifting the midtones and lowering the shadows slightly) can increase contrast and add punch to an image.
You can apply curves across the entire color spectrum (RGB) or target individual color channels (Red, Green, Blue) to adjust color balance and saturation. For example, you could add warm yellows and reds to the curve to enhance the colors of a sunset or introduce blues to create a cooler, more serene mood. Mastering the Curves Adjustment Layer is a significant step towards professional-level image enhancement, especially for genres like landscape photography where precise tonal control is paramount.
Layer Panel Deep Dive - Photoshop 2021 Beginner's Guide - Pt. 7
Smart Objects: Preserving Originality
Smart Objects are a special layer type that acts as a container for raster or vector data. This means you can place an image, vector artwork, raw camera file, video, or even 3D object into a Photoshop document as a Smart Object layer. The key advantage of Smart Objects is that they preserve the original source content of the layer, allowing for non-destructive editing.
When you transform a Smart Object (resize, rotate, skew), Photoshop stores the original data. This means you can scale it down multiple times and then scale it back up without any loss of quality, unlike regular pixel-based layers which degrade with each transformation. You can also apply filters to Smart Objects non-destructively. These filters are listed under the "Smart Filters" option and can be edited, reordered, or deleted at any time.
To convert an existing layer into a Smart Object, right-click on the layer in the Layers Panel and select "Convert to Smart Object." When you double-click a Smart Object layer in the Layers Panel, it will open in its own separate window, allowing you to edit its contents. Once you save and close this window, the changes will be reflected in the main Photoshop document.
Advanced Layer Concepts and Organization
As your projects grow in complexity, effective layer organization becomes paramount.
Layer Groups: Taming the Clutter
When dealing with a large number of layers, the Layers Panel can quickly become overwhelming. Layer Groups provide a solution by allowing you to bundle related layers into folders. This not only declutters the panel but also enables you to manage multiple layers as a single unit. For instance, you can group all the elements that make up a specific interface element or a character's features.
To create a Layer Group, click the "Create a new group" icon (a folder) at the bottom of the Layers Panel. You can then drag existing layers into this group. Alternatively, you can select multiple layers by clicking on them while holding down the Shift or Ctrl/Cmd key, and then press Ctrl/Cmd + G to group them. You can also change the color of layers and groups for even better visual organization.
Blend Modes: Harmonizing Layers
Blend Modes dictate how a layer's pixels blend with the pixels of the layers below it. This is a powerful tool for compositing, special effects, and achieving unique visual styles. Photoshop offers a wide array of blend modes, categorized into groups such as Normal, Darken, Lighten, Contrast, Inversion/Cancellation, and Component.
By default, layers are set to "Normal" blend mode, meaning they simply appear on top of the layers below. However, changing this to modes like "Multiply" can darken the underlying layers, "Screen" can lighten them, "Overlay" can increase contrast, and "Color" can apply the hue and saturation of the current layer to the luminosity of the layers below. Experimenting with different blend modes is key to unlocking creative possibilities. You can cycle through all blend modes by selecting a layer and pressing Shift + "+" or Shift + "-" to move up or down the list.
Layer Panel Deep Dive - Photoshop 2021 Beginner's Guide - Pt. 7
Other Layer Types
Beyond the standard pixel layers, Smart Objects, and Adjustment Layers, Photoshop supports other specialized layer types:
- Fill Layers: These layers allow you to add solid colors, gradients, or patterns directly to your composition. They are similar to Adjustment Layers in that they are non-destructive and can be edited at any time.
- Type Layers: Created using the Type Tool, these layers contain editable text. Type layers are vector-based, meaning they can be scaled infinitely without losing quality.
- Shape Layers: Created using the Shape Tools, these layers contain vector shapes. Like Type Layers, they are resolution-independent and can be scaled without quality degradation.
- Video Layers: Newer versions of Photoshop have expanded its capabilities into video editing. Video layers allow you to import and work with video footage, enabling the creation of animated slideshows and motion graphics directly within Photoshop.
- 3D Layers: Photoshop can import and work with 3D objects, and even prepare them for 3D printing.
Understanding the nuances of each layer type is crucial for leveraging Photoshop's full potential.
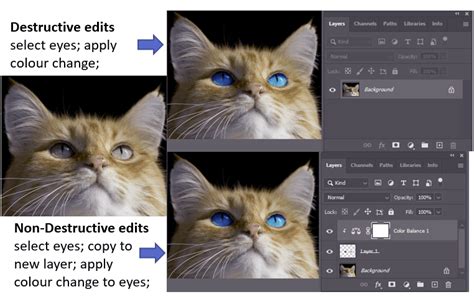
The Importance of Non-Destructive Editing
The overarching theme when working with layers in Photoshop is the emphasis on non-destructive editing. By utilizing features like Adjustment Layers, Layer Masks, and Smart Objects, you ensure that the original image data remains intact. This approach is vital for several reasons:
- Reversibility: Mistakes happen. With non-destructive methods, you can always go back and correct or refine an edit without having to start over.
- Flexibility: Your creative vision may evolve. Non-destructive edits allow you to easily adapt your work to new ideas or client feedback.
- Quality Preservation: By avoiding permanent pixel alterations, you maintain the highest possible image quality throughout your editing process.
- Efficiency: While it might seem more complex initially, non-destructive workflows often save time in the long run by preventing the need for repetitive edits or workarounds.
Trying to work in Photoshop without using enough layers and non-destructive techniques is one of the biggest mistakes design rookies make. While it might seem tricky at times, especially with the temptation to create too many layers, proper organization and understanding of these tools will lead to more impressive designs delivered in the shortest time possible.
Mastering Photoshop layers is not just about learning a tool; it's about adopting a fundamentally different and more powerful way of approaching image manipulation and creation. By understanding and applying the concepts discussed in this tutorial, you will gain the confidence and control to bring your creative visions to life with precision and flexibility.