Skies play a crucial role in setting the mood and atmosphere of your photos. A bland sky can leave your image feeling flat and uninspired, while a dramatic or colorful sky can elevate the entire composition. Luckily, Photoshop offers powerful tools to enhance your skies, and one of the most effective is called Blend If. This comprehensive guide will walk you through various techniques to create, manipulate, and integrate realistic and impactful clouds into your Photoshop projects, catering to both beginners and advanced users.
Selecting and Replacing Skies: The Foundation of Sky Enhancement
A well-executed sky replacement or enhancement begins with an accurate selection of the sky in your existing photo. Photoshop provides several intuitive methods to achieve this.
One of the most straightforward approaches is to utilize Photoshop's automated sky selection feature. Navigate to the Select menu and choose Sky. Photoshop will intelligently analyze your image, attempting to isolate the sky area based on its color and lighting characteristics. For instances where the automatic selection isn't perfectly precise, the Tolerance slider, accessible under the Select menu bar, can be employed to refine the selection. By adjusting this slider, you can expand or contract the selected area to include or exclude finer details.
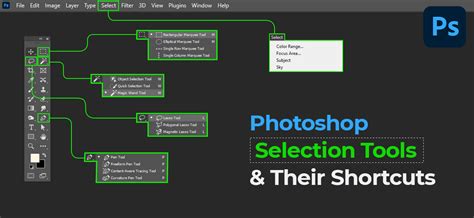
Alternatively, the Magic Wand Tool offers a more manual but equally effective method for selecting the sky. Access this tool via its keyboard shortcut, "W". Once activated, simply click directly on the sky area within your photograph. The Magic Wand Tool selects the clicked area and any contiguous pixels with similar colors. Similar to the automatic selection, the Tolerance slider, located in the top options bar, allows for fine-tuning the selection's sensitivity to color variations.
Once your sky is actively selected, the next step is to isolate it using a layer mask. In the Layers panel, click on the “Layer Mask” icon. By default, the newly created layer mask is linked to its corresponding layer, meaning any transformations applied to the layer will also affect the mask. If you need to adjust the placement or scale of the sky independently, you can unlink the mask by clicking on the “chain link” icon situated between the layer thumbnail and the mask thumbnail within the Layers panel. This allows for greater flexibility in manipulating the sky element.
For those seeking a more integrated approach to sky enhancement without a full replacement, Photoshop's Sky Replacement feature offers a dedicated workflow. Navigate to the Select menu and hit Sky. Subsequently, go to the Edit menu and choose Sky Replacement. This powerful tool presents a library of pre-set skies or allows you to import your own, seamlessly blending them into your image with adjustable parameters for edge refinement and color matching.
Mastering the Blend If Function: Seamlessly Integrating New Skies
The Blend If option is a cornerstone for advanced sky manipulation and integration, allowing for natural-looking transitions between layers. This powerful tool effectively controls how a layer blends with the layers beneath it based on luminosity values.
To access the Blend If settings, double-click on the layer containing your desired cloud or sky image (this will be your new sky layer). This action will open the “Layer Style” menu. Within this menu, you will find the “Blend If” section. Here, you'll see two sliders: one for the underlying layer and one for the current layer.
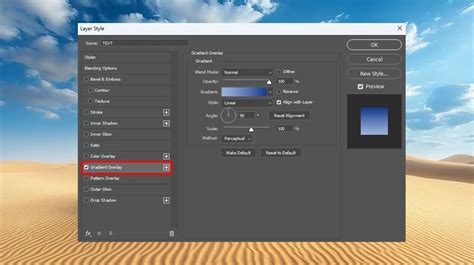
To effectively blend your new sky with the existing image, focus on the sliders for the current layer. Specifically, you'll want to manipulate the white slider on the left side of the “Blend If” graph. To create a smoother transition and remove unwanted dark areas from your new sky layer, hold down the “Alt” key (or “Option” on a Mac) and click-drag this white slider to the right. This action will split the slider, allowing you to feather the blend. As you drag, you’ll observe the effect in real-time on your canvas, gradually revealing the underlying image where the new sky layer is partially transparent. Experiment with dragging this slider further or less to achieve the most natural blend. You can also perform a similar adjustment on the black slider to control how darker tones of your new sky layer interact with the underlying content.
With Blend If mastered, you can take your photos from bland to breathtaking! Don’t be afraid to experiment with different cloud images and Blend If settings to achieve the perfect mood and atmosphere for your photos. This technique is invaluable for seamlessly integrating newly rendered clouds, stock sky images, or even subtle atmospheric effects.
Creating Clouds from Scratch: Rendering and Brushes
Beyond replacing existing skies, Photoshop empowers you to generate clouds from the ground up, offering complete creative control.
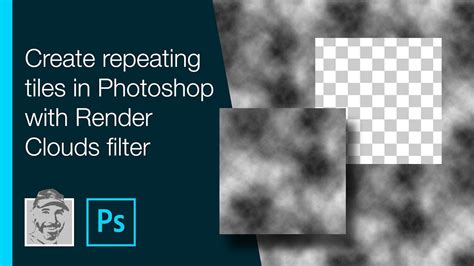
One fundamental method involves using Photoshop's built-in Render Clouds filter. Begin by creating a new document. For this process, any size will do, but you likely won't need more than a 1500x1500 pixel area to work with for optimal detail. To prepare for cloud rendering, ensure your document is in RGB color mode. You can change your color mode by clicking on "Image" from your menu bar, then "Modes" from the submenu, and selecting "RGB Color".
Next, create a new layer and set your Foreground Color to white (#ffffff) and your Background Color to black (#000000). The Gradient controls are represented by an icon shaped like a box with color fading from black to white. Apply a gradient to your new layer by using your gradient tool again, ensuring it covers the entire layer.
Now that you've got your colors and layers ready, you can have Photoshop render clouds. From the main menu bar, click through: Filter → Render → Clouds. This will fill your layer with a basic cloud-like pattern based on the foreground and background colors.
The raw output from the Clouds filter often appears too uniform or abstract. To refine it, the Levels dialog box is your next stop. Type in the shortcut Ctrl+L (or Cmd+L on Mac) to make the Levels dialog box appear. This will be the landing zone for the component parts of your cloud layer. By adjusting the black, white, and gray sliders within the Levels dialog, you can significantly alter the contrast and distribution of the cloud shapes, making them more defined and realistic.
For even more nuanced and realistic cloud generation, the Difference Clouds filter is a powerful tool. This filter works by applying a fractal noise pattern and then subtracting it from the existing image, creating a more organic and less uniform cloud effect. To use it, first, ensure you have a layer with some basic noise or a rendered cloud effect. Then, navigate to Filter → Render → Difference Clouds. You can apply this filter multiple times by pressing Ctrl+J (or Cmd+J) to duplicate the layer and then re-applying Difference Clouds to the new layer. Each application will further refine and alter the cloud patterns, leading to progressively more complex and natural-looking formations.
Harnessing the Power of Brushes: Detailed Cloud Creation
Photoshop's brush engine offers unparalleled flexibility for creating detailed and artistic cloud effects. This method is particularly useful for adding specific cloud formations or enhancing existing ones.
To begin, select the Brush Tool (keyboard shortcut “B”). From the list of brushes, choose a Soft Round Brush. The softness of the brush is crucial for creating gradual transitions and realistic blending.
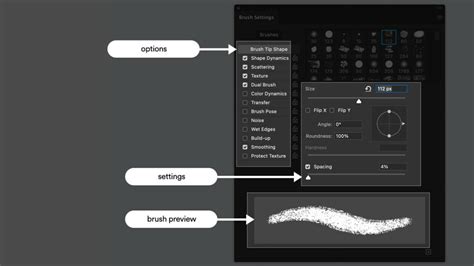
To achieve a more dispersed and natural scattering of cloud elements, navigate to the Scattering settings within the Brush Settings panel (accessible by pressing F5). Set the Scatter on Both Axes and adjust the Count Jitter to approximately 40%. These settings will cause the brush strokes to spread out more randomly, mimicking the irregular shapes of real clouds. You can further refine the brush's behavior by adjusting other parameters like Size Jitter, Angle Jitter, and Roundness Jitter, all of which contribute to a more organic appearance.
To create custom cloud brushes, you can start with a rendered cloud texture or a photograph of clouds. After rendering clouds using the Filter > Render > Clouds method, or by using the Difference Clouds filter, you can refine the resulting image using Levels and other adjustment layers to achieve desired shapes and contrast. Once you have a satisfactory cloud pattern, select the area you want to turn into a brush using a selection tool. Then, go to Edit > Define Brush Preset. This will save your custom cloud shape as a new brush that you can then use for painting.
Many artistic communities offer a vast array of free and premium Photoshop brushes, often with the ".abr" file extension. These brushes are specifically designed to simulate various cloud types, from wispy cirrus to dramatic cumulonimbus. To load these brushes, navigate to the Brush Tool Options, click on the dropdown menu for brush presets, and select "Import Brushes…". Locate your downloaded ".abr" file and Photoshop will add them to your brush library.
When using cloud brushes, consider the Brush Settings panel (F5) extensively. Beyond scattering, you can control the brush's size, opacity, flow, and even its angle dynamically. For instance, setting a Size Jitter will vary the size of the individual cloud elements as you paint, adding depth and reducing repetition.
Advanced Techniques: Cloud Text and Textures
Photoshop also excels at creating more stylized cloud effects, such as cloud text and textures.
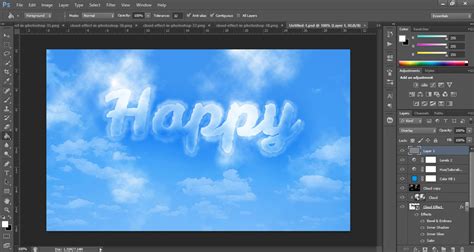
To create cloud text, begin by adding your desired text on a new layer. Then, apply a Filter > Distort > Ripple effect to this text layer. Set the Amount to around 55% to give the text a wavy, distorted appearance.
Next, create a new layer by pressing Shift-Control-N (or Shift-Command-N on Mac). Select the Brush Tool and use a cloud brush (either a default soft round brush with scattering enabled, or a custom cloud brush you've loaded) to paint cloud effects around and over your text. To enhance the cloud effect, you can add various layer styles to this cloud layer, such as Drop Shadow, Inner Shadow, Outer Glow, Inner Glow, Bevel and Emboss, and Satin. Adjust these layer styles to your liking, as their optimal settings will depend on the size and style of your text.

To create a unique clouds Photoshop texture, start by making a new layer and naming it something descriptive like "Clouds Texture." Set your Foreground Color to white (#ffffff) and your Background Color to black (#000000). Now, apply the Filter > Render > Clouds effect to this layer. To further refine this texture and achieve a more dramatic look, you can apply the Difference Clouds filter multiple times.
Once you have a base cloud texture, you can use it in various ways. For instance, you can duplicate this cloud texture layer and apply different blending modes (e.g., Overlay, Soft Light) to the original image to add subtle atmospheric depth.
Another method for creating cloud textures involves using stock images. Add a Flying Birds stock image to your document on a new layer. Press Control-I (or Command-I on Mac) to invert the color of the birds from black to white, creating a silhouette effect. Then, add a Color Fill adjustment layer using a desired sky color, such as #0096ec. By strategically masking and blending these elements, you can create unique and ethereal cloud-like textures.
To complete the image and enhance its visual impact, you can add a sharpen effect. Press Shift-Control-Alt-E (or Shift-Command-Option-E on Mac) to create a merged copy of all visible layers. Then, apply a sharpening filter, such as Unsharp Mask or Smart Sharpen, to this merged layer.
Beyond Manual Creation: Actions and Presets
For users who are pressed for time or seeking quick, professional results, Photoshop actions and presets offer an excellent solution. These pre-programmed sequences of commands can automate complex tasks, including the creation of sophisticated cloud effects.
There are numerous third-party resources available that offer Photoshop actions specifically designed for cloud creation. These can range from simple one-click solutions for adding realistic clouds to existing photos, to more elaborate actions that generate complex cloud formations from scratch. For instance, a single action might be designed to replicate the look of smoke cloud effects, offering multiple color options and particle enhancements. Another might be tailored for creating photorealistic results with a single click, compatible with recent versions of Photoshop.
Similarly, specialized brush sets, often referred to as HD clouds for Photoshop projects, can provide a library of unique cloud effects. These sets typically include a variety of brushes designed for different styles of clouds, each quick to use and offering high-definition results.
For those who appreciate the artistic qualities of specific cloud styles, such as skywriting fonts, dedicated cloud text effect actions or PSD files can be invaluable. These resources are often designed to work quickly with text layers, providing ready-made templates that can be easily customized.
One particular type of action to consider is one that adds a magical or ethereal quality to your images. These actions often work by allowing you to simply brush over the areas where you want to apply the effect, and then playing the action to generate the desired cloud or atmospheric enhancement.
When exploring actions and presets, always check for compatibility with your version of Photoshop and review any accompanying tutorials or instructions to ensure you can leverage their full potential. While these tools can significantly speed up your workflow, understanding the underlying principles of blending, masking, and layer styles will always empower you to achieve more nuanced and personalized results.
Understanding the Underlying Principles: A Deeper Dive
While Photoshop offers a plethora of tools and filters for cloud creation, understanding the fundamental principles behind these effects can significantly enhance your ability to achieve realistic and compelling results.
The Render Clouds filter, as mentioned, creates a basic pattern based on fractal noise. The Difference Clouds filter, by repeatedly applying a noise-based subtraction, generates more complex and organic structures. This process is akin to how natural phenomena like turbulence and diffusion can shape atmospheric formations.
The Blend If function operates on the luminosity values of pixels. When you adjust the sliders, you are essentially telling Photoshop to make the current layer transparent or opaque based on how bright or dark the pixels are in the current layer or the underlying layer. This is why it's so effective for blending skies - you can make the darker parts of a new sky layer transparent to reveal the original image's horizon, or vice versa.
Quick Mask Mode offers another perspective on selection and editing. It acts like a digital stencil. When you enter Quick Mask Mode (by pressing Q), areas painted with white become selected, and areas painted with black become deselected. This mode is best suited for quick editing and is used to add or subtract from your image to make a "mask." Running lines, often referred to as "marching ants," will appear when you exit Quick Mask Mode, indicating the active selection.
When working with brushes, the concept of Jitter in the scattering settings is crucial. Jitter introduces randomness to various brush parameters, such as size, angle, and position. This randomness is key to mimicking the natural, irregular distributions found in real-world elements like clouds, foliage, or even textures.
The ability to invert colors (Ctrl+I or Cmd+I) is a simple yet powerful technique. It's often used when working with masks or creating silhouette effects, allowing you to easily switch between positive and negative representations of an image.
Finally, understanding the principles of color modes (RGB vs. CMYK) is important for digital artwork intended for screen display versus print. RGB is additive, meaning colors are created by combining red, green, and blue light, and is the standard for digital images. CMYK is subtractive, used for printing, where colors are created by subtracting light.
By combining these foundational concepts with Photoshop's advanced tools, you can move beyond simply following tutorials to truly understanding and mastering the art of creating and manipulating clouds.