When embarking on a print design project, whether it's a magazine, booklet, or catalog, designers often work with "spreads" in Adobe InDesign. A spread is a view where two pages are designed side-by-side, mirroring how they will appear when the finished document is opened like a book. This approach is intuitive for visualizing the flow of content. However, for professional printing, there's a crucial step: submitting the file as single pages, not spreads. This transition, while sometimes causing hesitation, is essential for efficient and accurate printing.
The Printer's Perspective: Why Single Pages Reign Supreme
Commercial printing operations utilize sophisticated, large-scale presses and paper sheets that far exceed the dimensions of a standard office printer. This necessitates a different approach to layout configuration. Printers typically impose multiple pages onto a single, large sheet of paper. This strategy is paramount for minimizing paper waste, a significant cost factor in commercial printing. After printing, these large sheets are meticulously cut to the final required dimensions.
The expertise of press teams ensures that projects are printed in the correct sequence, whether it's for single-sided items like posters or double-sided materials such as magazines and books. They employ specific "printer's spreads" or imposition layouts, carefully selecting paper sizes for maximum efficiency.
Navigating the Export: From Spreads to Single Pages in InDesign
Fortunately, the process of separating a spread-based InDesign document into single pages is straightforward. The most common software for this task is Adobe InDesign.
- Initiate Export: Navigate to the
Filemenu and selectExport. - Choose Format: Choose
Adobe PDF Printas the format for your export. - Select "Pages": In the
Export Adobe PDFdialog box that appears, locate theExport Asoption. Instead of selectingSpreads, choosePages. This critical step ensures that each page of your document is exported as an individual, standalone file.
Export single or multiple pages in Adobe InDesign
This simple adjustment ensures that your printer receives the file in a format that aligns with their workflow, preventing potential issues and streamlining the printing process.
Booklet Production: The Magic of Multiples of Four
When envisioning a booklet or a saddle-stitched publication, a key technical consideration is the page count. Booklets require a page count that is a multiple of four (e.g., 12, 16, 32 pages). This requirement stems from the printing process itself, where four pages are typically arranged on a single sheet of paper - two on the front and two on the back. The first page of your InDesign document will serve as the front cover, and the last page will function as the back cover.
To aid designers, templates are often available. For instance, a 16-page booklet template can serve as a valuable reference or starting point. It is advisable to lay out your book in InDesign with facing pages enabled. If you opt for a different layout application, exporting to PDF is a viable option.
Pre-Press Essentials for Booklets
Before submitting your booklet files, several pre-press considerations are vital:
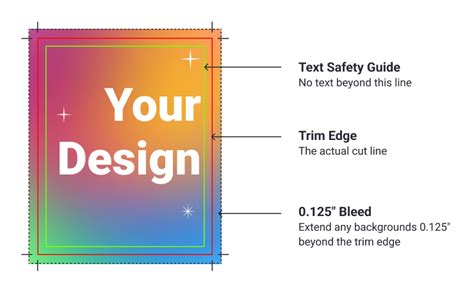
- Content Safety Zone: Keep important content at least ¼ inch away from the edge of the pages to prevent it from being trimmed during the finishing process.
- Bleed: For any content that is intended to extend to the very edge of the page, ensure you include at least ⅛ inch of bleed. Bleed allows for slight variations in the cutting process, guaranteeing that colors and images reach the edge without white gaps.
- Proofing: Thoroughly proof your document on screen or by printing a black-and-white version. This is the most effective way to catch errors before they become costly mistakes.
- File Packaging: In InDesign, use
File > Packageto gather all linked assets (fonts, images) into a single folder, ensuring the printer has everything they need. If using another application, save or export your pages as a PDF.
The Full-Service Booklet Order Process
When opting for professional booklet printing services, the process typically involves these stages:
- Design: Create your booklet in InDesign, adhering to the multiple-of-four page count and pre-press guidelines.
- Submission: Submit a dedicated booklet order form. This form will capture all necessary details about your project.
- Confirmation and Estimation: The printing service will confirm your order, provide an estimate, and verify that all necessary elements are present and correctly set up.
- Printing: The booklet is printed, with careful attention paid to front/back alignment and registration.
- Binding: The pages are bound using the chosen method, such as saddle-stitching.
- Trimming: If requested, the booklet is trimmed to its final size.
- Charging: Your account will be charged according to the agreed-upon pricing.
- Pickup: You will be notified when your completed booklet is ready for pickup.
DIY Booklet Printing: A Step-by-Step Guide
For those who prefer to print their booklets in-house, InDesign's Print Booklet feature offers a robust solution.
- Page Count Check: Ensure your document's page count is a multiple of four.
- Access Print Booklet: Go to
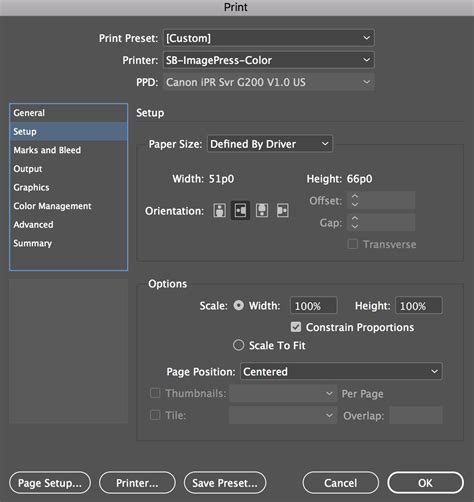
File > Print Booklet. - Default Settings: The default setting of
2-up Saddle Stitchis usually appropriate. - Print Settings: Click on
Print Settings. This opens the standard InDesign print window.- Options: Check the box for
Print Blank Pagesif necessary. - Setup Tab: Choose your desired page orientation and select
Scale to Fitif needed. LeavePaper SizeasDefined by Driver. - Page Setup: Click
Page Setup...to select your paper size and format for the specific printer you are using, as printer margins can affect front-to-back alignment.
- Options: Check the box for
- Duplexing (Double-Sided Printing): For public laser printers, you'll need to set up duplexing. Click the
Printer...button.- Finishing: Navigate to
Finishing(or a similar option likeLayouton some printers). - Two-Sided: Check the box for
Two-Sidedand selectShort-Edge bindingfor a standard booklet.
- Finishing: Navigate to
- Output Options: Back in the
Print Bookletwindow, you can enable other options likeCrop MarksorBleedsif desired. ClickOK. - Preview: Return to the
Print Bookletwindow and click thePreviewtab. Carefully examine the layout of your pages. The first sheet should display your front and back covers. Scrolling to the end should show the innermost pages.
Imposition: The Art of Arranging Pages for Printing
The process of arranging pages for printing, known as imposition, is fundamental to professional printing. When working with a booklet in InDesign, the Print Booklet feature handles this imposition automatically. It transforms your sequential page layout into printer spreads, which are the arrangements of pages on a single sheet of paper as it will be printed.
Understanding Imposition Parameters
The Print Booklet dialog box offers several settings to control imposition:
- Binding: This setting determines how the pages are grouped.
Saddle Stitchis for booklets where pages are folded and stapled at the spine.Perfect Boundis for books with glued spines. - Pages per Sheet: This dictates how many pages are placed on a single printed sheet. For saddle-stitched booklets,
4pages per sheet is standard. - Creep: This is a crucial setting for thicker booklets. As pages are folded, the inner pages tend to move slightly towards the outside of the fold. Creep compensates for this by adjusting the spacing between pages, ensuring they align correctly after trimming. A positive creep value pushes outer pages away from the spine. The amount of creep is often calculated based on paper thickness and the number of sheets.
- Between Pages: This setting controls the spacing between individual pages when they are imposed on a single sheet.
- Signature Size: This refers to the size of the sheet of paper being used for printing.
When creating impositions, especially for complex designs like fold-out brochures or booklets with color covers and black-and-white interiors, you might need to create separate impositions. For example, you could impose the cover pages (front, inside front, inside back, back) as one signature and the interior pages as another. This is achieved by specifying page ranges in the Pages area of the Setup tab.
Imposition for Specific Layouts
- 2-up Consecutive: Creates two-page, side-by-side printer spreads.
- 3-up Consecutive: Arranges three pages side-by-side. This can be useful for multi-panel brochures like a six-panel, trifold brochure.
- 2-up Perfect Bound: Creates two-page, side-by-side printer spreads suitable for perfect binding.
The Summary area in the Print Booklet dialog box provides a concise overview of your imposition settings, highlighting any potential conflicts.
Real-World Challenges: Laying Out Multiple Small Items
A common scenario involves needing to print multiple small items, such as business cards or name tags, onto a single larger sheet for efficient printing, especially when the client intends to use their own office printer. The user's query about printing 32 small business cards (150x100mm each) onto a single sheet of paper, while maintaining their original size and avoiding manual layout, highlights a practical challenge.
The Manual Layout Approach (and its Limitations)
One suggested method involves creating a new InDesign document, setting up a master page with frames for each desired layout (e.g., 8 frames for 8 business cards per A4 sheet), and then manually placing each original business card file into these frames. This approach, while functional, can be time-consuming and inefficient, especially when dealing with frequent design iterations or a large number of items. The user rightly points out that this is not a "fast working process" if frequent updates are needed.
A More Streamlined Solution: Placing Multi-Page PDFs
A more efficient method leverages InDesign's ability to place multi-page PDF files. If all 32 business cards are contained within a single multi-page PDF:
- Create New Document: Set up a new InDesign document with the dimensions of your target print sheet (e.g., A4). Ensure the document has enough pages to accommodate all your items (in this case, 4 pages if you're laying out 8 items per page).
- Master Page Setup: On a master page, create the required number of frames for your layout (e.g., 8 frames evenly spaced on an A4 page).
- Frame Fitting: Configure the frame fitting options, such as
Fill Frame Proportionally, to ensure the placed content scales correctly. - Place PDF: Use
File > Placeto select your multi-page PDF. Crucially, in thePlacing Optionsdialog box, chooseAll PagesorAll Pages in Range. - Sequential Placement: With the PDF pages loaded into your "place gun" (the cursor), click into each frame on your document pages. InDesign will sequentially place each page of the PDF into the frames. This significantly reduces the manual effort compared to placing each page individually from separate files.
This method automates much of the repetitive placement process, making it far more efficient for projects requiring multiple identical or similar items to be arranged on a single sheet for printing. The key is to have your source assets organized, ideally as a multi-page PDF, to take full advantage of InDesign's powerful placement features.
Beyond the Basics: Pre-Press Considerations and Professional Partnerships
Exporting to single pages and understanding imposition are critical steps, but they are part of a larger pre-press workflow. Designers should also be familiar with concepts like bleed, as mentioned earlier, and consider other print-specific elements such as paper weight and binding types. These choices significantly impact the final look, feel, and durability of the printed piece.
Collaborating with experienced print professionals can provide invaluable guidance. Many printing companies offer resources, templates, and expert advice to help designers navigate the complexities of print production. Building a relationship with a trusted printer ensures that your design vision is accurately translated into a high-quality printed product, leveraging over a century of collective industry experience.