Removing backgrounds from videos is a powerful technique that can significantly elevate the quality of your content, making it appear more professional and engaging. CapCut, renowned as one of the most effective mobile and desktop video editing tools, offers a remarkably user-friendly background remover. This feature empowers creators to achieve clean, polished visuals without requiring mastery of complex software. Whether your goal is to replace an existing background with a new scene, craft compelling green screen effects, or simply enhance your social media videos, CapCut’s Background Removal Tool is an indispensable asset.
This guide will meticulously walk you through the process of removing and changing backgrounds in CapCut, offering step-by-step instructions and exploring advanced techniques to ensure your edits truly stand out.

Understanding the Need for Background Removal
Vacation videos are intended to capture your most cherished moments. However, cluttered or unappealing backgrounds can inadvertently draw attention away from the primary subject, diminishing the overall impact of your footage. Excessive distracting elements in the background can render your videos less enjoyable to watch. Fortunately, CapCut PC’s Background Removal feature provides an immediate solution, allowing you to eliminate distracting elements and produce clean, professional-looking vacation videos. This capability ensures your holiday memories are highlighted effectively, keeping the focus precisely where you intend it to be - on the story you wish to tell.
Cluttered backgrounds can easily disrupt the intended atmosphere of your holiday videos. When numerous individuals, objects, or busy scenes are present behind you, it becomes challenging for viewers to concentrate on the significant moments. A clear and uncluttered background communicates your story more effectively, directing attention towards you, your companions, or any subjects you wish to emphasize. By eliminating messy backgrounds, your videos gain a cleaner, more professional aesthetic. The CapCut PC application boasts a robust background remover that accomplishes this task with remarkable ease, allowing you to remove unwanted sections effortlessly. CapCut PC simplifies the process of tidying up your holiday videos by removing messy backgrounds in mere seconds.
The Power of AI: Automatic Background Removal in CapCut PC
CapCut’s AI-powered background removal tool is designed for efficiency, enabling you to remove backgrounds with a single click. This intelligent feature automatically detects subjects within your video, eliminating the need for laborious manual masking or the requirement of a green screen for many common scenarios. This makes it an ideal solution for creating clean promotional videos or enhancing everyday footage in minutes.
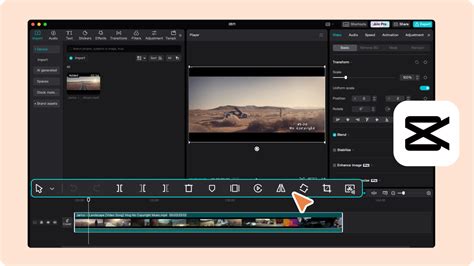
Method 1: Utilizing the Auto Background Remover for Swift Edits
CapCut’s AI-powered background removal tool is the quickest way to achieve clean visuals.
Step-by-Step Guide to Removing Backgrounds in CapCut:
Import Your Video:
- Open CapCut and initiate a new project.
- Click on "Import" to select the video file you intend to edit from your computer.
- Drag the chosen clip onto the timeline for straightforward editing.
Remove the Background:
- Select the video clip on your timeline.
- Navigate through the bottom menu and choose the "Cutout" option.
- Click on "Remove Background." CapCut will then process the video and automatically remove the background.
💡 Pro Tip: If the initial background removal isn't perfectly precise, consider using lighting correction tools to improve the AI's detection accuracy.
Refine and Replace the Background:
- Smooth the Edges: Utilize the "Feather" option to soften any harsh or jagged edges of the cutout, creating a more natural transition.
- Add a New Background: Import a new background image or video. Ensure this new background layer is placed below your subject clip in the timeline.
- Adjust Position & Scale: Resize your subject clip as needed to ensure it fits seamlessly and believably within the new scene.
For a more in-depth understanding of selecting, importing, and customizing backgrounds, consult a comprehensive tutorial on how to add a background in CapCut.
Advanced Techniques for Enhanced Background Removal
Once you have successfully removed the background using CapCut, you can further enhance your video with sophisticated editing techniques:
1. Incorporating Motion Effects
- Keyframing: Employ keyframes to introduce dynamic movement to your subject, making them appear to move within the scene.
- 3D Zoom Effects: Add 3D zoom effects to imbue your video with a cinematic quality, drawing the viewer deeper into the narrative.
2. Enhancing with Color Grading
- LUTs (Look-Up Tables): Apply LUTs to precisely match the color tones of your subject with the new background, ensuring a cohesive visual style.
- Brightness & Contrast Adjustments: Fine-tune the brightness and contrast of your subject to achieve a seamless integration with the new environment.
For even cleaner results, particularly when recording in less-than-ideal home conditions, combining background removal with audio cleanup is highly recommended. Refer to a guide on how to remove background noise in CapCut for comprehensive audio editing techniques.
Method 2: Leveraging Green Screen (Chroma Key) for Precise Control
If your video was originally filmed with a green screen, you can achieve exceptionally clean and precise background removal using CapCut's Chroma Key feature.
Step-by-Step Guide for Green Screen Footage:
Add Your Green Screen Video:
- Import both your green screen video clip and the desired background video into CapCut.
- Place the green screen clip on the timeline above the new background video.
Utilize the Chroma Key Tool:
- Select the green screen video clip on the timeline.
- Navigate to "Cutout" and then select "Chroma Key."
- Activate the Color Picker tool and precisely select the green (or blue) area in your video that you wish to remove.
- Adjust the "Strength" and "Shadow" settings to achieve a seamless blend between your subject and the new background.
🎬 Pro Tip: For the most effective green screen results, ensure the lighting on the green screen is as even and consistent as possible during filming.

Precision Custom Removal and Customizable Backgrounds
Beyond the automatic and chroma key methods, CapCut offers tools for manual refinement:
Precision Custom Removal: For intricate areas like hair or rapidly moving objects, you can manually refine background edges using adjustable brushes and precision tools. This ensures your subject remains sharp and natural-looking while complex background elements are meticulously cleaned up.
Customizable Video Backgrounds: CapCut empowers you to transform your videos with creative backgrounds. You can leverage the text-to-AI image function to generate unique backdrops from textual prompts, explore CapCut's extensive material library for pre-made options, or enhance your video with additional text overlays, stickers, and effects for a dynamic and engaging final product.
Frequently Asked Questions About CapCut Background Removal
How do I remove the background in CapCut?To remove the background in CapCut, select your video clip on the timeline, navigate to the "Cutout" menu, and tap "Remove Background." The AI tool will automatically process and erase the background.
Does CapCut have a background remover?Yes, CapCut features an AI-powered background remover that allows for one-tap background deletion, even without the need for a green screen.
Can I replace the background in CapCut?Absolutely. After removing the original background, you can easily add a new one by placing a desired image or video file underneath your main clip in the timeline.
How do I remove background in CapCut without a green screen?CapCut's "Remove Background" feature is specifically designed for this purpose. Simply select your clip, go to "Cutout," and enable "Remove Background." The AI will handle the rest.
How do I use CapCut’s Chroma Key for background removal?Import your green screen video, go to "Cutout," select "Chroma Key," use the color picker to select the green background, and then adjust the intensity and shadow settings for optimal results.
Why is the CapCut background remover not working?If the AI background remover is not functioning as expected, ensure your subject is adequately lit. You might also try increasing the "Feather" settings or consider using a green screen for more reliable outcomes.
Can I blur the background instead of removing it in CapCut?Yes, you can achieve a blurred background effect by applying the "Blur" effect from the "Effects" menu instead of using the background removal tool.
What is the best way to make a transparent background in CapCut?To create a transparent background, use the "Cutout" feature to remove the background. If exporting options allow, choose a format like PNG or a video format that supports transparency (though direct transparent video export might be limited depending on the version).
Can I remove backgrounds in CapCut for free?Yes, CapCut's background removal tool is available for free usage on both its mobile and desktop versions.
How can I learn advanced CapCut editing skills?To master CapCut and other content creation tools, consider enrolling in specialized courses. For instance, Miracamp’s CapCut Course offers comprehensive training on CapCut, Canva, and YouTube growth strategies, guided by industry experts.
13 Mindblowing Video Editing Tips (with CapCut on Desktop?)
CapCut PC: A Seamless Solution for Vacation Videos
Cluttered backgrounds in vacation videos can detract from the core memories you aim to preserve. The CapCut PC Background Removal feature offers an immediate solution, transforming cluttered clips into visually appealing narratives that maintain focus on the essential moments. With CapCut Desktop Video Editor, the process of background removal becomes effortless, making it an ideal tool for both novice and experienced editors. While most basic functionalities are free, some advanced features may require a subscription. Experiment with the background removal feature to enhance the entertainment value and clarity of your holiday videos.
Key Features of the Video Background Remover
One-Click Video Background Removal: CapCut's background remover for video instantly detects subjects and removes video backgrounds with a single click. It delivers clean, precise results without requiring a green screen or manual masking, making it ideal for creating clean promotional videos in minutes.
Precision Custom Removal: Manually refine background edges using adjustable brushes and precision tools. This allows you to clean up complex areas like hair or moving objects while keeping your subject natural and sharp.
Advanced Chroma Key Removal: CapCut includes a professional chroma key feature that lets you remove green screen backgrounds with pixel-level accuracy. You can adjust tolerance and edge softness to blend subjects seamlessly into any new setting.
Customizable Video Background: CapCut lets you transform your videos with creative backgrounds. You can use the text-to-AI image function to convert text into an image backdrop, explore CapCut's vast material library, or enhance your video with added text, stickers, and effects for a lively, festive look.
How to Remove a Background from a Video on PC
- Upload Video: Launch CapCut and select "Create project" on the main screen. Click "Import" to upload your video file from your computer.
- Remove the Video Background: Navigate to "Video" > "Remove BG" > "Auto removal" on the right-hand panel. Enable the feature and wait a few seconds for CapCut to automatically remove the background. You can then replace it by generating one with CapCut's AI image generator or by choosing from its built-in background library.
- Export & Share: Once your editing is complete, click "Export" in the top-right corner. Choose your preferred resolution, quality, and format. Finally, click "Export" again to save and share your polished video.
How to Remove a Background from a Video Online
- Upload Video: Open CapCut online and click "Create new" > "Video." Choose your preferred canvas size or start with a blank one. Click the "+" (Import) button to upload your video from your device. Drag the uploaded clip onto the timeline to begin editing.
- Remove the Video Background: Select your video clip in the timeline to open the editing options. Go to "Smart tools" > "Remove background." Use "Auto removal" to let AI instantly cut out the subject. For green/blue screen footage, switch to "Chroma key" and select the key color for a smoother cut. Replace the removed background with a solid color, an image, or another video.
- Export & Share: Click "Export" > "Download." Adjust export settings such as resolution, format, and frame rate. Hit "Export" again to save the video to your device.
CapCut allows you to remove video backgrounds instantly using AI without needing a green screen. You can also fine-tune edges, add new backgrounds, or replace scenes for a professional finish.
Yes, you can remove video backgrounds in CapCut Desktop without a green screen! Import your clip and go to "Video" > "Remove BG" > "Auto removal." Add your own visuals or choose from CapCut's background library to customize the scene.
Yes, CapCut Desktop allows complete background removal with no watermark on exported videos! Import your clip and go to "Video" > "Remove BG" > "Auto removal" or "Chroma key." Add or replace the background as you like. Export your HD video freely and watermark-free for a clean, professional finish.
To remove a GIF background, upload the file to CapCut Desktop, then select "Remove BG" > "Auto removal." Wait for the AI to automatically process and clean the background. You can then export the GIF with a transparent or new background to enhance its visual style. CapCut Desktop supports popular video formats such as MP4, MOV, AVI, and WMV for background removal.