Layer masks are an indispensable tool in Photoshop, offering a powerful yet non-destructive method to control the visibility and application of edits to specific areas of your image. This tutorial delves into the fundamental concepts and practical applications of layer masks, empowering you to refine selections, blend images seamlessly, and achieve sophisticated editing results without permanently altering your original pixel data. Whether you're a beginner looking to grasp the basics or an experienced user aiming to enhance your workflow, understanding layer masks is crucial for unlocking the full potential of Photoshop.
The Essence of Layer Masks: Non-Destructive Control
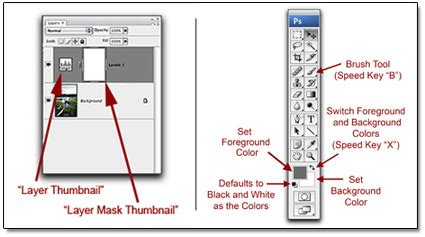
At its core, a layer mask is a grayscale image attached to a specific layer within Photoshop's Layers panel. This mask dictates which parts of that layer are visible, partially visible, or completely hidden, thereby affecting how the layer interacts with the content beneath it. Unlike destructive editing techniques such as erasing or deleting pixels, layer masks provide a reversible way to hide or reveal portions of a layer. This flexibility is paramount, allowing you to experiment with edits, make adjustments, and even bring back previously hidden areas of your image at any time.
When a layer mask is applied to a layer, it doesn't alter the layer's pixels directly. Instead, it acts as a stencil. The mask uses shades of gray to determine the opacity of the layer it's attached to. Pure white on the mask means the corresponding area of the layer is fully opaque and visible. Pure black on the mask means the corresponding area of the layer is fully transparent, effectively hiding the layer and allowing anything beneath it to show through. Shades of gray create partial transparency, allowing for subtle blending and graduated effects.
Understanding the Mechanics: Black, White, and Gray
The interplay between black, white, and gray is fundamental to mastering layer masks.
- White: Reveals the layer. Painting with white on a layer mask will make that area of the layer fully visible.
- Black: Hides the layer. Painting with black on a layer mask will make that area of the layer completely transparent, revealing the layer(s) below.
- Gray: Partially conceals the layer. The darker the shade of gray, the more transparent the layer becomes in that area. This is where subtle blending and soft transitions are achieved.
This grayscale logic is why painting with a reduced opacity brush is often recommended. By using a brush with a lower opacity, you can gradually build up the black or gray tones on the mask, creating smoother transitions and more natural-looking effects.
Visualizing the Mask: Alt+Click and Overlay
To gain a clear understanding of where your mask is affecting the image, Photoshop offers a convenient shortcut. By holding down the Alt key (or Option on a Mac) and left-clicking on the layer mask thumbnail in the Layers panel, you can view the mask itself as a grayscale image directly on your canvas. This is incredibly useful for identifying any unintended areas of black or white, or for refining the edges of your mask. Pressing Alt + Left-Click again will return the image to its normal view.

Applying Layer Masks: Practical Scenarios
Layer masks are versatile and can be applied in numerous editing scenarios. Let's explore some common and effective uses.
Masking Adjustment Layers
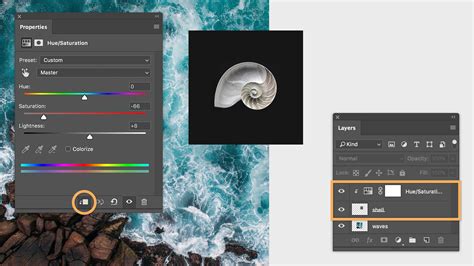
Adjustment Layers, such as Curves, Levels, Hue/Saturation, and more, are powerful tools for altering the tonal and color properties of your image. However, sometimes you might want an adjustment to affect only specific parts of your image. This is where layer masks shine.
When you add most Adjustment Layers in Photoshop (e.g., by going to Layer > New Adjustment Layer > Curves), a mask is automatically generated and attached to that adjustment layer. This white box, appearing to the right of the adjustment layer's icon in the Layers panel, is initially blank, meaning the adjustment applies to the entire layer below.
Consider a situation where you apply a Curves Adjustment Layer to darken your image, but you find that a particular area, like a subject's face, becomes too dark and loses detail. Instead of removing the adjustment layer entirely, you can use its associated mask.
- Select the Mask: In the Layers panel, click on the white mask thumbnail next to your Curves Adjustment Layer.
- Choose the Brush Tool: Select the Brush Tool from the Toolbar.
- Set Foreground Color to Black: Press D to set your default foreground and background colors (black and white), then press X if black is not your foreground color.
- Paint on the Mask: With the mask selected and your foreground color set to black, paint over the area of the image where you don't want the Curves adjustment to apply. As you paint with black on the mask, that portion of the adjustment will be hidden, revealing the original image beneath.
Tip: For smooth transitions, use a brush with a soft edge and adjust its opacity. This prevents harsh, visible lines where the mask begins and ends.
Combining Exposures: A Landscape Example
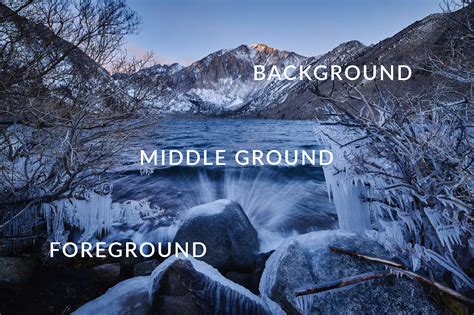
A classic application of layer masks is in blending multiple exposures of the same scene, particularly useful for landscapes with a high dynamic range where the sky is significantly brighter than the foreground.
Imagine you have two photos of a beautiful landscape shot from a tripod: one perfectly exposed for the sky, and another for the foreground.
- Load Images into Layers: Open both images in Photoshop. To get them into the same document with each on its own layer, go to File > Scripts > Load Files into Stack. In the Load Layers dialog box, click Browse, select your two image files, and click OK. This will create a new document with each image as a separate layer.
- Arrange Layers: Ensure the layer you want as the base (e.g., the foreground-exposed image) is at the bottom of the Layers panel, and the layer you want to blend in (e.g., the sky-exposed image) is above it. Rename these layers for clarity (e.g., "Foreground" and "Sky").
- Apply a Mask to the Top Layer: Select the "Sky" layer. Click the "Add layer mask" icon at the bottom of the Layers panel (it looks like a rectangle with a circle inside). A white mask thumbnail will appear next to the "Sky" layer.
- Masking the Sky: Now, you need to make the sky layer transparent where the foreground should be visible.
- Option A: Painting: Select the Brush Tool, set your foreground color to black, and paint over the foreground area on the "Sky" layer's mask. Use a soft brush to blend the transition between sky and land.
- Option B: Select > Color Range: For more automated selection, go to Select > Color Range. Use the eyedropper tool (often with the plus symbol) to click on areas of the sky you want to isolate. As you click, you'll see the selection update in the preview window. Adjust the Fuzziness to control the range of colors selected. Once you have a decent selection of the sky, click OK. Then, with the "Sky" layer selected and its mask active, fill this selection with black. You can do this by going to Edit > Fill and choosing black, or by holding Alt + Delete (if black is your foreground color).
- Refining the Mask: If the edges are too sharp or jagged, you can refine them. Select the mask, go to Filter > Blur > Gaussian Blur to soften edges. Be cautious not to overdo it, as excessive blur can create halos. Alternatively, use the Brush Tool with black or white to manually paint over areas and fine-tune the mask.
This technique allows you to create a single, well-exposed image by combining the best elements of different exposures, a process often referred to as High Dynamic Range (HDR) blending.
Advanced Masking Techniques
Beyond basic painting and selection, Photoshop offers several advanced methods for creating and manipulating layer masks.
Using the Gradient Tool on Masks
While often subtle, the Gradient Tool can be used to create smooth, gradual transitions on a layer mask.
- Select the Mask: Click on the layer mask thumbnail you wish to modify.
- Choose the Gradient Tool: Select the Gradient Tool from the Toolbar.
- Select a Gradient: In the options bar, choose a gradient preset. For masking, the Foreground to Transparent (represented by a black-to-white checkered box) or Black to White gradients are most useful.
- Set Colors: Ensure your foreground color is black and your background color is white (press D then X if needed).
- Draw the Gradient: Click and drag on your image. The gradient will be applied to the mask. Starting where you want the mask to be entirely black (hiding the layer) and ending where you want it to be white (revealing the layer) will create a smooth transition between the two states.
While this can be effective, gradients can sometimes be too obvious, leading to a less natural look.
Moving and Copying Masks
Photoshop makes it easy to reuse masks.
- Move a Mask: To transfer a mask from one layer to another, simply click and drag the mask thumbnail from its original layer to the target layer in the Layers panel.
- Copy a Mask: To create an identical copy of a mask on another layer, hold down the Alt key (or Option on a Mac) while clicking and dragging the mask thumbnail to the desired layer. This duplicates the mask.
Inverting a Mask
Sometimes, you might create a mask that hides more than you intended, or you might want to apply the exact opposite effect. Inverting a mask flips all the black areas to white and all the white areas to black.
- Select the Mask: Click on the mask thumbnail.
- Invert: Go to Image > Adjustments > Invert (Ctrl+I or Cmd+I), or right-click on the mask thumbnail and choose "Invert Mask."
Using Filter > Blur > Gaussian Blur on Masks
As mentioned earlier, applying a Gaussian Blur directly to a layer mask can soften its edges, creating a smoother transition. This is a quick way to fix harsh mask edges. It's advisable to zoom to 100% (Ctrl + Space + Left Click) for precise adjustments.
Max and Min Filters for Mask Expansion
- Maximum Filter: Found under Filter > Other > Maximum, this filter expands the white (revealing) areas of the mask. It's useful if you need to slightly enlarge the visible parts of a layer.
- Minimum Filter: Found under Filter > Other > Minimum, this filter expands the black (hiding) areas of the mask. It's useful for slightly shrinking the visible parts of a layer.
Use these filters with small radius values to avoid drastic changes.
Beyond Basic Layer Masks: Advanced Workflows
Layer masks can be integrated into more complex Photoshop workflows for enhanced control and efficiency.
Linking and Unlinking Masks
By default, a layer and its mask are linked. This means when you move the layer, the mask moves with it, maintaining their relationship. You can see this link represented by a chain icon between the layer and mask thumbnails in the Layers panel.
To move the layer and its mask independently, click on the chain icon to unlink them. This can be useful if you need to reposition the mask separately from the layer content. Remember to re-link them if necessary to maintain their intended correspondence.
Applying Masks to Layer Groups
For managing complex compositions with multiple layers, you can apply a single layer mask to an entire group of layers.
- Group Layers: Select the layers you want to group by holding Ctrl (or Cmd on Mac) and clicking on each layer. Then, press Ctrl + G (or Cmd + G).
- Add Mask to Group: With the newly created group selected in the Layers panel, click the "Add layer mask" icon. The mask will now affect all layers within that group collectively.
This is incredibly efficient for applying a consistent masking effect across several elements of your design.
Vector Masks for Scalable Precision
While pixel-based layer masks are created by painting, vector masks offer a different approach using vector shapes.
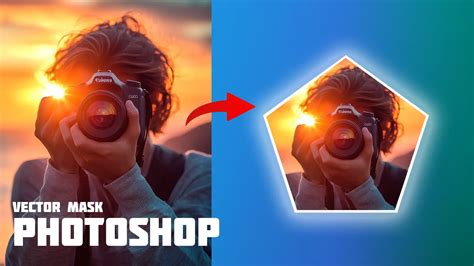
- Create a Vector Shape: Use tools like the Pen Tool, Shape Tools (Rectangle, Ellipse, etc.), or even text layers to create a vector path or shape.
- Convert to Vector Mask: With the desired layer selected, and the vector shape active, you can convert this shape into a vector mask. This is often done by clicking on the layer mask icon with a vector shape selected, or by using the Properties panel.
Vector masks are resolution-independent, meaning they can be scaled up or down without losing quality. They are ideal for creating sharp, clean edges for logos, product cutouts, or precise selections.
Why Layer Masks Trump Eraser Tools
It's important to reiterate why layer masks are superior to destructive tools like the Eraser Tool for hiding parts of an image.
- Reversibility: With a layer mask, every pixel of the original image remains intact. If you decide later that you want to reveal an area you previously masked out, simply paint with white on the mask. The Eraser Tool, however, permanently deletes pixels, making it impossible to recover them without starting over or reverting to a previous save.
- Flexibility: Layer masks allow for gradual transparency and blending. The Eraser Tool typically creates hard edges unless specific brush settings are used, and even then, the removal is permanent.
- Non-Destructive Workflow: In professional editing, maintaining the integrity of original files is paramount. Layer masks are a cornerstone of non-destructive editing, allowing for maximum flexibility and future revisions.
Consider creating a movie poster as an example. You might layer a cityscape background with an image of actors. If you used the Eraser Tool to remove the green screen from the actors' image, that green screen data is gone forever. With a layer mask, you can mask out the green screen, and if you later decide you want to bring back a small part of the original green screen background for some artistic effect, you can easily do so by painting with white on the mask.
Conclusion: Embracing the Power of Masks
Layer masking in Photoshop is a fundamental skill that elevates your editing capabilities. It provides unparalleled control over how adjustments and layers interact, enabling seamless compositing, precise selective editing, and sophisticated visual effects. While it might seem daunting at first, familiarizing yourself with Photoshop's layering basics and practicing with the techniques outlined in this tutorial will quickly build your confidence. Embrace the power of layer masks, and unlock a new level of creative freedom and professional polish in your image editing workflow. The ability to non-destructively refine, blend, and control visibility is what makes layer masks a cornerstone of nearly every effective functionality and interface within Photoshop.