Background noise can be the bane of any video producer's existence, often ruining otherwise great video footage with unwanted sounds like fans, air conditioning, traffic, or general hum. Fortunately, Adobe Premiere Pro offers a robust suite of tools designed to tackle these sonic intruders, allowing you to salvage and significantly improve your audio quality in post-production. Whether you're a seasoned editor or just starting, understanding how to effectively reduce background noise is a fundamental skill that can elevate your projects from amateur to professional. This tutorial will delve into various methods, from the accessible Essential Sound panel to more granular controls, empowering you to achieve cleaner, clearer audio.
Understanding the Nature of Background Noise
Before diving into the technicalities of removal, it's crucial to understand what background noise truly is and why it's so pervasive. Noise can manifest in numerous forms: wind noise and traffic if you're filming outdoors, or air conditioning, fans, room reverb, and low-frequency noises from home appliances when indoors. It's important to note that while Premiere Pro and other non-linear editors (NLEs) like Final Cut Pro and DaVinci Resolve offer tools advertised as "removing" noise, a more accurate term is "reducing" it. This is because background noise and human speech often occupy the same frequency ranges. Therefore, complete elimination without any impact on the desired audio, such as dialogue or music, is typically not achievable. The goal, therefore, is reduction, not absolute eradication.
Sound: Wavelength, Frequency and Amplitude.
The Foundation: Premiere Pro's Built-In Noise Reduction Tools
Premiere Pro provides several powerful, built-in tools to address common audio issues. For typical YouTube or social media content, the Essential Sound panel often proves sufficient for significant improvements. However, for more complex scenarios or when seeking finer control, the advanced features within the Premiere Pro Audio workspace offer unparalleled power.
Method 1: Utilizing the DeNoise Effect
One of the most direct ways to combat background noise is by applying the DeNoise audio effect. This method involves a step-by-step process to isolate and reduce unwanted sonic elements.
Step 1: Project Setup and Audio Import
Begin by opening your project in Adobe Premiere Pro. The first step in any audio editing process is to add your audio to the project. You can do this by browsing to an audio file stored on your computer and importing it. Once imported, locate the Timeline panel, which is typically at the bottom of the Premiere Pro interface. This panel is the central hub for sequencing your multimedia elements, controlling when video and audio begin, end, and interact. Drag and drop your audio file onto the Timeline to add it to your project sequence.
Step 2: Accessing and Applying the DeNoise Effect
To apply effects, you'll need to work with two key panels: the Effects panel and the Effect Controls panel. If these panels are not visible, navigate to the "Window" dropdown menu at the top of Premiere Pro and select "Effects." This will open the Effects panel, which contains a library of audio and video effects. Within the Effects panel, locate the "Audio Effects" subfolder, and then drill down into "Noise Reduction/Restoration." Here, you will find the "DeNoise" effect.
To apply it, click and drag the "DeNoise" effect from the Effects panel onto the audio clip you have selected in the Timeline. The audio clip will typically appear as a colored bar (often green or red) in the Timeline.
Step 3: Adjusting DeNoise Settings in Effect Controls
Once the DeNoise effect is applied, the Effect Controls panel (accessible via the "Window" dropdown menu) will populate with new options related to the effect. Locate the "DeNoise" dropdown within the Effect Controls panel. To access granular controls, expand this section and click the "Edit" button within the "Custom Setup" group. This action will launch the Clip Fx Editor.
The Clip Fx Editor provides a preview box where you can monitor the sound waves as you make adjustments. Premiere Pro offers several presets, such as "Light Noise Reduction" and "Heavy Noise Reduction," which can serve as starting points. However, for precise control, focus on the "Amount" slider at the bottom of the editor. This slider dictates the intensity of the noise reduction. The key here is to play back your audio and adjust the "Amount" slider in real-time. Start with a low setting and gradually increase it, listening carefully to the results.
Pro Tip: It's crucial to strike a balance. While the goal is to reduce background noise, applying too aggressive settings can negatively impact the quality of your voice or music, making it sound robotic or muffled. The aim is reduction, not complete elimination. If your voice sounds robotic, your settings are likely too aggressive; reduce the "Amount" or "Strength."
Step 4: Fine-Tuning and Saving
After adjusting the "Amount" slider to an acceptable level, you can exit the Clip Fx Editor. If the overall volume of your audio has been reduced during the noise reduction process, you can use the "Gain" control in the Effect Controls panel (or on the audio track itself) to increase it back to an appropriate level.
Method 2: Leveraging the Essential Sound Panel
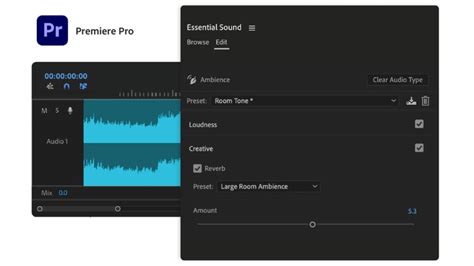
The Essential Sound panel offers a more streamlined and intuitive approach to audio repair, making it an excellent choice for users who prefer a less technical workflow. It's particularly effective for unifying loudness and removing common background sounds.
Step 1: Opening the Essential Sound Panel
Access the Essential Sound panel by navigating to the "Window" dropdown menu and selecting "Essential Sound." Once open, click on the audio track you wish to edit in the Timeline to select it.
Step 2: Utilizing the Repair Tab
Within the Essential Sound panel, ensure you are on the "Edit" tab. You will see several subsections. Locate the "Repair" subsection and click on it to reveal its options. To activate noise reduction, click the checkbox next to "Reduce Noise." Similar to the DeNoise effect, you can then play back your audio by pressing the Spacebar and move the "Reduce Noise" slider to adjust the amount of noise reduction applied.
The Essential Sound panel also offers other valuable repair tools:
- Reduce Rumble: This slider is useful for mitigating low-frequency noises, such as those caused by air conditioning units, traffic rumble, or microphone handling.
- DeHum: Effective for reducing persistent hum sounds, often caused by electrical interference.
- DeEss: Targets harsh "s" sounds and other sibilant frequencies that can be grating to the listener.
- Reduce Reverb: Helps to minimize echo or reverberation in your audio, which can be especially problematic in large, untreated spaces.
As with the DeNoise effect, start with the sliders at their lowest setting and gradually increase them while listening to the audio. Remember the warning: EQ affects voice too if voice occupies those frequencies. The goal is to find a setting that reduces the unwanted noise without introducing audible artifacts or degrading the quality of your primary audio.
Step 3: Enhancing Speech Clarity and Repairing Sound Quality
If the noise reduction process has negatively impacted the clarity or quality of your dialogue, the Essential Sound panel provides tools to address this. Navigate to the "Clarity" subsection within the "Edit" tab. Here, you can use the "EQ" (Equalization) option. Selecting a preset like "Podcast Voice" can be a good starting point, and then you can adjust the "Amount" slider to fine-tune the equalization.
Additionally, Premiere Pro's "Enhanced Speech" feature, a new AI-powered tool, can significantly improve the clarity and presence of dialogue recordings. Simply turn on "Enhance Speech" in the Essential Sound panel, and Premiere Pro's AI system will analyze the clip to improve vocal clarity. You can choose between "High Tone" (often suitable for female voices) and "Low Tone" (often suitable for male voices) to further tailor the enhancement.
Advanced Techniques and Third-Party Plugins
While Premiere Pro's built-in tools are powerful, sometimes you might need even more specialized solutions.
Method 3: CrumplePop AudioDenoise
CrumplePop AudioDenoise is a third-party plugin that utilizes AI to automatically detect and remove background noise. Its strength lies in its intelligent processing, which can often yield impressive results with minimal user input.
Step 1: Installation
First, you'll need to download and install the CrumplePop AudioDenoise plugin. Follow the installation instructions provided by CrumplePop, which typically involve using Adobe's plugin manager (accessible via Preferences > Audio > Audio Plugin Manager) and scanning for new plugins.
Step 2: Applying and Adjusting AudioDenoise
Once installed, you can find "AudioDenoise" in the Effects panel under "Audio Effects." Drag and drop it onto your audio clip in the Timeline. The plugin's interface will launch, offering a primary "Strength" knob for overall noise reduction. Additional controls at the bottom allow you to fine-tune the effect on low, mid, and high frequencies. As before, play back your audio and adjust these controls until you achieve the desired balance between noise reduction and audio quality. If the plugin affects the track's volume, use the "Output Volume" slider to compensate.
Step 3: Creating and Using Presets
A significant advantage of plugins like AudioDenoise is the ability to create custom presets. If you find a set of settings that work particularly well for a specific type of noise or recording environment, you can save these settings as a preset. This allows you to quickly apply the same settings to other clips in the future, saving considerable time. You can also load existing presets if available.
The Importance of Prevention
While post-production tools are invaluable, the adage "prevention is better than cure" holds particularly true for audio. Practicing good audio recording techniques can significantly reduce the amount of noise you need to deal with later.
- Environment Control: Whenever possible, record in a quiet environment. Treat your recording space with sound-absorbing materials (like acoustic panels) to minimize reverb and ambient noise.
- Equipment: Use the best recording equipment you can afford. A good microphone placed strategically can capture clearer audio with less background interference.
- Microphone Proximity: Get the microphone as close to the sound source (e.g., the speaker's mouth) as possible without causing plosives or other unwanted artifacts. This increases the signal-to-noise ratio, meaning your desired audio is much louder than the background noise.
- Gain Staging: Set your recording levels appropriately. Avoid recording too "hot" (which can cause distortion) and too "low" (which requires excessive gain in post-production, amplifying noise).
Advanced Considerations: EQ and Reverb
Sometimes, noise isn't a broad spectrum but lives in specific frequencies. Equalization (EQ) can be a powerful tool to surgically remove these problematic frequencies. However, this requires a nuanced understanding of audio frequencies.
Using EQ for Noise Reduction
If you identify a specific hum or hiss that is particularly bothersome, you can use an EQ effect to attenuate (reduce) the frequencies where that noise resides. For instance, a persistent electrical hum might be concentrated around 60 Hz or 50 Hz (depending on your region's electrical frequency). By creating a narrow band at that frequency and reducing its level, you can eliminate the hum without significantly affecting the rest of the audio.
Warning: EQ affects all sounds within those frequencies, including your voice. If your voice occupies the same frequencies as the noise you're trying to remove, using EQ aggressively can alter the natural tone of your voice, making it sound thin or unnatural. Always toggle the EQ effect on and off to compare the processed audio with the original and ensure you're not sacrificing vocal quality for noise reduction. The goal is reduction, not elimination.
Managing Reverb
Reverb, while sometimes desirable for adding a sense of depth and space, can be detrimental to dialogue clarity, especially in video podcasts or voiceovers. Tools like the "Reduce Reverb" slider in the Essential Sound panel or dedicated de-reverb plugins can help mitigate excessive echo. Again, use these tools judiciously, as over-processing can make audio sound unnaturally dry.
Workflow and Best Practices
When working with Premiere Pro for audio editing, consider these workflow tips:
- Audio Editing Order: Audio and video are processed separately. The order of your audio editing steps relative to your video edits generally doesn't matter, but it's often efficient to address audio issues before making final video cuts that rely heavily on precise audio cues.
- Toggle Effects: Regularly toggle effects on and off to hear the difference they are making. This is crucial for judging the impact of your adjustments.
- Listen Critically: Use good quality headphones or studio monitors to accurately hear the nuances of your audio. What might sound acceptable on laptop speakers could reveal significant problems on better equipment.
- Work Smarter with Presets: As mentioned, saving custom presets for noise reduction, EQ, or other common audio treatments can save immense time on future projects. You can create presets within the Essential Sound panel or for individual effects like DeNoise.
- Explore Adobe Stock: Premiere Pro integrates with Adobe Stock, allowing you to browse and preview millions of royalty-free audio tracks directly within the application. This can be a valuable resource for finding background music or sound effects to enhance your projects.
- Auto Ducking: For situations where you need background music to be quieter when someone is speaking, Premiere Pro's "Auto Ducking" feature can automatically adjust the music's volume relative to dialogue, streamlining the mixing process.
By understanding the tools available in Adobe Premiere Pro and applying sound recording and editing principles, you can effectively tackle background noise and ensure your video projects have the professional audio quality they deserve. Remember that practice is key, and exploring these powerful features will help you hone your audio editing skills.