The Paint Bucket Tool in Adobe Photoshop is a fundamental yet powerful instrument for filling areas of your artwork with color or patterns. While its name suggests a simple function, the tool offers a surprising degree of control and versatility, allowing for both quick fills and nuanced enhancements to your designs. Whether you're a beginner looking to understand basic coloring techniques or an experienced artist seeking to refine your workflow, a thorough understanding of the Paint Bucket Tool's capabilities is invaluable. This guide delves into its functionalities, settings, and common troubleshooting steps, aiming to demystify this essential Photoshop feature.
Locating the Paint Bucket Tool
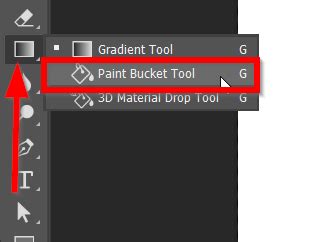
For those new to Photoshop, locating the Paint Bucket Tool can sometimes be a minor challenge. It doesn't always appear as a standalone icon. The Paint Bucket Tool is often nested within the submenu of the Gradient Tool. To access it, look for the Gradient Tool icon in the left-hand toolbar. Clicking and holding on the Gradient Tool will reveal a fly-out menu, from which you can select the Paint Bucket Tool. The keyboard shortcut for the Gradient Tool, and by extension its submenu which includes the Paint Bucket Tool, is G.
Understanding the Paint Bucket Tool's Options Bar
Once the Paint Bucket Tool is selected, an Options Bar appears at the top of the Photoshop workspace, offering a range of settings to customize how the tool functions. Familiarizing yourself with these options is key to effectively utilizing the Paint Bucket Tool.
Fill Type: Foreground vs. Pattern
The first crucial setting allows you to choose the type of fill you wish to apply. You have two primary options:
- Foreground: This option fills the selected area with the currently active foreground color. This is the most straightforward way to apply a solid color to an object or background.
- Pattern: Instead of a solid color, this option allows you to fill the area with a pre-defined pattern. Photoshop comes with a variety of built-in patterns, and you can also create and import your own custom patterns for more unique fills.
A. The first setting allows you to select Foreground or Pattern.
Blending Modes: Controlling Color Interactions
The Blending Mode dropdown menu offers a sophisticated way to control how the fill color interacts with the existing pixels on your layer. While the default Normal mode simply applies the color with its set opacity, selecting other modes can create a wide array of effects.
- Normal: This mode sets the paint fill pixels to normal opacity, with no blending or algorithm attached. It simply overlays the color.
- Darken: This mode only affects pixels that are darker than the fill color, making the overall image darker.
- Multiply: Similar to Darken, Multiply darkens the image by multiplying the color values of the fill layer with the base layer. This is excellent for creating shadows or adding depth.
- Color Burn: This mode darkens the base color to reflect the color of the paint bucket. It results in a more intense darkening effect than Multiply.
- Lighten: This mode only affects pixels that are lighter than the fill color, making the overall image lighter.
- Screen: This mode lightens the color to reflect the color of the paint bucket. It's the opposite of Multiply and is useful for creating highlights or glow effects.
- Linear Dodge (Add): This mode brightens the base color to reflect the color of the paint bucket. It's a more intense brightening effect than Screen.
- Lighter Color: This mode compares the color information in each channel and selects the lighter of the two.
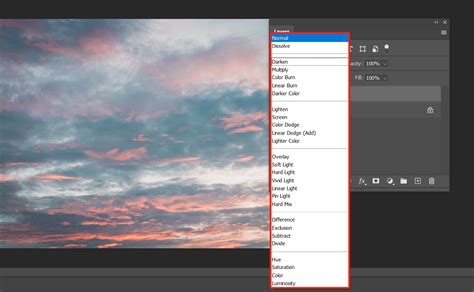
B. Alternatively, in the drop-down menu beside Mode, you can choose from a list of blending modes such as Darken and Luminosity.
Opacity: Adjusting Transparency
The Opacity setting controls the transparency of the fill. A value of 100% means the fill is completely opaque, fully covering the underlying pixels. Reducing the opacity allows the underlying layers or colors to show through, creating semi-transparent effects, subtle shading, or layering impacts.
C. Set the Opacity Value to 100% and there will be no transparency between the fill and base layer.
Tolerance: Defining Color Similarity
Tolerance is a critical setting that determines how much variation in color the Paint Bucket Tool will consider when filling an area.
- Low Tolerance: With a low tolerance value (e.g., 0-20), the tool will only fill pixels that are very similar in color to the pixel you click on. This is useful for precise fills in areas with subtle color gradients or when you want to avoid filling adjacent areas with slightly different shades.
- High Tolerance: A high tolerance value (e.g., 200-255) instructs the tool to fill a much broader range of similarly colored pixels. Setting the tolerance to 255 will fill all pixels of the same color within the contiguous area, regardless of minor variations.
The Paint Bucket Tool allows you to paint a huge area with just one click. However, you can fix this area by changing the tolerance value. Basically, if you want to paint all the pixels with the same color, choose the tolerance value high like 255.
Contiguous: Selecting Connected Pixels
The Contiguous option dictates whether the tool will fill only the directly connected pixels of a similar color or all pixels of that similar color throughout the entire layer (or visible area, depending on other settings).
- Contiguous Enabled: When checked, the Paint Bucket Tool will only fill pixels that are adjacent to the pixel you click on and share a similar color value within the tolerance range. This is ideal for filling specific shapes or enclosed areas without affecting other parts of the image.
- Contiguous Disabled (All Layers): If you uncheck Contiguous and check "All Layers," the tool will fill all pixels of the selected color across all layers that are not locked. This can be a very powerful, albeit potentially destructive, function if not used with care.
Choosing this option will allow you to select the pixels that are connected to the one you have selected. Suppose you want to paint the pixels that are red. Once you chose to use the contiguous option, it will paint only the pixels of the same color that are directly attached to the one you have selected.
All Layers: Filling Across Multiple Layers
The "All Layers" checkbox, when enabled, allows the Paint Bucket Tool to affect fills across all visible and unlocked layers in your document. If this option is unchecked, the fill will only apply to the currently selected active layer.
Basically, when we use the paint bucket tool to paint, it only paints the selected layers. However, sometimes we may want to paint all the layers simultaneously.
Troubleshooting Common Paint Bucket Tool Issues
Despite its straightforward appearance, users sometimes encounter problems when using the Paint Bucket Tool. Here are some common issues and their solutions:
Solution 1: Check the Layer Selection
Ensure that the correct layer is selected in your Layers Panel. The Paint Bucket Tool, by default, operates only on the active layer. If you're trying to fill an area on a layer that isn't selected, your action will have no effect or will apply to the wrong layer.
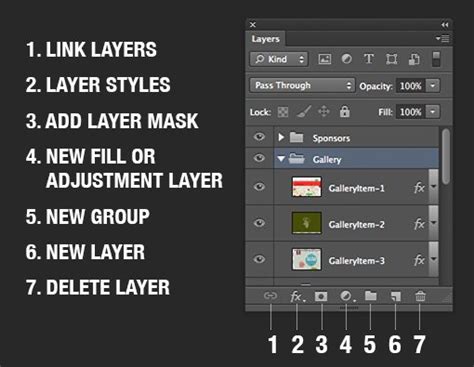
Check the Layer Panels to see if your chosen layer is selected.
Solution 2: Adjust Tolerance and Opacity Settings
Low Tolerance or Opacity settings can prevent the Paint Bucket Tool from filling an area as expected.
- Low Tolerance: If the tolerance is set too low, the tool may not recognize enough of the surrounding pixels as being similar in color to what you're trying to fill, leading to incomplete fills or only filling a very small area.
- Low Opacity: If the opacity is set very low, the fill color will be so transparent that it might appear as if nothing has happened, especially if the underlying color is similar.
Check the Paint Bucket Tool Options Bar above the canvas workspace to see if the Tolerance, Opacity, or Contagion settings are low.
Solution 3: Verify the Blending Mode
Certain Blending Modes can significantly alter how a fill color appears. For instance, if you're expecting a bright color but get a dark, muted result, it's likely due to a blending mode like Multiply or Color Burn being active.
Check the Blending Mode.
Solution 4: Raster vs. Vector Layers
The Paint Bucket Tool primarily works on raster (pixel-based) layers. If you attempt to use it on a vector layer (like those created with shape tools or the Pen Tool without rasterizing), it may not function as intended or might convert the vector to a raster layer automatically.
Check that the layer you are working on is a Rastor Layer and not a Vector Layer.
Solution 5: Unlocked Layers
A locked layer in Photoshop cannot be edited. If your layer is locked, the Paint Bucket Tool, along with other editing tools, will be ineffective. Look for a padlock icon next to the layer name in the Layers Panel and click it to unlock the layer.
Make sure the layer youâre working on is not locked.
Advanced Techniques and Creative Applications
The Paint Bucket Tool is more than just a simple fill command; itâs a tool that can add depth and detail to your artwork.
Achieving Shading Effects
By reducing the Tolerance value and using a slightly darker or lighter shade of your primary color, you can use the Paint Bucket Tool to create subtle shading effects. Clicking on different areas with varying tolerance settings allows for nuanced color application.
For example, when you select the paint bucket tool, go to the paint bucket toolbox, which you can find on the top. Choose your setting for the paint. I am choosing the foreground as I want a plain color for the fill. As I don't want to fill one color in the entire area, I will reduce the tolerance to 20. In that way, I can add some shading effect to the object.
How to use the Paint Bucket Tool in Photoshop + Common Problems (HOW TO FIX)
Layering and Multiple Fills
You can use the Paint Bucket Tool multiple times on different layers or with different settings to build up complex color schemes. For instance, you could fill a base shape with one color on one layer, then use a slightly different shade with a lower opacity on another layer to add depth or highlights.
Select the color you want to use for the fill. You can use multiple colors for different areas. I am using different shades of pink for the flower (object). After picking the color, all you are left to do is click on the areas to fill them in with the selected color. Just pick your color and keep clicking on the object to fill in with different colors.
Filling Selections
For precise control, you can first make a selection using tools like the Marquee Tool, Lasso Tool, or the Object Selection Tool, and then use the Paint Bucket Tool to fill only the selected area.
Select the Object Selection Tool from the left toolbar. The shortcut key for this tool is (W). Using the Object Selection Tool, select the object you want to fill in with the paint bucket tool.
Historical Context and Evolution of the Tool
The Paint Bucket Tool isn't a recent invention; it has been a staple in Photoshop since its early versions. Its core functionâfilling areas with colorâhas remained consistent, but its integration with evolving Photoshop features has enhanced its utility. Its presence has been fundamental for tasks like creating backgrounds, laying out designs, and quickly coloring large areas. The toolâs longevity speaks to its essential role in digital art and design workflows.
The Paint bucket tool can be found in the side Toolbar, i.e. To know how we go about using the Paint bucket tool, we start by following a few steps. While doing so, we should also start our work by using the shortcut keys to speed our work a bit, which can help us improve our speed. The Move tool can also be found in the side Toolbar, i.e. We can also use the shortcut key (G) on the keyboard. This shortcut key activates the Paint Bucket Tool as well the set tools, i.e. In order to start adding or selecting colors, we need to click on the âForeground Colorâ swatch, which we see in the image. Using the Tool Options Bar, we select the options Fill type to be applied by this tool which we see on the top left-hand corner in the images. In case we wish to use some pattern instead of colors, we can then go to the select âPattern fillâ option. This tool is located in the same place, i.e. The âOpacityâ option is something we use to set its transparency percentage, i.e. from 1 to 100% using the slider. Step 2: The âToleranceâ option is something from which the lowest tolerance value only paints the color on the image that has the same color in that area. The values in the slider which we have by default to choose from, i.e. Step 4: The âBlending Modeâ option is something that we can use to apply while testing around with different Blending modes that could suit our needs. Furthermore, when we have the option âAll Layersâ selected, it affects the fill color selected in all layers, and if itâs not selected, then the pixels are filled in the currently selected layer.
Addressing the "One-Click Fill" Challenge
A common frustration among Photoshop users, particularly those coming from simpler art programs, is the difficulty in achieving a perfect, one-click fill of a closed area without leaving small gaps or jagged edges. This is often due to the nature of raster graphics and how the Paint Bucket Tool interprets pixels.
While some believe Photoshop's Paint Bucket Tool is incapable of a flawless one-click fill in all scenarios, especially with complex line art, several factors contribute to this perception. The primary culprits are usually the Tolerance and Contiguous settings, along with the quality of the lines themselves. If the lines are not perfectly closed or have anti-aliasing, the tool might struggle to recognize the area as a single, fillable region.
For a more consistent one-click fill, especially in comic art or illustration where clean fills are essential:
- Ensure Closed Lines: Double-check that your linework forms a completely closed shape. Even a single pixel gap can prevent a full fill.
- Adjust Tolerance: Experiment with higher tolerance values, but be mindful that this can also fill unintended areas if the colors are too similar.
- Use Anti-aliasing: Ensure the "Anti-aliasing" checkbox is enabled in the Paint Bucket Tool options. This option smooths the jagged edges of the fill, making it appear cleaner.
- "Smart Fill" or "Gap Options": Some versions or related tools might offer specific "gap closing" or "smart fill" functionalities, but the standard Paint Bucket Tool relies heavily on precise settings and clean artwork.
- Alternative Methods: While not a "one-click" solution with just the Paint Bucket Tool, alternative methods like using the Magic Wand Tool to select the area and then filling, or using the "Fill" command on a selection, can sometimes yield more predictable results for beginners. However, these involve more steps than a direct Paint Bucket click.
The perception that a simple mobile art app can outperform Photoshop in this specific function highlights a difference in underlying technology and user interface design. While Photoshop offers unparalleled depth and control, achieving seemingly simple tasks can sometimes require a deeper understanding of its advanced settings and the nature of digital image manipulation.
Conclusion
The Paint Bucket Tool in Photoshop is a versatile instrument that, when fully understood, can significantly enhance your digital art and design workflow. From applying solid color fills to creating subtle gradients and textures, its capabilities extend far beyond basic coloring. By mastering its various settingsâForeground/Pattern fill, Blending Modes, Opacity, Tolerance, Contiguous, and All Layersâand understanding common troubleshooting steps, users can unlock its full potential. Whether you're a beginner or an experienced professional, investing time in learning the nuances of the Paint Bucket Tool is a worthwhile endeavor for any Photoshop user.