Have you ever wondered how to remove a background in Procreate? Then this tutorial is just for you! Removing a background helps to make the object or subject stand out more. You may even want to use the isolated image in another project. In just a few steps, you will learn how to remove the background from an image in Procreate. This guide will delve into various methods, from simple selection tools to more advanced techniques, ensuring you can achieve a clean, transparent background for any of your creative endeavors.
We are using this butterfly background photo as our example. During the tutorial, we are making use of an iPad Pencil, but you can also use your finger to create a selection. Please note: we are using the latest version of Procreate 5X. If you do not see the features mentioned below, ensure your Procreate is up-to-date.

Importing Your Image into Procreate
The first crucial step in any background removal process is getting your image into the Procreate environment. Let’s begin by opening your selected image on the iPad. This can be an image you have downloaded or one from your camera roll.
We need to send this image to Procreate to be able to remove the background. To do this, tap on the Share icon in the top right and select Procreate from the applications. You will see a message pop up that says “Sending to Procreate.” Once done, the photo will be added to the gallery in Procreate.
4 Ways to Import Photos into Procreate
Method 1: Freehand Selection for Precise Control
Open the Procreate app on your iPad. Then, in the Procreate gallery, locate and open the photo you just imported. We need to create a selection around what we want to keep. Whatever isn’t selected will be removed. In this case, we want to keep the butterfly and remove the rest of the background.
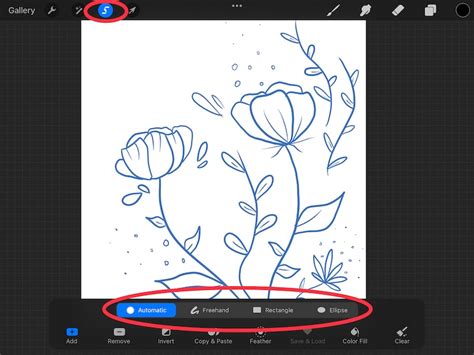
To create a selection, tap on the Selection tool (S icon) at the top of the screen. Then, in the options at the bottom, select the Freehand selection. Freehand selection will allow us to create our own selection. This is the best option when your background is very busy or when you need to meticulously outline a complex subject. The Automatic selection tool, while powerful, doesn't always select a single subject perfectly, so we will focus on Freehand for this detailed approach.
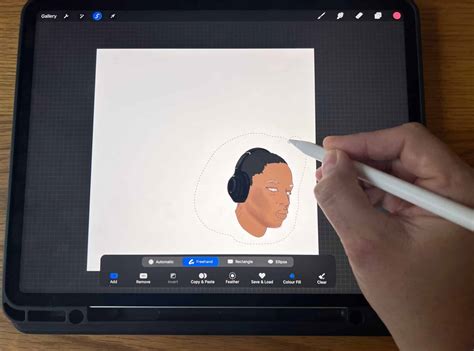
Use your finger or Pencil and begin outlining your subject. You will see a dashed line appear while you are drawing the selection. Once you have completely outlined your selection, tap on Copy & Paste. This action creates a new layer containing only the selected part of your image.
Next, we need to check if we have a clean cut where no background is showing. You can see this by going to your Layers Panel in the top right (stacked square icon). In the Layers Panel, you will see all of your layers, including the top layer called "From selection." This top layer is what we outlined with the Selection tool. Check if the selection was successful by un-ticking the visibility box for the imported layer or Layer 1. If you need more information on managing layers, we have a great tutorial on how to use Procreate layers.
Method 2: Leveraging the Automatic Selection Tool
Procreate is known for its intuitive interface, and the Automatic Selection tool is a prime example of its user-friendly approach. This tool is particularly effective when dealing with subjects that have a clear contrast from their background.
First, tap on the ‘Actions’ menu, which is found under the wrench icon. Navigate to the ‘Add’ tab on the drop-down menu. Tap on ‘Insert a Photo’ and locate your desired image in your device’s camera roll. Once your image is on the canvas, tap on the ‘Selection Tool,’ the S-shaped icon at the top of your screen. Select ‘Automatic’ from the left-hand side of the menu.
Now, tap on any part of the background that you want to remove. Procreate’s AI will attempt to intelligently select the surrounding pixels that appear to be part of the background. If the initial selection isn’t perfectly accurate, you can refine it by tapping and dragging around the object or background area you want to cut out. This allows for a degree of manual adjustment within the automatic process.
Once you are satisfied with the selection of the background, tap on ‘Invert’ from the selection tool menu. This crucial step reverses your selection, so instead of the background being selected, your subject is now highlighted. Next, tap on ‘Copy & Paste’. Procreate will automatically create a new layer with your cutout, isolating your subject.
To ensure a clean transparent background, tap on the Layers icon in the top-right menu (looks like a pair of overlapping squares). Deselect your original image and background layer by tapping on the square checkboxes next to them. Alternatively, you can delete them by swiping left on the layer and clicking ‘Clear’. This leaves you with only your isolated subject on a transparent canvas.

Refining Your Selection and Masking Techniques
While both Freehand and Automatic selection tools are powerful, sometimes a combination or a more nuanced approach is required for complex images. Procreate offers additional features that can significantly improve the quality of your background removal.
One advanced technique involves using masks. Open your Layers Panel and tap twice on the imported image layer. Then, tap ‘Copy’. Open up the same menu and tap ‘Mask’. This creates a mask layer associated with your copied image. Scrub three fingers down on the canvas and select ‘Paste’ (or use Actions → Add → Paste). This applies your copied image onto the mask.
Next, open up your Layers Panel again, then tap twice on the Mask itself and select ‘Invert’. This inverts the mask, effectively revealing the parts of your image that were previously hidden and vice-versa. This technique can be incredibly useful for fine-tuning selections.
Before you even attempt masking, consider adjusting the image's contrast. Play around with the Curves tool, specifically the Gamma setting, to make your darks darker and your lights brighter. An increase in contrast will produce more distinct lines, making it easier for selection tools to differentiate between your subject and the background.
4 Ways to Import Photos into Procreate
Understanding Procreate's Capabilities and Limitations
Procreate is primarily designed for digital sketching and illustration, which means its capabilities for complex image manipulation, like intricate background removal, can sometimes be less straightforward than dedicated photo editing software. While Procreate provides excellent selection tools, mastering them for perfect background removal often requires time and practice. It’s not always a five-minute job, especially with highly detailed or complex images.
For instance, the ‘Auto Selection’ tool, while convenient, can sometimes struggle with intricate objects or subtle gradients. In such cases, the Freehand Selection Tool, as mentioned earlier, becomes indispensable. You can also use the ‘Reference’ layer feature in conjunction with other tools. If you set a layer to Reference, you can then use tools like ColorDrop to fill in areas or create selections based on that reference. Ideally, you’ll create a layer below the Reference layer and use ColorDrop in here to block out your colors. If you drop it into the Gallery, it will create a canvas with the subject, and if you drop it into a canvas, it will create a layer with the subject.
If you find it tricky to switch between apps, Procreate offers a convenient way to work with subjects from other images. When you tap and hold a subject, you can continue to hold and then tap ‘Copy Subject’. You can then paste it into a canvas in Procreate using Actions → Add → Paste, or the Copy & Paste menu.
Exporting Your Transparent Image
Once you have successfully isolated your subject and are happy with the clean cut, it's time to save your image with a transparent background.
First, ensure you have deleted any unnecessary original image layers or background layers by swiping left and selecting Delete. Then, un-tick the visibility box for the background color to turn off the background. You should now be left with just your isolated image selection visible on a checkered background, which signifies transparency.
Then, go to the Actions panel (wrench icon) and tap on ‘Share’. From the options, select PNG. A transparent background will only work correctly when saved as a PNG file format. JPEGs, for example, do not support transparency and will fill the background with white.
There you go, you have now learned how to remove a background in Procreate. Remember, the background color needs to be toggled off before exporting to get a transparent background. We hope you enjoyed this tutorial and learned a new trick you can use with Procreate. Procreate allows you to change the size of your canvas, isolate a specific area, and resample an image to make it larger or smaller. The ability to toggle snapping can allow you to snap handles in line with the horizontal and vertical centers of the canvas, or the quadrants that they make up. You can toggle on Resample to have your entire image scaled up or down to the new dimensions.
For situations where Procreate’s built-in tools might not suffice for very complex or automated background removal, external AI-powered tools like Icons8 Background Remover can be a helpful alternative. These tools can automatically remove backgrounds from images with the help of artificial intelligence, offering a quick solution for batch processing or for users who prioritize speed and automation. However, for creative control and artistic refinement, mastering Procreate’s native tools remains the preferred method for many digital artists.
4 Ways to Import Photos into Procreate
tags: #how #to #remove #background #procreate