Eradicating an image's background is a fundamental skill for any digital artist or photo editor. Whether your aim is to declutter a busy scene, isolate a subject for a new composition, or simply replace an uninspired backdrop with something more captivating, Photoshop offers a robust suite of tools to achieve this. This tutorial will guide you through several effective methods for removing backgrounds in Photoshop, ranging from rapid, automated processes to meticulous manual techniques, ensuring you can tackle any image with confidence. We'll explore how to leverage Photoshop's built-in intelligence, precise selection tools, and even external solutions for unparalleled speed and quality.
The Power of Selection: Quick and Intelligent Background Removal
Photoshop's evolution has seen the integration of powerful Artificial Intelligence, notably Adobe's Sensei AI, which significantly streamlines the background removal process. These intelligent tools are designed to detect edges and differentiate subjects from their backgrounds with remarkable accuracy, saving considerable time and effort.
1. The Quick Selection Tool: Swift and Intuitive Isolation
The Quick Selection tool is an excellent starting point for many background removal tasks. It operates by allowing you to "paint" a selection over your desired subject. As you paint, Photoshop's AI analyzes the area and intelligently extends the selection to encompass the edges of the subject, making it easier to separate it from the background.
Best for: This tool excels in situations requiring quick selections, especially in images with clear contrast between the subject and the background. It's also adept at handling images with more intricate details where precise manual selection might be tedious.
How to remove backgrounds in Photoshop using the Quick Selection tool:
- Open your image: Sign in to Photoshop and upload your image by clicking "Create +" on the menubar to the left or selecting "Upload file" on the welcome screen.
- Access Quick Selection: Click on "Select" in the toolbar to open a range of options, and then choose "Quick Selection."
- Detect Objects: Toggle the "Detect objects" switch on. Photoshop will then prompt you to choose the image subject. For instance, if your image features a chair, you would select the chair.
- Initial Selection: Photoshop will highlight your chosen subject with a pink overlay and wiggly lines, confirming your selection.
- Copy the Subject: Press
Ctrl + C(orCmd + Con macOS) on your keyboard to copy the selected area. - Create a New Layer: Navigate to the "Layers" menu on the right side of the screen. Click the "+" sign to create a new, empty layer.
- Paste the Subject: In this newly created layer, press
Ctrl + V(orCmd + Von macOS) to paste the copied subject. - Hide the Original: Click on the original layer that contains the entire image. Then, click the eye icon next to it to hide it. You will now be left with your subject isolated on a transparent background.
2. The Remove Background Tool: One-Click Simplicity
For those seeking the utmost in speed and simplicity, Photoshop's "Remove Background" tool offers an almost instantaneous solution. This feature leverages AI to automatically identify and remove the background in a single step.
Best for: This tool is ideal for images with a single, clearly defined subject against a relatively simple background. It's perfect for when you need to quickly erase backgrounds without the need for pixel-perfect edge refinement, though some manual touch-ups might be necessary for complex areas.
How to erase backgrounds in Photoshop with the Remove Background tool:
- Open your image: Sign in to Photoshop and upload your image by clicking "Create +" on the menubar to the left or selecting "Upload file" on the welcome screen.
- Activate the tool: Click the "Remove background" option, which is typically located at the bottom of the image in the editing screen.
- Automatic Removal: Photoshop will then scan the image, identify the primary subject, and automatically erase the background.
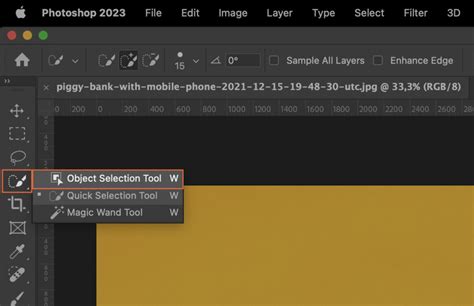
3. The Object Selection Tool: Advanced AI-Powered Selection
Introduced in Photoshop 2022, the Object Selection tool takes AI-powered selection a step further. It allows you to quickly select distinct objects within an image by simply hovering your cursor over them.
Best for: This tool is highly effective for images with multiple objects or complex compositions where you need to isolate specific elements efficiently.
How to use the Object Selection tool for background removal:
- Open your photo: Launch Photoshop and open the image you wish to edit.
- Select the tool: Choose the "Object Selection" tool from the toolbar on the left (it shares a spot with the Quick Selection Tool in some versions).
- Hover and Select: Hover your cursor over the subject you want to select. As you do, Photoshop will display a blue highlight on the object.
- Auto-Select Objects: To automatically select all discernible objects in the vicinity, press and hold the
Shiftkey while the Object Selection tool is active and hover over your subject. Photoshop will then automatically select each object, indicated by the "marching ants" outline. - Prepare for Deletion: Before deleting, you may need to unlock your image layer if it's currently a locked "Background" layer. This is typically done by clicking the lock icon on the right side of your image's layer in the Layers panel. The layer will then be renamed, often to "Layer 0."
- Inverse Selection (if needed): If you've selected the subject and want to delete the background, you'll need to invert the selection. Go to
Select > Inverse. The "marching ants" should now encompass the background. - Delete the Background: Press the
Deletekey (orBackspaceon Windows) to remove the background. You should now see a transparent, checkered pattern.
Precision and Control: Manual Techniques for Intricate Edits
While AI tools are incredibly powerful, there are times when manual control is paramount for achieving flawless results, especially with intricate details or challenging edges.
4. The Eraser Tool: Direct Manipulation
The standard Eraser tool offers direct, pixel-by-pixel control over background removal. It functions much like a digital eraser, allowing you to manually paint over and remove unwanted areas of the image.
Best for: This tool is invaluable when you need to meticulously erase specific parts of the background or when working with irregularly shaped subjects where automated tools might struggle. It requires patience and a steady hand.
How to delete backgrounds in Photoshop with the Eraser tool:
- Open your image: Sign in to Photoshop and upload your image.
- Select the Eraser Tool: In the left-hand menu, navigate to "Paint" and select the "Eraser" option. Your cursor will transform into a circular brush.
- Adjust Brush Settings: You can adjust the brush's size and hardness in the options bar at the top of the screen. A harder brush will create a sharp edge, while a softer brush will create a more gradual transition.
- Erase the Background: Carefully glide the eraser cursor over the areas you wish to remove. Be mindful to avoid erasing parts of your main subject. Zooming in is highly recommended for precise work.
- Save your Image: Once satisfied, click the blue "Download" button at the top menu bar to save your background-free image. Ensure you save in a format that supports transparency, like PNG.
5. The Background Eraser Tool: Guided Manual Removal
The Background Eraser tool provides a hybrid approach, offering more control than the automatic tools while still incorporating some intelligent edge detection. It works by sampling colors and erasing them as you drag the tool.
Best for: This tool is useful when you need more precise control over background removal than automated tools offer, but still want Photoshop to assist in the process. It's particularly helpful for subjects with fine details like hair or fur.
How to use the Background Eraser tool:
- Open and Duplicate Layer: Open your image in Photoshop. Right-click your "Background" layer in the Layers panel and select "Duplicate Layer." Name it as desired and click "OK." This ensures you have a non-destructive copy to work with.
- Select the Background Eraser Tool: Locate the Background Eraser tool in the toolbox (it might be nested under the regular Eraser tool).
- Configure Tool Options: In the options bar at the top:
- Brush Size and Hardness: Adjust the brush size using the square bracket keys (
[and]) for convenience. Set the hardness to around 100% for cleaner edges. - Sampling: Set "Sampling" to "Continuous." This tells the tool to continuously sample colors as you drag.
- Limits: Choose "Find Edges." This helps the tool detect and preserve the edges of your subject.
- Tolerance: Set the "Tolerance" to around 20-25%. A lower tolerance will remove fewer color variations, while a higher tolerance will remove more. Experiment to find what works best for your image.
- Brush Size and Hardness: Adjust the brush size using the square bracket keys (
- Erase Carefully: Click and drag the tool around the edges of your subject. The goal is to keep the crosshairs (which sample the color) away from your subject while the brush removes the background. Zoom in for detailed areas. Use short strokes and consider letting go of the mouse button periodically to allow Photoshop to process the selection.
- Refine Edges: If the tool is removing too much or too little, adjust the Tolerance. For very fine details, you may need to switch Sampling to "Once" and Limits to "Discontiguous" with a lower Tolerance (around 10%) to target specific colors more precisely.
6. The Pen Tool: Ultimate Precision for Complex Selections
The Pen Tool is the professional's choice for creating highly precise selections. It allows you to draw vector paths around your subject, offering complete control over every curve and point. While it's the most time-consuming method, it yields the most accurate results, especially for subjects with well-defined edges.
Best for: Images with intricate details, subjects with smooth, defined curves, or when absolute precision is required. It's a cornerstone tool for professional photo retouching.
How to delete backgrounds in Photoshop with the Pen Tool:
- Open and Duplicate Layer: Open your image in Photoshop and duplicate the "Background" layer.
- Select the Pen Tool: Choose the Pen Tool from the toolbar.
- Create a Path: Zoom in closely to your subject. Click to create anchor points along the edge of your subject. For curved lines, click and drag to create Bezier curves.
- Complete the Path: Work your way around the entire subject, ensuring you connect back to your starting point to close the path.
- Save the Path: Open the "Paths" panel (
Window > Paths). Click the menu icon and select "New Path." Give your path a descriptive name. - Make a Selection: Right-click on your saved path in the Paths panel and choose "Make Selection." Leave the default feather radius at 0 pixels for a sharp edge, or adjust slightly if a softer edge is desired. Click "OK."
- Inverse the Selection: With the subject now selected (marching ants), go to
Select > Inverseto select the background. - Delete the Background: Press the
Deletekey. - Refine: Even with the Pen Tool, some minor cleanup might be necessary using other tools or layer masks.
Leveraging External Tools for Unmatched Speed
For users who prioritize speed and ease of use, or who have a high volume of images to process, dedicated background removal tools offer an excellent alternative or complement to Photoshop's built-in features.
Photoroom: AI-Powered Background Removal in Seconds
Photoroom is a powerful, AI-driven tool designed for rapid and high-quality background removal. It utilizes advanced image recognition and segmentation algorithms to automatically isolate subjects and remove backgrounds, often with remarkable accuracy, without requiring complex software or extensive editing skills.
Best for: Users with little to no editing experience, those needing to process many images quickly, or businesses looking to streamline their product photography workflow.
How to erase image backgrounds faster with Photoroom:
- Access Photoroom: Sign up to use their Web editor or download the free app for iOS or Android devices.
- Upload Your Image: Upload the picture you want to edit.
- Automatic Removal: Photoroom's AI will automatically detect and remove the background, delivering a high-quality result.
- Further Editing (Optional): After background removal, you can resize your image, adjust lighting and shadows, or use AI to generate new, custom backgrounds.
- Batch Processing: Photoroom's Batch Mode feature is a game-changer for processing hundreds of images at once, significantly saving time for businesses and e-commerce sellers. Ashley Peek, a top seller on Poshmark, reported a 45x revenue boost by using Photoroom's Batch Mode to create high-quality images.
Combining Techniques for Optimal Results
In many cases, the most effective approach to background removal involves combining multiple tools and techniques. For instance, you might use the Quick Selection tool for an initial, broad selection, and then employ the Refine Edge option (or Select and Mask workspace) to meticulously clean up the edges, especially around hair or fine details.
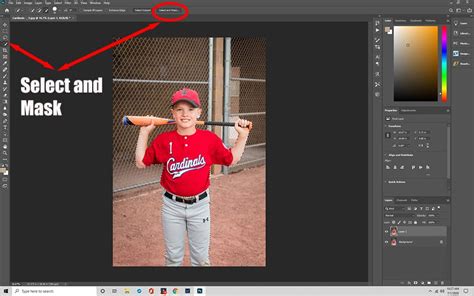
Refining Selections with "Select and Mask"
The "Select and Mask" workspace is a dedicated environment within Photoshop designed for refining selections. It offers tools like the "Refine Edge Brush Tool," which is excellent for improving selections around soft or complex edges like hair, fur, or foliage. You can also adjust sliders for smoothing, feathering, contrast, and shifting the edge to achieve a perfect blend.
How to refine edges:
- Make an Initial Selection: Use any of the selection tools mentioned above (Quick Selection, Object Selection, Pen Tool, etc.) to create a rough selection of your subject.
- Enter Select and Mask: With your selection active, click the "Select and Mask…" button in the options bar (or go to
Select > Select and Mask...). - Use the Refine Edge Brush: Select the "Refine Edge Brush Tool" from the left-hand toolbar within the workspace. Paint over the edges of your subject, particularly areas like hair or fur. Photoshop will analyze these areas and attempt to separate the subject more accurately from the background.
- Adjust Global Settings: Utilize the sliders on the right-hand panel (e.g., Smooth, Feather, Contrast, Shift Edge) to fine-tune the overall selection.
- Output Settings: In the "Output Settings" section, choose how you want the refined selection to be applied. For background removal, "Output To: Layer Mask" is often the most flexible and non-destructive option. Click "OK."
- Apply Layer Mask: A layer mask will be applied to your layer, effectively hiding the background. You can further refine the mask by painting on it with black (to hide) or white (to reveal) brushes.
Saving Your Transparent Image
The final crucial step is saving your image in a format that preserves transparency.
- PNG (.png): This is the most common format for web graphics and images requiring transparent backgrounds. It supports lossless compression, meaning no image quality is lost.
- GIF (.gif): While it supports transparency, GIF is limited to 256 colors and is best suited for simple graphics or animations.
- TIFF (.tif): A high-quality format that supports transparency and is often used in print and professional workflows.
To save your image: Go to File > Save As... or File > Export > Export As... and choose your desired format, ensuring the transparency option is enabled.
By mastering these diverse techniques, you can confidently tackle any background removal task in Photoshop, transforming ordinary images into visually striking compositions. The continuous advancements in Photoshop, particularly with AI-driven features, mean that removing backgrounds is more accessible and efficient than ever before.