Navigating the intricate world of Photoshop layers can often feel like an expedition through a dense forest, especially when the goal is to isolate a specific element, like an arrow icon, for use on a website with a transparent background. The common frustration of sifting through numerous layers, often by trial and error, is a sentiment shared by many designers working with web templates. Fortunately, Photoshop offers a sophisticated suite of tools and techniques designed to streamline this process, allowing for precise layer selection and efficient extraction. This guide delves into these methods, moving from specific techniques for isolating single elements to broader strategies for managing and manipulating multiple layers.
The Challenge of Layer Isolation
When working on a web design template within a Photoshop document (PSD file), a common task is to extract a specific graphic element, such as an arrow icon, while ensuring it has a transparent background for seamless integration into a website. The inherent complexity arises from the layered nature of PSD files, where each element, from background textures to intricate icons, resides on its own layer. The default behavior, even when using the Move Tool and its right-click context menu, often presents a list of layers, requiring further identification and selection. This can be a time-consuming and inefficient process, particularly in files with dozens or even hundreds of layers. The need for a more direct and immediate way to pinpoint and isolate a desired layer is paramount for efficient workflow.

Leveraging the Move Tool for Precision Selection
One of the most direct ways to select a layer is by using the Move Tool in conjunction with its "Auto-select" option. This feature allows Photoshop to intelligently select the layer that contains the pixels you click on directly within the document window.
Enabling Auto-Select
To activate this functionality, select the Move Tool (shortcut: V). In the Options bar at the top of the Photoshop interface, you will find the "Auto-select" checkbox. When this box is checked, clicking on an element in your document will automatically select the corresponding layer in the Layers panel.
There are two primary modes for Auto-select:
- Layer: When "Layer" is selected from the Auto-select dropdown menu, clicking on an object will select the individual layer it resides on. This is ideal for isolating single elements like your arrow icon.
- Group: If you have organized your layers into groups, selecting "Group" will automatically select the entire group containing the clicked element. This is useful for moving or transforming sets of related layers as a single unit.
The Power of Ctrl/Command + Click
Even if Auto-select is disabled, a powerful shortcut exists for precise single-layer selection. While the Move Tool is active, holding down the Ctrl key (on Windows) or the Command key (on macOS) and then clicking on an element in the document window will temporarily activate Auto-select for that click. This allows you to select a specific layer without altering your general Auto-select settings, offering a quick and unobtrusive way to target individual elements.
Isolating a Layer for Web Use: Step-by-Step
Once you have successfully selected your target layer, the next crucial step is to isolate it for use on a website, ensuring transparency and a perfectly trimmed canvas.
Duplicate the Layer: With the desired layer selected in the Layers panel, navigate to the Layer menu at the top of the Photoshop interface. From the dropdown, choose "Duplicate Layer." A dialog box will appear. Crucially, at the bottom of this dialog, you will find a "Destination" field.

Create a New Document: In the "Destination" field of the Duplicate Layer dialog, click the dropdown menu and select "New." This action will create a brand new Photoshop document that contains only the duplicated layer, with all other layers from your original document hidden. This new document will automatically have a transparent background if the original layer had transparency.
Trim Empty Pixels: The new document now contains your isolated layer, but it may still have a large, transparent canvas surrounding it. To achieve a perfectly sized image, go to the Image menu and select "Trim."
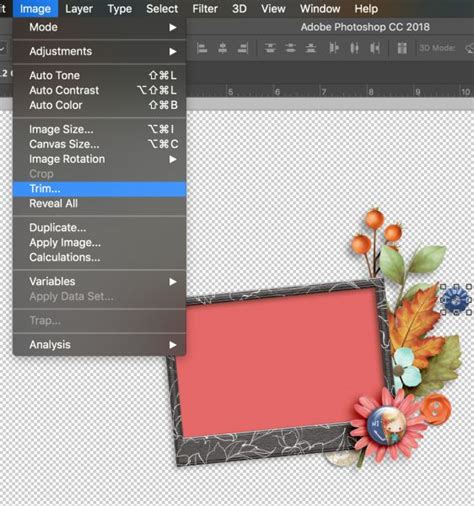
Configure Trim Settings: In the Trim dialog box, ensure that the option "Transparent Pixels" is checked under the "Trim Away" section. You can also choose whether to trim from the Top, Bottom, Left, and Right. For isolating an icon, selecting "Transparent Pixels" and leaving the directional options checked will ensure the canvas is resized precisely to fit the bounds of your isolated layer, eliminating all surrounding empty transparent space.
This sequence of actions provides a robust method for extracting any layer from a complex PSD file and preparing it for web use with a transparent background and a perfectly fitted canvas.
Beyond Single Layer Isolation: Managing Multiple Layers
While isolating a single icon is a common requirement, Photoshop's layer management capabilities extend to handling multiple layers for more complex design tasks.
Selecting Multiple Layers
Photoshop offers several ways to select more than one layer simultaneously:
- Shift-Click: In the Layers panel, click on the first layer you want to select. Then, hold down the
Shiftkey and click on another layer. This will select both the initial layer and all layers in between them. - Ctrl/Command-Click: To select multiple, non-contiguous layers, hold down the
Ctrl(Windows) orCommand(macOS) key and click on each individual layer you wish to select. This is particularly useful for picking out specific layers scattered throughout a large panel. - Drag-Select: With the Move Tool selected and "Auto-select" enabled (either for "Layer" or "Group"), you can click and drag a marquee box over multiple layers in the document window. All layers that fall within this marquee will be selected. This method works best when layers are not overlapping significantly or when you have a background layer that is locked (as locked layers are typically ignored by Auto-select).
- Context-Sensitive Menus: With the Move Tool active, you can
Ctrl-click (Windows) orRight-click(macOS) directly on an element in the document window. A context-sensitive menu will appear, listing the layers that contain pixels under your cursor. You can then select the desired layer from this list.
Layer Arrangement and Grouping
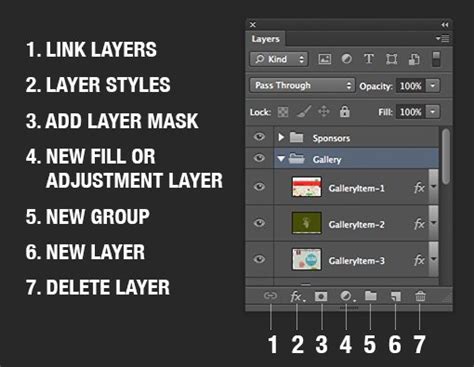
Effective organization is key to managing a large number of layers. Photoshop provides tools to rearrange and group layers, treating them as single entities for various operations.
- Rearranging Layers: Layers can be reordered in the Layers panel by simply clicking and dragging them up or down in the stacking order. Dragging a layer into a folder icon will place it within a group.
- Layer Arrangement Commands: You can also use the Layer menu's "Arrange" submenu to move selected layers up, down, forward, backward, or to the very front or back of the layer stack. If the selected item is within a group, these commands will apply to its stacking order within that group. The "Reverse" command within this submenu is useful for quickly flipping the stacking order of multiple selected layers.
Locking Layers
To prevent accidental modifications, Photoshop allows you to lock layers. A lock icon will appear next to the layer name when it is locked.
- Lock Transparent Pixels: This option confines editing to the opaque portions of a layer, leaving transparent areas untouched.
- Lock Image Pixels: Prevents any changes to the pixels on the layer.
- Lock Position: Prevents the layer from being moved.
- Lock All: Locks all aspects of the layer.
Locking layers can be particularly helpful when using Auto-select, as locked layers will be skipped, preventing them from being inadvertently selected and moved.
Advanced Layer Filtering and Isolation
For extremely complex documents, Photoshop offers advanced filtering and isolation features to manage the Layers panel effectively.
Filtering Layers
At the top left of the Layers panel, you'll find a dropdown menu that allows you to filter layers based on various criteria:
- Kind: Filter by layer type (e.g., pixel layers, adjustment layers, text layers, smart objects).
- Name: Filter by layer name.
- Effect: Filter by layer effects.
- Mode: Filter by blending mode.
- Attribute: Filter by properties like pixel data, position, or color.
- Color: Filter by the color label assigned to layers.
- Smart Object: Specifically find all smart object layers.
- Selected: Display only the currently selected layers.
- Artboard: Filter for layers within specific artboards.
A "light switch" icon next to the filter dropdown toggles the filtering on and off. You can often select multiple filter types simultaneously to narrow down your search even further. For instance, filtering by "Kind" and then selecting "Smart Object" will show only smart object layers.
Layer Search
A powerful search function can be activated by pressing Option + Command + Shift + F (macOS) or Alt + Control + Shift + F (Windows). This toggles on "Layer Search" in the Layers panel, allowing you to type a layer's name to quickly locate it.
Isolate Layers Feature
Perhaps the most direct way to tackle panel complexity is the "Isolate Layers" feature.
- Select Desired Layers: In the Layers panel, select the layers you want to work with.
- Activate Isolate Layers: Go to the Select menu and choose "Isolate Layers."
- View and Work: The Layers panel will immediately update to show only the selected layers, hiding all others. This drastically simplifies the workspace, allowing you to focus on the elements you need.
- Toggle Off: To return to the full view of all layers, simply select "Isolate Layers" again from the Select menu. Alternatively, selecting "Selected" from the "Filter Type" dropdown in the Layers panel achieves the same immediate isolation effect.
These advanced techniques transform the daunting task of layer management into a streamlined and efficient process, empowering designers to extract elements, build complex compositions, and maintain order within even the most intricate Photoshop documents. Understanding and applying these methods will significantly enhance your workflow, allowing you to achieve precise results with greater speed and less frustration.