Encountering an unexpected grey background when copying and pasting text into Microsoft Word can be a frustrating experience, especially when facing tight deadlines. This phenomenon often arises because the text retains formatting from its original source, including background shading. Fortunately, Word offers several built-in features to address this issue, allowing users to regain control over their document's appearance. Beyond text manipulation, the challenge of removing backgrounds from images also presents itself, requiring different approaches and tools.
Understanding the Source of Grey Backgrounds in Word
The appearance of a grey background when pasting text into Microsoft Word is a direct consequence of how software handles copied content. When you copy material from a website or another document, it often carries its inherent formatting. This formatting can include specific font styles, sizes, line spacing, and, crucially, background shading applied to the text. The shading feature in Word, for instance, applies a background color to text, which can be customized to match document themes or selected from a color wheel. When this formatting is transferred, the grey background effectively acts as a persistent highlight.
The reason why this grey background appears is precisely because the text is copying the formatting from its source. While this process can sometimes clear other formatting elements like font type, size, and spacing, the background shading often persists. This can be particularly vexing if the goal is to have clean, unformatted text.
Methods for Removing Grey Backgrounds from Text in Word
Microsoft Word provides multiple straightforward methods to remove unwanted grey backgrounds from text. These methods cater to different user preferences and the specific nature of the formatting applied.
Using the Shading Feature
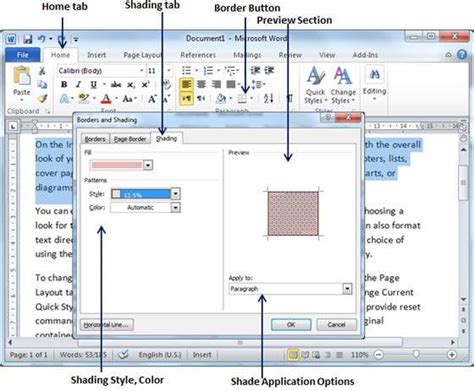
One of the most direct ways to tackle a grey background is by utilizing Word's Shading feature. This tool allows you to modify or remove the background color applied to selected text or entire paragraphs. By accessing the Shading option, typically found within the "Format" menu (or accessible via the "Home" tab's "Paragraph" group, often labeled as "Shading"), you can select "No Color" or choose a different shade to replace the grey. This effectively removes the background shading, which is the yellow color of the text you selected, or in this case, the grey color.
It's important to distinguish the Shading feature from other formatting applications. While the Shading feature directly addresses background color, sometimes the issue might be more complex. If the grey color is persistent or not entirely removed by shading adjustments, it's possible that "Borders" have also been applied to the text, creating a more stubborn background effect.
The "Clear Formatting" Option
Another highly effective method for removing all formatting, including unwanted backgrounds, is the "Clear Formatting" option. This function, usually found on the "Home" tab in the "Font" group, is represented by an icon with a capital "A" and an eraser. Applying "Clear Formatting" to selected text will strip away all applied formatting, reverting the text to its default style. This includes removing background colors, font changes, bolding, italics, and other stylistic modifications. This is an excellent choice when you want to start with a completely clean slate for your pasted text, ensuring no residual formatting interferes with your document's design.
Borders and Shading Feature Nuances
The "Borders and Shading" feature in Word offers a more comprehensive approach to text formatting, including background color. While the Shading feature specifically targets the fill color behind the text, the "Borders and Shading" dialog box provides granular control over both borders and background fills. If the grey background is proving difficult to remove with the basic Shading tool, exploring the "Borders and Shading" dialog box is recommended. Here, you can ensure that no unwanted borders are applied and that the shading is set to "No Color." This method is often preferred as it can be applied to selected text or an entire paragraph without altering other aspects of the text's formatting, such as font type or size, unlike the "Clear Formatting" option which removes all.
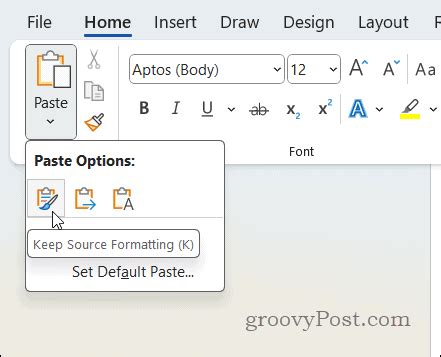
A user might encounter a scenario where they paste text, and it appears with a grey background, as if it were highlighted. They might have tried paste settings but are looking for alternative solutions. The "Highlight" feature, accessible from the Ribbon's "Home" tab, is often mistaken for background shading. However, the "Shading" feature, accessible from the main menu bar's "Format > Borders and Shading," can be applied to selected text or to the whole paragraph, offering a more direct way to manage background colors. For text copied from web pages, the "Cell fill" option within table formatting can also sometimes be a factor, though less common for general text.
How to remove Background color of text in Word || All possible methods
Addressing Backgrounds in Images: Beyond Text
While removing grey backgrounds from text in Word is a relatively straightforward process, the task of removing backgrounds from images presents a different set of challenges and requires different tools. Unlike text formatting, image background removal often involves complex algorithms to distinguish between the foreground subject and the background.
Online Tools for Image Background Removal
For users needing to remove backgrounds from photos, specialized online tools have become increasingly popular. These platforms leverage artificial intelligence to automate the process, often delivering results in seconds. However, the quality and features of these free tools can vary significantly.
Some free tools, like remove.bg, may offer quick background removal but can limit the resolution of the downloaded images, making them unsuitable for high-quality projects. Other services, such as PhotoRoom, might leave a watermark on the edited images, necessitating a paid subscription for watermark-free results.
The most effective approach for image background removal often involves using online tools that can quickly process images and deliver high-quality results. The ideal tool would precisely create a transparent PNG of the subject without blurring the edges of the cutouts, ensuring a clean and professional finish.
Advanced Object Removal and Image Enhancement
Beyond simple background removal, there are situations where users might want to remove specific unwanted objects from an image while retaining the rest of the background. This is different from deleting the entire background. For such tasks, tools that allow selective object removal are invaluable.
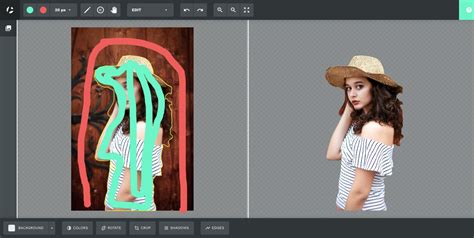
Clearoff is an example of a highly efficient tool designed for this purpose. It allows users to tap or draw over unwanted objects, which the software then removes, blending the surrounding areas seamlessly. This capability doesn't require advanced Photoshop or graphic design skills, making it accessible to a broader audience.
However, a common issue with many image editing tools, especially those that process images online, is the quality of the input and output. Input images are not always in High Definition (HD). While several image enhancement tools can upscale images to resolutions like 2K or 4K, there's a significant drawback: transparent PNGs often acquire a black background when processed by these upscaling tools. This can render the image ineffective for its intended purpose, particularly if transparency is crucial.
Achieving High-Quality Transparent PNGs
When the goal is to create a transparent PNG with clean edges and without an unwanted black background, careful selection of tools is paramount. Some online services are specifically designed to handle this with precision. For instance, tools that offer an "Edit" button allow for further adjustments to the selected background image or object.
If a transparent background appears too empty, and the user wishes to retain a background but remove only specific elements, tools like Clearoff are ideal. This selective object removal is a powerful technique that avoids the need for extensive photo editing expertise. The key is to find a tool that not only removes unwanted elements but also preserves the integrity and quality of the remaining image, especially when dealing with transparent backgrounds.
Synthesizing Solutions for Word and Image Editing
In summary, when faced with a grey background in Microsoft Word after copying and pasting, users have several reliable options. The Shading feature, the Clear Formatting option, and the more comprehensive Borders and Shading dialog box all provide effective means to rectify the issue. The choice among these often depends on whether other formatting needs to be preserved.
For image editing, the landscape is more varied. While free online tools can offer quick solutions, they often come with limitations in quality or features. For precise background removal or selective object deletion, specialized online services and tools like Clearoff are recommended. The challenge of maintaining transparency and high resolution, especially after image enhancement, requires careful consideration of the tools employed. Ultimately, a combination of Word's built-in functionalities and targeted image editing solutions can address a wide range of background-related challenges, ensuring documents and visual content meet professional standards.