The digital landscape of image formats can often feel like a labyrinth, especially when aiming for seamless integration with widely used platforms like Google Docs. One common point of friction arises from Apple's adoption of the High Efficiency Image File Format (HEIC) for its devices, a format that, while efficient, can present compatibility challenges. This article delves into the necessity and methods of converting HEIC files to JPG, specifically for use within Google Docs, exploring the technical underpinnings and practical solutions.
Understanding HEIC and JPG: A Format Face-Off
To effectively convert HEIC to JPG, it's crucial to understand the fundamental differences between these two image formats.
HEIC (High Efficiency Image File Format): This is a modern container format that stores images, sequences of images, and image data. It's an evolution of the High Efficiency Image File Format (HEIF), which leverages advanced video compression technology known as HEVC (High Efficiency Video Coding), also referred to as H.265. HEVC is a standard developed by the Moving Picture Experts Group (MPEG), the same committee responsible for widely adopted video compression standards like MPEG-1, MPEG-2, MPEG-4, and H.264/AVC. Images compressed as HEIF are typically saved with the .heic filename extension.
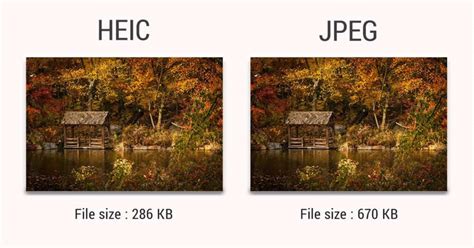
The primary advantage of HEIC lies in its efficiency. It allows digital photographs to be captured and stored in significantly smaller file sizes compared to older formats like JPEG, while simultaneously retaining a higher image quality. This is particularly beneficial for mobile devices, where storage space can be a premium. HEIC was introduced as a default image format for iPhones with iOS 11, replacing JPEG in this role. A notable feature of HEIC is its ability to store multiple images within a single file, making it suitable for burst photos or image sequences. Furthermore, HEIC files can embed rich metadata, including depth information for portrait mode photos, which can be utilized for post-capture editing.
JPG (Joint Photographic Experts Group): Known commonly by its .jpg or .jpeg filename extension, JPEG is a raster image format that has been a staple of digital photography and web use for decades. It is named after the committee that developed it, the Joint Photographic Experts Group. JPEG is a popular method of lossy compression for digital images. This means that during compression, some image data is discarded to reduce file size. The degree of compression can be altered, offering a trade-off between file size and image quality.
While JPEG offers broad compatibility across virtually all devices and software, it has limitations. One significant drawback is its inability to support transparent backgrounds; JPG images will always have a solid background. Another aspect to consider is that JPEG is a "lossy" format, meaning repeated saving and editing can degrade image quality over time. Despite these limitations, its widespread adoption and excellent balance between file size and quality for photographic images have made it the de facto standard for many applications, including Google Docs.
Why Convert HEIC to JPG for Google Docs?
The necessity for conversion primarily stems from compatibility issues. While Google Docs has improved its handling of various file types over the years, direct support for HEIC can be inconsistent or may not offer the full range of functionality expected when embedding images.
- Universal Compatibility: JPG is a universally recognized image format. When you convert an HEIC file to JPG, you ensure that the image will display correctly and consistently across different operating systems, web browsers, and applications, including Google Docs. This eliminates the risk of the image not appearing or being displayed with errors.
- Streamlined Workflow: For users who frequently share or collaborate on documents using Google Docs, maintaining a consistent workflow is essential. Working with JPG files simplifies this process, as there's no need to worry about whether the recipient's system can render HEIC images.
- Metadata Considerations: While HEIC can store extensive metadata, this can sometimes lead to larger file sizes or compatibility issues when the metadata is not fully supported by the target application. Converting to JPG allows for the removal or management of EXIF metadata, which can be beneficial for reducing file size and ensuring broader compatibility. Some converters offer the option to remove EXIF data, which can save storage space on devices.
- Editing and Manipulation: Many image editing tools and features within Google Docs or other common applications are optimized for JPG. Converting to JPG ensures that these tools will function as expected without any unforeseen compatibility problems.
Methods for Converting HEIC to JPG
Fortunately, converting HEIC files to JPG is a straightforward process with several accessible options, ranging from online converters to dedicated software.
Online Conversion Services
Online file converters offer a convenient, no-installation-required solution for converting HEIC to JPG. These services typically operate through a web browser.
How they work:
- Upload: Users select one or multiple HEIC files from their computer or drag and drop them into the browser window.
- Conversion: The online service processes the files, converting them to the desired JPG format.
- Download: Converted JPG files are made available for download, often through a direct link, a QR code for mobile devices, or by saving them directly to cloud storage services like Google Drive or Dropbox.
Key features and considerations for online converters:
- Ease of Use: Most online converters are designed for simplicity, requiring minimal user input.
- Batch Processing: Many services support batch conversion, allowing users to convert multiple HEIC files simultaneously, saving time and effort. This is particularly useful for users with many iPhone or iPad pictures to process.
- Quality and Settings: Some converters allow users to adjust output parameters such as image quality, resolution (DPI), resizing, cropping, and compression. This offers a degree of control over the final JPG file.
- Privacy and Security: Reputable online services prioritize user privacy. For instance, fCoder Solutions Sp. z o.o. notes that "All uploaded files will be deleted from our servers forever after one hour" and that "We do not use your files in any way and do not give access to them to any third parties." They typically only store file names and conversion types for internal analysis, with no personal data being collected or transferred. Secure IT environments and measures to prevent unauthorized access are usually in place.
- No Software Download: A significant advantage is that no software needs to be downloaded or installed, making it an ideal solution for users who prefer not to clutter their systems or have limited administrative privileges.
- Speed: Conversion speeds can vary depending on the service, file size, and internet connection.
A prime example of such a service is the one offered by fCoder Solutions Sp. z o.o., which converts MacOS and iOS photos online to JPEG or PNG without compromising quality or changing your workflow. They emphasize taking Apple’s new HEIC (HEIF) format without worrying about compatibility. Another option mentioned is the Online Image Converter at online-image-converter.com.
Offline Software Solutions
For users who prefer an offline approach, either due to security concerns, a need for more advanced settings, or a desire to avoid uploading files to external servers, dedicated software offers a robust alternative.
DocuFreezer: This program is specifically suggested as an offline solution by fCoder Solutions. It provides more granular control over the parameters of output JPEGs.
Key features and considerations for offline software:
- Advanced Settings: DocuFreezer offers more extensive settings, such as changing the color mode (CMYK, RGB, RGB/A, Grayscale, etc.), applying watermarks, and fine-tuning compression levels. This level of control is beneficial for professional workflows or specific output requirements.
- Security: By operating offline, these solutions eliminate the need to upload sensitive files to third-party servers, providing an added layer of security and privacy.
- Batch Processing: Similar to online services, offline software often supports batch processing, enabling users to convert large numbers of HEIC files efficiently.
- Installation Required: The primary drawback is that these solutions require software to be downloaded and installed on your computer.
HOW TO CONVERT HEIC TO JPG WINDOWS
Built-in Operating System Tools
Both macOS and iOS have built-in functionalities that can assist with HEIC to JPG conversion, albeit sometimes indirectly.
On macOS:
- Preview App: You can open an HEIC file in the Preview app, then go to
File > Export. In the export dialog, you can choose JPEG as the format and adjust quality settings. - Finder (Copy as JPEG): For single HEIC files, you can right-click (or Control-click) the file in Finder and select "Quick Actions" > "Convert Image." You can then choose JPEG and select the desired size.
On iOS:
- Settings: You can change your camera settings to capture photos in JPEG format by default. Navigate to
Settings > Camera > Formatsand select "Most Compatible." This ensures that future photos are saved as JPGs, bypassing the need for conversion. - Files App: While not a direct converter, you can sometimes export images from certain apps to JPG format.
Advanced Conversion Options and Considerations
Beyond basic conversion, several advanced features and considerations can enhance the process and the final output.
Image Quality and Resolution
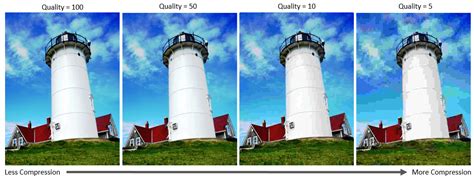
When converting HEIC to JPG, maintaining the original image quality is paramount. Modern converters aim to preserve the full resolution and quality of the converted files. Your photos should ideally keep their original DPI (dots per inch) and dimensions after being converted to JPEG. However, since JPEG is a lossy format, some degree of data is inevitably lost during compression. Users can often control the level of compression, balancing file size with visual fidelity. Setting the output file image quality to a higher setting will result in a larger file but better visual quality.
Resizing and Cropping
Many conversion tools offer options to resize or crop images during the conversion process. This can be useful for preparing images for specific uses, such as fitting them into a particular document layout or reducing their overall dimensions to save space. Resizing allows you to change the width and height of an image, while cropping allows you to remove unwanted parts of the image.
Batch Conversion for Efficiency
For users dealing with a large number of HEIC files, batch conversion is a critical feature. Instead of manually converting each file, batch processing allows you to select multiple HEIC files or even entire folders containing HEIC images and convert them all at once. This significantly speeds up the workflow, especially when preparing a collection of photos for upload to Google Docs or for archiving.
Metadata Management
As mentioned earlier, HEIC files can contain rich metadata, including EXIF data. While this metadata can be useful for photographers (e.g., camera settings, date, time, location), it also contributes to file size. Some conversion tools offer the option to remove EXIF metadata during the conversion process. This can be a useful feature for reducing file sizes, especially if the metadata is not required for your intended use.
Integrating Converted Files into Google Docs
Once your HEIC files have been successfully converted to JPG, integrating them into Google Docs is straightforward.
- Open your Google Doc.
- Navigate to the point where you want to insert the image.
- Go to
Insert > Imagefrom the menu bar. - Select "Upload from computer."
- Browse to and select your converted JPG file.
The JPG image will then be embedded into your Google Doc, ready for viewing and sharing.
Conclusion
The transition from HEIC to JPG for compatibility with platforms like Google Docs is a common requirement for many users. Fortunately, the process is accessible through a variety of online converters, offline software, and built-in operating system tools. Whether you prioritize convenience and speed with online services or require more control with offline applications, a suitable solution exists. By understanding the nuances of these image formats and leveraging the available conversion methods, you can ensure your images are seamlessly integrated into your Google Docs, maintaining quality and accessibility.