Anika Lacerte, a seasoned digital artist and creator of The Handcrafted Story, has been drawing daily with an iPad Pro and the Procreate app since April 2017. Procreate, an application exclusively available for iPad, offers a robust suite of tools for artists. For those new to the app, understanding its functionalities, including how to rename artwork, can initially be a learning curve. This guide aims to demystify the process, drawing from practical experience and the app's core features to inspire your creativity and storytelling.
Navigating the Procreate Gallery: Renaming and Organizing Your Art
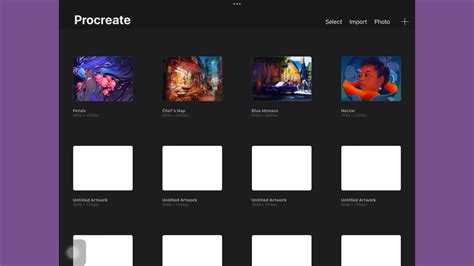
The Procreate app's Gallery serves as your central hub for managing all your artwork. Keeping this space organized is crucial for efficient workflow, especially as your collection grows. One of the most fundamental organizational tools is renaming your canvases. By default, layers within your project are given sequentially numbered titles. Similarly, your artwork thumbnails in the Gallery will have titles that are often automatically generated.
To rename an artwork directly within the Gallery, you'll first need to enter the selection mode. Tap the "Select" button, which then allows you to tap on individual canvases to choose them. Once you have selected an artwork, look beneath its thumbnail. You will see a title displayed there. While the provided information doesn't explicitly detail how to edit this title directly from the Gallery view, the general principle of renaming elements in Procreate involves accessing their specific options. For layers, renaming is straightforward: in the Layers panel, tap a layer to bring up Layer Options, then tap "Rename." It's highly probable that a similar, albeit perhaps less explicitly stated, method exists for renaming canvases in the Gallery itself, likely through a contextual menu or a dedicated "Rename" option when an artwork is selected or long-pressed.
Beyond individual renaming, Procreate offers powerful tools for managing multiple artworks simultaneously. Bulk actions are designed to save significant time. After tapping the "Select" button and choosing multiple canvases, a toolbar appears with options to "Share," "Duplicate," and "Delete" your selected artworks. This is invaluable for clearing out older pieces, backing up important work, or creating copies for experimentation.
Furthermore, the Gallery allows for intuitive rearrangement of your artworks and the creation of "Stacks." To rearrange selected artworks and Stacks, you can tap and hold on an artwork to pick them all up, then drag them to a new position. This drag-and-drop functionality extends to organizing your work into thematic groups. To merge two artworks into a new Stack, simply drag and drop one artwork thumbnail onto another. The bottom artwork will turn blue, indicating it's ready to be merged. Similarly, you can drag and drop an artwork thumbnail onto an existing Stack. In this case, you must hold the top thumbnail for a moment longer until the Stack flashes blue twice to confirm the merge.
To extract artwork from a Stack, tap the Stack to enter it. Then, pick up one or more artworks. With these selected, tap the Stack return button in the top left of the toolbar (indicated by < Stack) with another finger. This action moves the selected artworks out of the Stack. By default, all Stacks are named "Stack." You can rename these Stacks using the same principles as renaming individual artworks, ensuring your organizational structure is as clear as your artistic creations. Addressing sideways and upside-down canvas previews can also be managed within the Gallery, ensuring your artwork is always presented in the correct orientation.
Understanding and Utilizing Layers in Procreate
Layers are fundamental to digital art creation in Procreate, offering unparalleled flexibility in editing and refining your work. As Anika Lacerte highlights, "Layers make it easy to make changes to portions of your drawing without having to redo the entire drawing." This means you can adjust the color or opacity of specific elements without affecting others, a significant advantage when adding detail or experimenting with different creative directions.
Creating and Managing Layers
To create a new layer, navigate to the Layers menu (accessed via the icon that looks like two stacked boxes, second from the right). Within this menu, tap the plus sign (+) at the right. A new layer will appear above your current selection. Anika often uses layers when "adding a lot of detail, especially if Iâm not sure Iâm going to like what Iâm adding." This allows her to "hide the layer I added to see what parts I like and what I want to leave out." This non-destructive workflow is key to efficient artistic development.
Layers are also instrumental in refining specific aspects of your artwork, particularly lettering. Anika uses layers to "improve on my drawing, especially lettering. So I might do a fairly quick lettering layer so I can try out the spacing, then lower the opacity so I can still see it underneath." This technique allows for precise adjustments to letter spacing and form without committing to a final version until you are satisfied.
Advanced Layer Techniques
Procreate offers several advanced layer functionalities that significantly enhance creative control.
Layer Opacity: To change the opacity of a layer, go to the Layers menu. Then, tap with two fingers on the desired layer. The Layers menu will close, and you can then slide your finger or stylus across the screen from left to right to adjust the opacity. This is useful for creating subtle effects, fading elements, or building up translucent color washes.
Alpha Channel (Alpha Lock): The Alpha Lock feature, accessed by swiping right on a layer with two fingers in the Layers menu, acts like a protective shield for your existing artwork on that layer. Once Alpha Lock is enabled, a checkerboard pattern becomes visible behind the image in the Layers menu. This means any brush strokes or color fills will only affect the non-transparent parts of the layer. Anika uses this to "change the colour that way, so with the alpha channel turned on, I make my brush as large as it can go and choose the new colour and draw all over the image." To disable Alpha Lock, simply swipe right again with two fingers in the Layers menu.
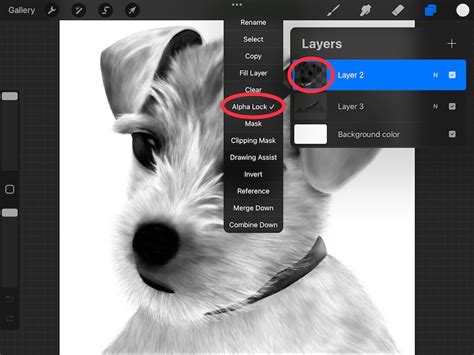
Fill with Color: To fill a shape with a color, tap and hold on the color circle in the top right of the screen. Then, drag this color into the shape you wish to fill. If Alpha Lock is enabled on the layer, the "Fill" action will color only the existing artwork on that layer, rather than the entire layer.
Layer Masks: A Layer Mask functions similarly to Alpha Lock but offers greater flexibility. Changes made to the Layer Mask can be removed or altered without impacting the parent layer. This is an excellent method for non-destructively modifying the appearance of a layer.
Clipping Masks: A Clipping Mask is even more versatile. Unlike a Layer Mask, it's not tied to a single specific layer. A Clipping Mask acts as a distinct layer that can be linked to any other layer. This allows you to move a Clipping Mask between layers or stack multiple Clipping Masks above a single base layer. Clipping Masks are ideal for non-destructive modifications; if you dislike the result, you can simply remove the mask.
Grouping Layers: To group layers, open the Layers menu. Tap on one layer you wish to include, then let go and swipe right on all other layers you want to add to the group. The swiped layers will appear a lighter shade of blue. This bundles related layers together, making them easier to manage, move, and hide as a unit. You can also merge multiple groups with a simple Pinch gesture by pinching together the top and bottom layers you intend to merge.
Merge Down: This action combines the active layer with the layer directly below it. Merging layers applies any blending modes to the pixels below. If you reach your layer limit, merging less critical layers can free up space. This action can be undone instantly with a two-finger tap. It's important to note that if you use "Combine Down" on a layer directly above a Layer Group, the behavior might differ, and it's wise to be aware of the layer structure before merging.
Essential Procreate Tools for Artists
Beyond layer management, Procreate provides a rich set of tools to facilitate the drawing and painting process.
Brushes and Color Selection
Choosing a Brush: The Brushes menu, accessed via the brush icon, allows you to select from a vast array of pre-installed brushes or imported custom brushes. Tapping on a brush icon selects it for use.
Changing Brush Color: The Color menu, located at the top right of the screen, is where you select your brush color. The "Classic" setting, found at the bottom of the Colour menu, is a common and intuitive way to pick colors.
Color Theory for BEGINNERS + How to ACTUALLY use it in Digital Painting
Modifying and Installing Brushes: To modify an existing brush, it's best practice to first create a duplicate. With the Brushes menu open, swipe left on the brush you wish to alter and tap "Duplicate." You can then adjust its settings to your preference. To install a new brush, tap the Brushes menu, then the plus sign (+) at the top right, and select "Import."
Selection and Transformation
Select and Move: The "Select" menu, identified by an icon resembling the letter 'S' at the top of the screen, enables you to select specific areas or objects. Draw around the desired object to create a selection. Once done, tap the arrow icon next to the Select menu. To move the selected object, tap and drag outside the bounding box that appears around your selection. Tapping inside the box will deselect it.
Grids and Guides
Creating a Grid: While Procreate has built-in grid and perspective guide options within the Canvas settings (under the wrench icon), Anika prefers a more manual approach for temporary grids. She suggests tapping the Brush menu, then "Textures," and selecting "Grid." She then creates a new layer and draws a grid on it. This grid layer can be used as a visual aid for drawing and then easily hidden by unchecking the box next to its name in the Layers menu when it's no longer needed. This method provides flexibility without permanently altering the canvas.
Eraser Tool
The eraser tool is as versatile as the brushes. You can use "any brush to erase your artwork." This means you can select the same brush you're drawing with or choose a different one for erasing. The size of the eraser brush can be adjusted using the scroll bar, typically located on the left or right side of the screen.
Inserting Photos and Color Picking
Inserting a Photo: To bring external images into your Procreate canvas, tap the Actions menu (wrench icon), then "Image," and finally "Insert a photo." Anika often uses a photo of a blank sketchbook page as a base layer, then adds new layers on top to draw.
Choosing a Color from a Photo: To sample a color directly from an image on your canvas, tap and hold on the square color swatch located between the brush size and opacity sliders at the top right of the screen. You can then drag this eyedropper tool over any part of your image to select that color.
These tools, when used in conjunction with a well-organized layer system and a clear understanding of Procreate's interface, empower artists to create, refine, and manage their digital artwork with exceptional efficiency and creative freedom.