Photoshop Actions are a powerful, yet often underutilized, feature within Adobe Photoshop that can dramatically enhance a photographer's post-processing workflow. For those new to the concept, the Actions panel might seem a bit daunting, but understanding its capabilities can transform how you edit images, making the process both faster and yielding more aesthetically pleasing results. This guide provides a comprehensive introduction to Photoshop Actions, detailing how to use them, create your own, and leverage them to their full potential.
What Exactly Are Photoshop Actions?
At their core, Photoshop Actions are a one-click solution for applying a sequence of post-processing steps to an image. The process involves recording a series of edits - such as adjustments to color, contrast, or applying filters - into an "action." Once recorded, this action can be replayed on any new image, executing the exact same steps. This is particularly useful if you have a specific post-processing "recipe" for achieving a signature look.
The Actions feature has been a part of Photoshop since 1996, meaning it's available across virtually all versions of the software. Whether you're adding a complex border, applying a vintage effect, or batch resizing and sharpening a series of photos, an action can automate these repetitive tasks. The benefit extends beyond mere speed; it ensures consistency across multiple images, a crucial aspect for professional photographers.
Navigating the Actions Panel
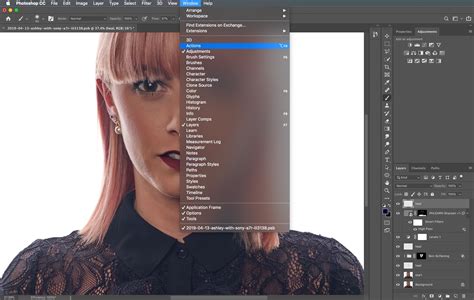
The Actions Panel is the central hub for all your action-related activities. You can access it by going to the "Window" menu and selecting "Actions," or by using the keyboard shortcut Alt + F9 (Windows) or Option + F9 (Mac). The panel's icon resembles a triangular "play" symbol.
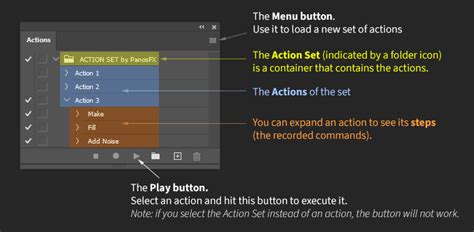
Within the Actions Panel, you'll find several key elements:
- Sets: Actions are organized into "sets," which function like folders. This is essential for keeping your actions organized, especially as you accumulate more. Photoshop comes with a default set, and you can create new ones to categorize your custom actions.
- Actions: These are the individual recorded sequences of steps. Each action is contained within a set.
- Steps/Commands: These represent the individual Photoshop commands that make up an action. You can expand an action by clicking the disclosure triangle next to its name to view each step.
- Control Buttons: At the bottom of the panel, you'll find buttons for creating new sets, creating new actions, deleting actions, and importantly, the Play button.
Understanding the Columns
To the left of each action and its steps, you'll notice columns with icons:
- Tick Column: This column, typically filled with ticks, indicates which steps will be executed when the action is played. You can toggle these ticks on or off to selectively skip certain steps within an action without deleting them permanently.
- Dialog Box Column: This column contains small square icons, often referred to as "menu dialog" icons. If this icon is visible (usually appearing as a small black square), it means that Photoshop will pause at that specific step, allowing you to modify its settings before proceeding. This is incredibly useful for actions that involve filters or adjustments where you might want to fine-tune parameters for each individual image. If the icon is absent, the step will execute with its default recorded settings without user intervention.
How to Run a Photoshop Action: A Quick Guide
Applying a pre-recorded or downloaded action is straightforward:
- Open Photoshop: Launch the application.
- Open Your Image: Load the photograph you wish to edit.
- Locate the Actions Panel: Access it via Window > Actions or Alt/Option + F9.
- Select the Action: Browse through your sets and actions, and click on the specific action you want to apply.
- Play the Action: Click the "Play" button (the triangle icon) at the bottom of the Actions Panel.
Once the action has run, you can further refine the results. If the action included adjustment layers, these will be visible in the Layers Panel. You can then tweak their settings, opacity, or blend modes to better suit your image.
Quick Tip: To run a single step within an action, hold down the Cmd key (Mac) or Ctrl key (Win) and double-click on that specific action step.
Button Mode for Swift Access
For even faster execution, you can switch the Actions Panel to "Button Mode." To do this, open the Actions Panel menu (the icon with horizontal lines in the top-right corner) and select "Button Mode." In this mode, each action is represented by a colored button. A single click on a button will immediately play the corresponding action. Note that you cannot record new actions while in Button Mode. To revert to the default list view, repeat the process and deselect "Button Mode."

Recording Your Own Photoshop Actions
The true power of Photoshop Actions lies in your ability to create your own. This is an invaluable skill for automating any repetitive editing task.
- Open the Actions Panel: Ensure it's visible.
- Create a New Set (Optional but Recommended): Click the folder icon at the bottom of the panel to create a new set for your custom actions. Give it a descriptive name.
- Create a New Action: Click the "Create new action" icon (looks like a plus sign or document icon) at the bottom of the panel. A dialog box will appear.
- Name: Give your action a clear and descriptive name (e.g., "Sharpen for Web," "Vintage Film Look").
- Set: Choose the set where you want to save this action.
- Function Key (Optional): You can assign a keyboard shortcut for quicker access.
- Color (Optional): Assign a color for better visibility, especially in Button Mode.
- Record: Click the "Record" button (the red circle icon) to begin recording.
- Perform Your Editing Steps: Execute the exact sequence of commands you want to automate. Every click, every adjustment, every filter application will be recorded.
- Example: If you want to create an action to resize an image for web use, you would first go to Image > Image Size, set your desired dimensions, click OK, and then go to Filter > Sharpen > Unsharp Mask, adjust the settings, and click OK.
- Stop Recording: Once you have completed all the desired steps, click the "Stop" button (the square icon) at the bottom of the Actions Panel.
Your newly recorded action will now appear in the chosen set. You can then test it on another image by selecting it and clicking the "Play" button.
Modifying and Re-recording Steps
Photoshop Actions are not set in stone. You can modify existing steps or re-record them:
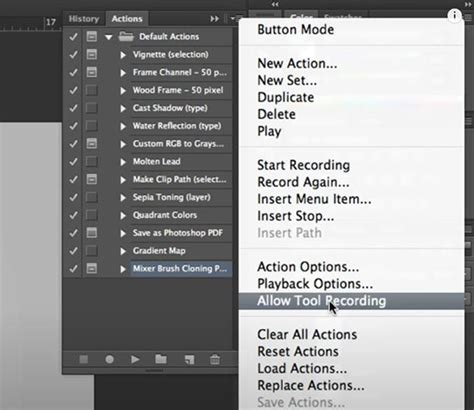
- Insert Menu Item: To add a new command that wasn't recorded initially, select the step you want to insert the new command after, then click the "Insert Menu Item" option from the Actions Panel flyout menu.
- Record Again: If you're unhappy with a specific step, select it, then choose "Record Again" from the Actions Panel flyout menu. Photoshop will then record your subsequent actions, replacing the selected step.
- Adding Dialog Prompts: To allow user input at a specific step, click the small square icon in the "Dialog Box Column" next to that step. This will cause Photoshop to pause at that point, presenting the relevant dialog box for you to adjust settings before continuing. For example, if you record a "Gaussian Blur" and want to be able to change the radius each time, ensure the dialog box icon is enabled for that step.
Managing Your Photoshop Actions
As you create and download more actions, organization becomes crucial.
Renaming Actions and Sets
To rename an action or a set, simply double-click on its current name. The name will become highlighted and editable. Type in your new desired name and press Enter.
Deleting Actions and Steps
If you want to remove an action you no longer need, select it and click the trash can icon at the bottom of the Actions Panel. To delete individual steps within an action, expand the action, select the unwanted step(s), and click the trash can icon. You can also drag actions or steps directly onto the trash can icon to delete them.
Duplicating Actions
Sometimes you might want to create a variation of an existing action without altering the original. To duplicate an action or an entire set, select it, open the Actions Panel menu, and choose "Duplicate." This creates an exact copy that you can then modify.
Organizing Actions into Sets
As mentioned, sets are vital for organization. To group existing actions into a new set:
- Select the first action you want to include.
- Hold down the Shift key and click on the last action in the contiguous block you wish to group. For non-contiguous selections, hold down the Cmd (Mac) or Ctrl (Win) key and click on individual actions.
- Click the folder icon at the bottom of the Actions Panel to create a new set.
- Name your new set and click "OK." The selected actions will now be moved into this new set.
Exporting and Installing Photoshop Actions
Sharing your custom actions or using them on different computers requires exporting and importing.
Exporting Photoshop Actions
- In the Actions Panel, select the action set you wish to export.
- Open the Actions Panel menu.
- Choose "Save Actions…"
- A file dialog box will appear. Give your action file a name and choose a location to save it. The file will automatically have the
.atnextension, which is Photoshop's action file format. - Click "Save."
You now have a .atn file that can be shared or backed up.
Installing Photoshop Actions
Installing actions is just as simple:
- Method 1 (Loading via Menu):
- Open the Actions Panel.
- Click the Actions Panel menu icon.
- Select "Load Actions…"
- Navigate to the location of your
.atnfile, select it, and click "Load."
- Method 2 (Drag and Drop):
- Locate your
.atnfile in your computer's file explorer. - Drag the
.atnfile directly into the Photoshop Actions Panel.
- Locate your
The action set will then appear in your Actions Panel, ready to be used.
Where to Find Professional Photoshop Actions
While creating your own actions is empowering, there are many high-quality, professionally designed action sets available for purchase from various online marketplaces and photography resources. These can offer sophisticated effects and workflow enhancements, especially for specific genres like landscape, portrait, or product photography.

You can also find free Photoshop actions, but their quality and effectiveness can vary significantly. Often, purchased actions are more thoroughly tested and offer better results and support.
Photoshop Beta: AI-Powered Actions
Photoshop's beta version is introducing exciting advancements in the Actions panel, leveraging AI to streamline the workflow further. This new feature allows users to apply complex edits using intuitive text prompts.
- Open Actions Panel in Beta: Navigate to Window > Actions.
- Explore Suggested Actions: Based on the open image, Photoshop analyzes it and suggests relevant actions. Rolling over these suggested actions displays a live preview on your image.
- Use Text Prompts: In the search bar, you can type phrases like "make it pop" or "remove haze" to find and apply actions that enhance vibrancy or sharpen images.
- Preview and Apply: The panel allows you to preview actions before committing them to your image history. You can also easily adjust applied effects, customize opacity, and toggle specific layers for non-destructive editing.
The NEW Actions Panel in Photoshop
While this AI-driven approach offers remarkable speed and convenience, it's important to note that the beta version currently lacks the ability to record or edit classic actions directly within this new interface. However, the integration of AI-powered suggestions and text-based commands represents a significant step towards more intuitive and efficient image editing.
Conclusion: Unleashing Efficiency with Actions
Photoshop Actions are an indispensable tool for any photographer looking to save time, ensure consistency, and elevate the quality of their post-processing. Whether you're applying a complex color grade, batch resizing images, or automating a series of creative adjustments, actions provide a powerful mechanism for streamlining your workflow. By understanding how to record, manage, and utilize actions effectively, you can unlock new levels of efficiency and creativity in your photographic work. Exploring the Actions Panel, experimenting with built-in actions, and creating your own custom sequences are the first steps toward mastering this essential Photoshop feature.