Adding a border to a photograph can lend it a polished, professional look, transforming it into something akin to a tangible print. This technique is particularly useful for making your images stand out on busy social media feeds or for giving them a timeless aesthetic. While the Develop module in Lightroom Classic does not offer a dedicated border feature, the Print module provides a straightforward and effective method for achieving this desired effect. This tutorial will guide you through the process, from initial setup to saving your bordered images as new JPEG files, ensuring your originals remain untouched.
Understanding the Print Module Approach
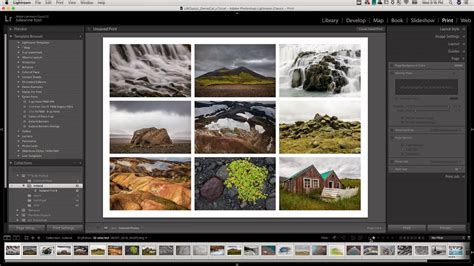
The method for adding borders in Lightroom Classic relies on its Print module. It's crucial to understand that this process does not alter your original files. Instead, it generates a new JPEG file with the border applied. This distinction is important for maintaining a non-destructive workflow. The Print module allows for flexible output settings, including paper size and quality, which are essential for preparing images for web sharing or printing.
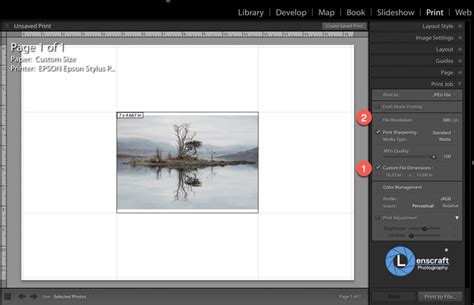
Before embarking on the border creation process, it's vital to configure the "Print Job" settings. These settings dictate the final output of your image, including its size and quality. The first critical step is to change the "Print to" option from its default "Printer" to "JPEG file." This ensures that Lightroom will export your bordered image as a digital file rather than sending it to a physical printer.
Preparing Your Images for Border Application
If you intend to share your bordered images online or on social media, resizing is often a necessary step. You can achieve this by adjusting the paper size within Lightroom's Print module. Accessing the "Page Setup…" button allows you to select standard paper sizes. However, if your desired dimensions are not readily available, Lightroom offers the flexibility to set custom file dimensions directly within the Print Job panel.
For instance, if you're aiming for a 5" x 7" output, you would set the custom file dimensions accordingly. It's important to note that if your image's aspect ratio differs from the selected paper size (e.g., a 3:2 image on a 5" x 7" paper), Lightroom will introduce white space at the top and bottom of the page to accommodate the difference.
Seven Tips for the Print Module in Lightroom Classic
While not strictly necessary for adding a border, the quality settings in the Print Job panel offer valuable flexibility. These include file resolution (ppi), print sharpening, and JPEG quality. For internet sharing, setting the resolution to 72 or 96 ppi is generally recommended. The JPEG quality slider controls image compression; a higher compression results in a smaller file size, ideal for web use, albeit with a slight reduction in image quality.
Controlling Layout and Margins for the "Frame" Effect
The "Layout" settings in the Print module are instrumental in creating the "frame" look around your image. By default, when you set your margins to 0, the "Cell Size" sliders can be maximized to fill the custom page dimensions you've set. This effectively makes the image extend to the edges of the paper.
However, you might still observe small white gaps at the top and bottom, especially if the image aspect ratio doesn't perfectly match the chosen paper size. To overcome this, Lightroom provides the "Zoom to fill" option within the Image Settings panel. Activating this feature will enlarge the image's height and width to fill the entire page, eliminating any extraneous white space.
Creating the Matte Border Effect
Beyond a simple stroke border, you can achieve a "matte" or "frame" effect by manipulating the margins. Increasing the margin values in the Layout panel creates a thicker border around your image without the need for a separate stroke. For example, setting the left, right, and top margins to 1 inch and the bottom margin to 2 inches will result in a substantial white frame around your photograph. You can utilize the "Guides" option to better visualize these layout lines as you adjust them.
Adding the Stroke Border
With your layout and image fill settings configured, you're ready to add a distinct stroke border. Within the "Image Settings" panel, locate and enable the "Stroke Border" option. A "Width" slider will appear, allowing you to control the thickness of the border. You can set this to a desired point size, for instance, 5pt for a thicker border.
While this tutorial uses black as an example, the border color is fully customizable. To change the color, click on the color swatch located to the right of the Width slider. This action will open a color picker dialog. If it initially displays only black and white, drag the slider on the right side of the picker from bottom to top to reveal the full spectrum of colors.
Saving Your Bordered Image
Once you've finalized your border and layout settings, the next step is to export the image as a JPEG file. Click the "Print to File…" button, typically located in the bottom right corner of the Lightroom interface. This will prompt you to choose a location and filename for your new bordered image.
Batch Processing and Saved Print Templates
A significant advantage of this workflow is its efficiency for processing multiple images. Once you've established your desired border and layout settings, you can save this configuration as a "Print Template." This is achieved by clicking the "Create Saved Print" button, usually found in the top right of the Lightroom interface. You can then name your template and choose a location to save it.
To apply this saved template to other images, simply drag and drop those images onto the saved print template in the Collections panel. Lightroom will automatically apply the border and layout settings to each selected image. When you select and save multiple files using a template, Lightroom will generate a folder containing the bordered images rather than a single file.
Alternatives and Advanced Considerations
Using Photoshop for Borders
For users who have access to Adobe Photoshop, it offers a more extensive range of options for creating borders, providing greater flexibility than Lightroom's Print module.
Third-Party Plugins and Software
Specialized plugins and software, such as those within the Nik Collection (e.g., Nik Silver Efex Pro, Analog Efex Pro), can also be used to add borders. Exposure Software is another capable option for special effects, though its development status may be a consideration.
Creating Borders in Lightroom Mobile and Cloud-Based Lightroom
It's important to note that the cloud-based Adobe Lightroom and Lightroom Mobile do not feature a Print module. For these versions, a workaround involves using the Crop and Geometry tools within the Develop module to simulate a border. This method requires careful adjustment of crop and geometry settings to position the photo within a defined frame.
Understanding Border Presets in Lightroom
Lightroom presets are essentially saved sets of editing parameters. Creating border presets involves a more advanced understanding of Lightroom's masking and coordinate systems. This method typically involves using multiple linear gradients or brushed masks to define the border area. The brush radius setting is then used to control the width of the border, ensuring consistent thickness across different image sizes and aspect ratios. These presets can offer non-destructive border application and space-saving benefits, but require careful consideration of editing order and potential conflicts with other adjustments.
Troubleshooting Common Issues
"Stroke Border" Not Visible
If you cannot find the "Stroke Border" option, ensure you are working within the Print module. This feature is not available in the Develop or Library modules. Also, confirm that "Print to: JPEG File" is selected in the Print Job panel and that you are using the "Print to File…" function for export.
Image Cropping or Unwanted Gaps
Check your layout and cell settings. If the image is filling the cell in a way that causes cropping, adjust the cell size and margins to ensure the image fits as expected. The "Zoom to fill" option in Image Settings can also help manage how the image fits within the page dimensions.
Lightroom Classic vs. Other Versions
This tutorial specifically applies to Lightroom Classic CC due to its robust Print module functionality. Other Lightroom versions, such as Lightroom CC (cloud-based), do not offer the same Print-template workflow.
A Deeper Dive into the Print Module's Capabilities
The Print module in Lightroom Classic is a powerful, often underutilized, tool for image output. Beyond simple borders, it allows for the creation of sophisticated layouts, including collages and contact sheets. Understanding its various panels â Layout Styles, Print Job, Image Settings, and Page â provides a comprehensive toolkit for preparing images for any purpose.
Identity Plates: More Than Just Logos
The "Identity Plate" feature, accessible within the Page panel, can be used not only for adding logos but also for incorporating graphical frames. By creating a transparent PNG image of your desired frame in an external editor like Photoshop, you can import it as an Identity Plate. This imported frame, when scaled appropriately, will overlay your image, effectively creating a custom border. The transparency of the PNG ensures that your photograph shows through the frame. You can then save this graphical frame as a reusable Identity Plate for future use.
Watched Folders for Automated Workflows
For an even more streamlined workflow, consider setting up a "Watched Folder." This feature, found under File > Auto Import, allows Lightroom to automatically import files from a designated folder. If you set up a Watched Folder in conjunction with the "Print to File…" function, any image you export into that folder will be automatically cataloged into Lightroom. This is particularly useful if you frequently batch process bordered images.
By mastering the Print module's capabilities, you can efficiently and creatively add borders to your photographs, enhancing their visual appeal and preparing them for a variety of applications, from online sharing to professional printing.