Feathering is a fundamental technique in Adobe Photoshop, offering a powerful way to soften the edges of selections, brushes, and layers. This capability is essential for achieving seamless blends, creating natural-looking composites, and enhancing the overall professionalism of your image edits. Whether you're a beginner looking to understand the basics or an experienced user seeking to refine your skills, this tutorial will guide you through the nuances of feathering in Photoshop.
Understanding the Concept of Feathering
At its core, feathering is the process of making a selection's edges fade into transparency. It achieves this by gradually transitioning between the colors or effects of the pixels on the edge of your selection and the pixels surrounding it. This gradual fade creates a soft, diffused edge, which is crucial when you need to blend newly added elements into an existing image or when creating masks.
Feathering isn't about blurring the entire image or selection; instead, it specifically targets the transition zone. By gradually fading between the colors of the pixels on the edge and the pixels surrounding it, feathering can help you make a newly added element blend in with the rest of your image. This is particularly useful when you have an undoctored photo, a photograph taken with a subject in front of a seamless background, and you want to "Photoshop" or change the photo by adding a foreign object, necessitating the separation of the subject and background. This is a useful tip in creating collages and detailed compositions. You can layer multiple images on top of each other to create an interesting graphic or poster.
While feathering creates soft edges, it's important to distinguish it from anti-aliasing. Anti-alias smooths jagged edges but doesn't fade or blur the edge itself. Feathering, on the other hand, creates a genuine gradient transition.
When to Employ Feathering
Feathering is a versatile tool that finds application in numerous editing scenarios:
- Compositing Images: When you layer multiple images on top of each other to create an interesting graphic or poster, feathering is key to seamlessly blending elements. For instance, if you're compositing an object onto a new background, feathering the edges of the object helps it integrate naturally.
- Creating Masks: Layer masks are indispensable in Photoshop for non-destructive editing. Feathering applied to a mask allows for soft transitions between areas that are visible and those that are hidden.
- Softening Brush Strokes: For artistic effects or when painting with brushes, feathering can soften the edges of your brush strokes, leading to more organic and blended results.
- Refining Selections: After making an initial selection, feathering can refine those edges, making them less harsh and more natural-looking.
- Creating Vignettes: Feathering is instrumental in creating vignette effects, where the image gradually darkens or lightens towards the edges, drawing focus to the center.
Core Techniques for Feathering in Photoshop
Photoshop offers several methods to achieve feathering, catering to different workflows and preferences. While newer versions might introduce additional features, these core techniques remain tried and tested by many Photoshop professionals.
Method 1: Using the Feather Option in Select Menu
This is a direct and commonly used approach to apply feathering to an active selection.
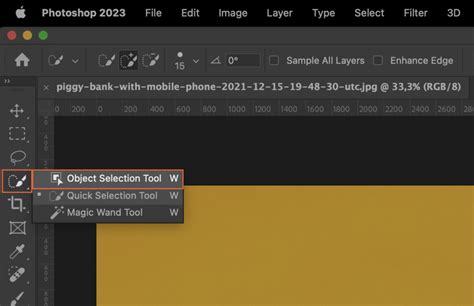
- Open Adobe Photoshop and then open the image you want to feather.
- Select the area: Use a shape-based selection tool, such as the Elliptical Marquee Tool or Lasso Tool, to choose the area that you want to feather. Photoshop offers various tools for selecting a portion of an image.
- Apply Feathering: Once you have your selection, navigate to
Select > Modify > Feather. - Enter Feather Radius: A dialog box will appear, prompting you to enter a feather radius value. Start with a small radius like 0.5-2px for subtle softening. Go higher at 5-20px for wide, feathery edges. Use larger feather amounts for bigger selections or objects.
- Confirm: Click "OK" to apply the feathering. Your selection's edges will now have a soft, graduated transition.
- Proceed with Editing: Now you can copy the selection out of the main image or apply further adjustments.
Important Note: The "Modify" option in the Select menu might be greyed out if no selection is active or if the active layer is locked. Ensure you have made a selection and are working on an unlocked layer.
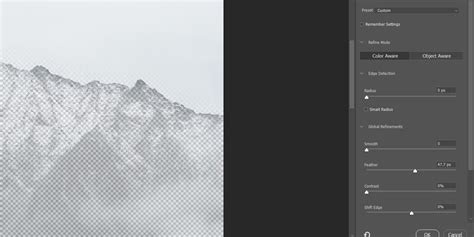
Method 2: Utilizing the "Select and Mask" Workspace
The "Select and Mask" workspace offers a more advanced and interactive way to refine selections, including feathering.
- Make an Initial Selection: Use any selection tool (Lasso, Marquee, Quick Selection, etc.) to create a preliminary selection around your subject.
- Enter Select and Mask: With your selection active, click the "Select and Mask…" button in the Options bar, or go to
Select > Select and Mask.... - Adjust Feathering: In the "Select and Mask" workspace, you'll find a "Global Refinements" section on the right-hand panel. Here, you can adjust the
Featherslider. Increase the value to soften the edges. You can also adjustSmoothness,Contrast, andShift Edgefor further refinement. I increased the smoothness, the feather, and the contrast too to give the feather a more refined look. I also shifted the edge (negatively) to further tighten things up a bit. - Output Settings: Choose your desired output setting (e.g., "New Layer with Layer Mask") and click "OK."
This method is particularly effective for complex selections like hair or fur, where precise edge control is crucial.
Method 3: Feathering with Layer Masks and Gradients
This technique is powerful for creating smooth transitions and is often used in conjunction with layer masks for non-destructive editing.
- Create a New Layer: In the Layers Panel, create a new layer.
- Make a Selection: Use any selection tool to define the area you want to feather.
- Create a Layer Mask: With the selection active, click the "Add layer mask" icon at the bottom of the Layers Panel. This will create a mask based on your selection.
- Feather the Mask:
- Option A (Modify Selection): Deselect everything (
Ctrl/Cmd + D). Then, re-select your original object (e.g., byCtrl/Cmd + Clickon the layer thumbnail if it was a shape, or by re-making the selection). Go toSelect > Modify > Feather, enter your desired radius, and click "OK." Then, with the layer mask thumbnail selected, fill the selection with black (to hide) or white (to reveal) usingEdit > Fill. - Option B (Gradient Tool): Ensure the layer mask thumbnail is selected. Select the Gradient Tool from the toolbar. In the Options bar, choose a gradient that goes from black to transparent (or black to white, depending on your needs). Drag the Gradient Tool across the mask to create a smooth transition. For a feathered edge, you'd typically drag from the edge inwards.
- Option A (Modify Selection): Deselect everything (
Using layer masks and feathering allows for a non-destructive workflow, meaning you can always go back and adjust the feathering without altering the original image pixels.
Method 4: Using Soft Brushes and Smudge Tool (Advanced)
While not a direct "feathering" command, these tools can simulate a feathered effect, especially for organic textures.
- Initial Selection and Deletion: Make a selection of your object. Inverse the selection (
Ctrl/Cmd + Shift + I) and pressDelete(orEdit > Clear) to create a transparent background. This often results in sharp edges. - Smudge Tool: Select one of the default non-circular brushes. Choose the Smudge Tool and set its strength to around 40%. Gently smudge around the edges of your object. Varying the brush stroke and strength can achieve realistic effects for textures like fur or feathers. This is another tutorial in itself! Weâll be using the same project as an example.
This method requires practice and a good understanding of brush dynamics to achieve convincing results.
How to blur edges of image and feather tool in Photoshop
Understanding Feather Radius
The feather radius is the critical value that determines the degree of softness applied to the edges.
- Small Radius (0.5-2px): Ideal for subtle softening of edges, maintaining a good amount of detail while removing harshness. This is often suitable for low-resolution web images where over-feathering can lead to noticeable softness.
- Medium Radius (5-10px): Provides a more pronounced soft edge, useful for blending objects onto new backgrounds or creating smoother transitions in composites.
- Large Radius (20px+): Creates very soft, diffused edges, akin to a gradual fade. This is best for larger selections or when a dramatic soft edge is desired.
The choice of radius depends heavily on the resolution of your image and the intended effect. Use conservatively on low-res web images.
Feathering and File Size
Yes, feathering makes edges semi-transparent, which can increase file size slightly. This is because the semi-transparent pixels require more data to define their color and opacity. However, for most modern workflows and image sizes, this increase is usually negligible.
Feathering vs. Blurring
It's important to differentiate feathering from blurring:
- Feathering: Softens the edges of a selection by creating a smooth gradient transition between the selected area and the surrounding pixels. It specifically targets the transition zone.
- Blurring: Reduces the overall sharpness and detail of an entire image or selection, making it appear less focused. Filters like Gaussian Blur affect all pixels within the applied area.
While Gaussian Blur can be used on a layer mask to simulate a feathered effect, it's a different process than applying a direct feather to a selection.
Feathering Beyond Basic Selections
Photoshop's capabilities extend feathering to various elements:
Feathering Text and Shapes
When working with text or vector shapes, you can also apply feathering for softer outlines or integration.
- Make a Selection: Create a selection around your text or shape.
- Apply Feather: Go to
Select > Modify > Featherand enter your desired radius. - Stroke or Fill: You can then apply a stroke on a new layer or fill the selection to create a feathered effect around the object.
Alternatively, for vector shapes in Adobe Illustrator, you can select an object with the Selection tool, go to the Effect menu, select Stylize > Feather, and enter a feather radius value.
Feathering Layer Styles
Layer styles, such as drop shadows or outer glows, can also incorporate feathering. When you double-click a layer to open the Layer Style dialog, you'll find options for controlling the softness and spread of these effects, which are akin to feathering.
Advanced Feathering Techniques
For more nuanced control, consider these advanced methods:
Gaussian Blur on Layer Masks
As mentioned, applying a Gaussian Blur filter to a layer mask provides a high degree of control over the softness of the transition. This allows for experimentation with different levels of smoothness and easy adjustments without affecting the original image.
Creating Vignettes with Feathering
- Create a New Layer: Add a new layer above your image layer.
- Fill with Black: Fill this new layer with black (
Edit > Fill > Black). - Add Layer Mask: Add a layer mask to this black layer.
- Radial Gradient: Select the layer mask. Use the Gradient Tool with a foreground of white and a background of black, choosing the "Radial Gradient" option. Draw a gradient from the center of your image outwards. This will reveal the black layer in a circular pattern.
- Feather the Mask: Apply Gaussian Blur to the layer mask, or use the
Select > Modify > Featheroption on a selection made from the mask to soften the edges of the vignette. Adjust the opacity of the black layer to control the intensity.
Using Layer > Matting > Defringe
If you're working with images that have transparent pixels, particularly after extracting subjects, the Layer > Matting > Defringe command can be useful. It helps to feather just the transparent pixels on the inside, cleaning up halos or fringing.
Feathering in Other Adobe Software
While this tutorial focuses on Photoshop, it's worth noting that similar concepts exist elsewhere:
- Adobe Illustrator: As mentioned, Illustrator has a
Stylize > Feathereffect for vector objects. - Photopea: The free online photo editor Photopea offers a similar function. To achieve a feathering effect, first make a selection, and then go to
Select > Modify > Border. Adjusting the "border width" and "smoothing" can achieve a feathered appearance.
Practical Application: Painting Feathers in Photoshop
The concept of feathering is directly applicable to artistic endeavors, such as painting realistic feathers. The goal is to show you how to transfer the complexity and beauty of feathers to your digital works.
- Start with a Black Base: For better contrasts, begin with a black base color. Work from dark to light to avoid unwanted muddy transitions.
- Vary Brush Strokes: Vary the brush stroke and strength to achieve realistic effects.
- Use References: Utilize references to analyze and replicate the structures and shapes of feathers.
- Sketching and Layering: Sketch the basic shape and then carefully insert feathers, considering their placement and size.
- Blending and Refining: Use blending techniques and add small details, accents, and finer strokes to portray the three-dimensional texture and fineness of feather tips. Pay special attention to the different types of feathers â some should be smaller and fluffier while others appear larger and denser.
- Mirroring: Mirroring the image can help spot imbalances and make final adjustments.
When painting feathers, the principles of soft edges and smooth transitions, achieved through careful brushwork and blending, are paramount to creating a realistic and visually appealing result.

By understanding and applying these feathering techniques, you can elevate your Photoshop edits from basic manipulations to sophisticated and seamless visual compositions. Practice is key, so experiment with different methods and settings to discover what works best for your specific projects.