Creating digitized artwork that is high-resolution is paramount, especially when aiming to license your creations for online sales. When artwork is licensed, it's typically reproduced on a variety of products, and for these reproductions to appear sharp and professional, the source digital file must possess a high level of detail. Procreate, a powerful digital art application, offers robust tools for artists, but achieving high-resolution output can present a unique challenge: the larger your canvas size, the fewer layers you are afforded. This limitation can be particularly frustrating when you need the flexibility of multiple layers for intricate work. Fortunately, with a strategic approach and a few workflow adjustments, you can effectively navigate Procreate's layer constraints and produce stunning, high-resolution artwork suitable for licensing.
The Layer-Limitation Dilemma in Procreate
The core of the resizing challenge in Procreate lies in the inverse relationship between canvas dimensions and available layers. When you begin a project with a very large canvas, Procreate allocates its available memory resources to accommodate that size, which in turn restricts the number of distinct layers you can utilize. For artists working on projects intended for print or licensing, where a minimum of 300 DPI (dots per inch) is often required, starting with a massive canvas might seem like the most direct route. However, this approach can quickly lead to hitting the layer limit, forcing you to merge layers prematurely, thereby sacrificing the non-destructive editing capabilities that make digital art so versatile.
Consider a scenario where the end goal is a canvas size of 24” x 30” for art licensing. If you were to start with this exact dimension at a high DPI, Procreate might only grant you a mere four layers. This is severely limiting for any complex illustration involving multiple elements, reference images, color studies, and refinement stages. The ability to work with a generous number of layers allows for experimentation, correction, and a more organized workflow, all of which contribute to a better final product.
The Strategic Approach: Sketching Small, Scaling Up
A highly effective strategy to circumvent Procreate's layer limitations for high-resolution artwork involves a two-stage process: initiating your sketch on a smaller, more manageable canvas, and then scaling it up to your desired final dimensions. This method prioritizes layer flexibility during the crucial initial stages of creation.
Step 1: Establishing the Sketch Canvas
The first step is to create a new custom canvas. The orientation of this initial canvas should align with the intended final piece. For instance, if your final illustration is to be vertically oriented, start with a vertical canvas. The key to this strategy is selecting a canvas size that is a precise fraction of your final target size. A common and effective ratio is to start with a canvas that is exactly one-third the dimensions of your final goal.
If your target is a 24” x 30” canvas, a logical starting point would be an 8” x 10” canvas. This proportion ensures that when you scale up later, the dimensions will align perfectly. It is crucial to set your initial canvas to a print-ready resolution, typically 300 DPI. This ensures that even though the physical dimensions are smaller, the pixel density is sufficient to maintain quality when enlarged.

This smaller canvas offers a significant advantage: abundant layer flexibility. With an 8” x 10” canvas at 300 DPI, you will have a substantial number of layers available, far more than the restrictive four you might get with a 24” x 30” canvas. This abundance allows you to:
- Incorporate Reference Photos: Easily import and place reference images directly onto your canvas without consuming precious layer real estate.
- Explore Color Palettes: Experiment with different color schemes on separate layers, allowing for easy comparison and adjustment.
- Refine Your Sketch: Develop and iterate on your sketch with multiple layers for linework, shading studies, and compositional adjustments.
- Loosen Up Creatively: Work without the constant anxiety of running out of layers, fostering a more fluid and experimental creative process.
It is vital to understand that this initial sketch canvas is a workspace for exploration and refinement. You should avoid drawing elements that are intended to be part of the final, high-resolution illustration directly on this small canvas if they are meant to remain crisp after scaling. Because the sketch will be scaled up significantly, any fine details drawn at this stage might lose their sharpness and become pixelated or fuzzy when enlarged. The purpose of this canvas is to capture the form, composition, and general idea.
Step 2: Resizing for the Final Illustration
Once you are satisfied with your sketch and ready to translate it into a high-resolution final piece, it's time to resize. While it might be tempting to resize within the same Procreate file, it is generally a better practice to duplicate your artwork. This preserves your original sketch, providing a fallback if needed.
To duplicate, navigate to your Gallery view, tap on the canvas you wish to duplicate, and select "Duplicate." Within the duplicated canvas, it's a good organizational habit to rename it (e.g., "Final Illustration - 24x30") to easily distinguish it from your initial sketch.
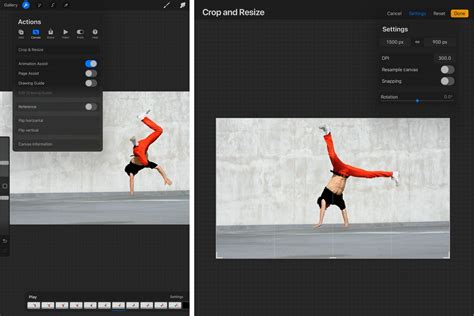
Now, access the canvas resizing tools. You'll find these under the Actions menu (the wrench icon), then navigate to Canvas, and select Crop and Resize. This opens the Crop and Resize interface.

Within the Crop and Resize interface, you have several options:
- Settings: Tapping "Settings" reveals the core resizing and cropping controls. Here, you can choose between "Crop" and "Resample." For scaling your artwork to a larger size, you will primarily use the "Resample" option.
- Resample: When "Resample" is toggled on, the Aspect Lock (the chainlink icon between width and height readouts) is automatically engaged. This ensures that your image's proportions are maintained during resizing. Instead of adjusting the crop overlay affecting the dimension readouts, the numerical dimensions you input directly set the canvas area.
- Dimensions: You will see numerical readouts for the width and height of your canvas, displayed in your chosen unit of measurement (inches, centimeters, pixels, etc.). To change these dimensions, tap on either the width or height readout. This will bring up the iPadOS keypad, allowing you to type in your desired new dimensions.
- DPI (Dots Per Inch): This setting dictates the print resolution. For art licensing and high-quality prints, 300 DPI is the standard. While you can adjust DPI here, be aware that changing it can also affect the physical dimensions of your canvas and potentially your layer count. For this workflow, ensure your DPI remains at 300.
Enter your target dimensions (e.g., 24 inches for width and 30 inches for height) into the respective fields. As you input these values, Procreate will recalculate the available layers. You will notice that the number of layers available will likely decrease significantly, reflecting the larger canvas size.
Important Consideration for iPad Models: Not all iPad models can handle extremely large canvas sizes due to hardware limitations and available RAM. If you are working on an older model or an iPad that isn't a Pro, you might encounter restrictions on how large you can resize. If you experience issues or are limited in your resizing options, consider slightly smaller, yet still substantial, dimensions like 18” x 24” or 16” x 20” at 300 DPI.
Handling Layer Limits After Resizing
Once you have resized your canvas to your desired larger dimensions, you will almost certainly have fewer layers available. If you had multiple layers in your sketch, you will need to consolidate them to fit within the new layer limit. The most straightforward way to do this is by "pinching" the layers together in the Layers panel. This action flattens selected layers into a single layer.
If you encounter issues with resizing, it might be necessary to flatten your sketch layers before initiating the resize operation. This ensures that the entire sketch is treated as a single entity during the scaling process.
After flattening and resizing, you will likely observe your scaled-up sketch positioned in one corner of the new, larger canvas. The next critical step is to use the Transform tool (the arrow icon) to scale your sketch to fill the entire canvas. Drag the corner handles outward to enlarge the sketch until it fits the bounds of your new, high-resolution canvas.
It's important to reiterate that scaling up rasterized artwork, especially a sketch, will inevitably compromise its quality. The image may appear fuzzy, pixelated, or lose some of its crispness. However, in this specific workflow, this is an acceptable trade-off because you are primarily scaling up the initial sketch, not the final inked or painted artwork. The goal here is to establish the composition and forms on a larger canvas so that you can then begin the detailed, high-resolution work of inking, painting, and adding final touches directly onto this larger canvas, using the available (though reduced) layers.
Advanced Canvas Manipulation and Features
Procreate offers a suite of tools that enhance the canvas manipulation and overall workflow, beyond just resizing. Understanding these features can further optimize your artistic process.
Cropping and Flipping
The Crop and Resize interface is not only for changing dimensions but also for refining the composition. You can use the grid overlay to crop your canvas to a specific aspect ratio or to remove unwanted areas. Tapping "Settings" and then "Crop" allows you to precisely define the boundaries of your canvas.
Flipping your canvas horizontally is an invaluable technique for reviewing your artwork. This action reveals any subtle issues with composition, balance, or proportions that might have gone unnoticed in the original orientation. Access this by going to Actions > Canvas > Flip Horizontal.
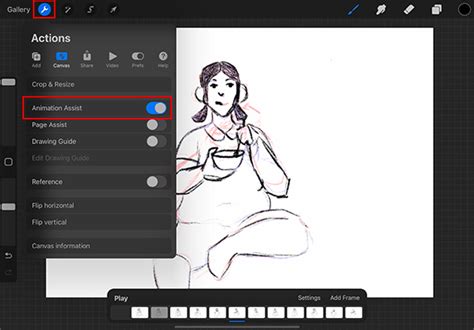
Animation Assist and Page Assist
For artists venturing into animation or sequential art, Procreate provides powerful tools:
- Animation Assist: This feature is designed to bring your art to life. It presents a visual Timeline of your animation, incorporates onion-skinning (allowing you to see previous and subsequent frames for smoother transitions), and offers Play/Pause controls. Activate it via Actions > Canvas > Animation Assist.
- Page Assist: This tool transforms your layers into individual pages, creating a digital book-like structure with its own Timeline. It's ideal for storyboarding or creating multi-page comics. Access it through Actions > Canvas > Page Assist.
Drawing Guides and Reference Companion
Procreate's Drawing Guides are designed to help artists maintain consistency and focus on the larger picture. These can include perspective guides, isometric grids, and symmetry tools, all accessible via Actions > Canvas > Drawing Guide.
The Reference Companion is a floating window that allows you to display an image or reference photo directly on your canvas. This is incredibly useful for artists who need to constantly refer to reference material without having to switch between applications. You can resize, pan, and zoom within the Reference Companion. Activate it by going to Actions > Canvas > Reference. You can choose to display your current canvas, an imported image, or even use the iPad's camera with the FacePaint feature.
FacePaint is a unique AR feature that wraps a custom canvas around your face, using the front-facing camera. It displays guides for your eyes, nose, and mouth, allowing you to paint directly onto your face in a virtual space. This can be activated via the Reference Companion.
How To Use Reference Companion In Procreate - Procreate Tutorial For Beginners
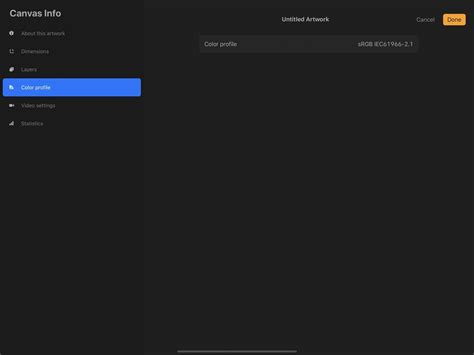
Canvas Information and Time-lapse Recording
The Canvas Information screen, accessible through Actions > Canvas > Canvas Information, provides a wealth of data about your artwork. Here, you can:
- Add Signatures: Input your name, draw a signature, or add a profile picture to digitally "sign" your artwork.
- Change Artwork Title: Rename your piece directly without returning to the Gallery.
- View Dimensions: See the width and height of your canvas in pixels, as well as your chosen units of measurement.
- Check Layer Count: Monitor "How many more layers you can add to this canvas."
- Adjust Color Profile: Change the color profile of your artwork at any time.
Procreate also automatically records a Time-lapse video of your entire creative process. This video can be exported and provides a fascinating look at your workflow. You can adjust the quality settings for this recording, with higher settings yielding better visual quality but increasing file size. The Canvas Information screen also displays the file size of your time-lapse recording and the video codec used.
Understanding Resampling and Interpolation
When you resize an image in Procreate using the "Resample" option, the software employs interpolation algorithms to create new pixel data.
- Upscaling (Enlarging): When you scale an image up, Procreate uses methods like bicubic interpolation to generate new pixels based on the surrounding existing pixels. This process aims to smooth out the enlargement and minimize pixelation, but it's important to remember that no new detail is actually being created; the software is essentially making educated guesses. This is why scaling up a sketch is more forgiving than scaling up a final, highly detailed illustration.
- Downscaling (Shrinking): Scaling an image down generally results in less quality loss than scaling up. Procreate will discard pixels to achieve the smaller size, and the interpolation methods help to maintain the overall appearance.
The "quality percentage" indicated in the Resample settings reflects how well the current pixel data matches the target resolution. If you input more pixels than the canvas originally had, the quality percentage will go up. Conversely, reducing the canvas size will decrease this percentage.
The Importance of DPI for Licensing
For any artwork intended for licensing or print, understanding DPI is critical. DPI, or "dots per inch," is a measure of print resolution. It indicates how many individual pixels are packed into each linear inch of your printed output.
- 300 DPI: This is the industry standard for high-quality printing. At 300 DPI, an image will appear sharp and detailed when printed at its intended size. For example, an 8” x 10” canvas at 300 DPI contains 2400 x 3000 pixels (8 inches * 300 DPI = 2400 pixels, and 10 inches * 300 DPI = 3000 pixels).
- 72-144 DPI: These lower DPI values are typically suitable for digital display (e.g., web graphics, screen backgrounds) where the artwork is viewed on a screen and not physically printed.
When you are resizing your canvas in Procreate, ensure that your DPI remains at 300 if your intention is print or licensing. Changing the DPI without also adjusting the pixel dimensions can lead to unexpected physical size changes for your artwork. For example, if you have an 8” x 10” canvas at 300 DPI, and you change the DPI to 150 without altering the dimensions, the physical print size would effectively double to 16” x 20”, but the pixel count would remain the same, resulting in a lower effective resolution for that larger print size.
By strategically utilizing Procreate's canvas resizing tools, starting with a smaller canvas for initial ideation and layer flexibility, and then scaling up to a high-resolution target size, artists can effectively overcome layer limitations and produce professional-grade artwork ready for licensing and reproduction. The key is understanding the interplay between canvas dimensions, layer count, and resolution, and employing a workflow that prioritizes these factors at each stage of the creative process.