For designers and photographers, editing and manipulating images to showcase creativity is a common practice. Knowing the shortcuts to increase editing speed becomes mandatory, especially when working with a large number of photos, where editing becomes a significant task. Shortcuts and tricks help a lot in the process to reach the desired results. One awesome Photoshop hack is inverting the selection made on an image. To make a selection in Photoshop means that we select or choose a specific area on an image, and that very area becomes our working area. Everything we change or manipulate remains within that selected area. When something is selected in Photoshop, that area becomes surrounded by the “marching ants.” Understanding how we can use the selection invert feature to make our task easier is crucial for efficient image editing.
Understanding Selections in Photoshop
A selection in Photoshop is akin to placing a spotlight on a particular part of an image. You can choose different shapes or areas to work on. Once a selection is active, you can apply various adjustments or modifications to the selected area, keeping the rest of the image untouched. This is fundamental to controlling where your edits are applied. The process of making a selection guarantees limited modifications to the chosen area.
The Importance of Inverting Selections
Reversing a selection, or inverting it, involves changing it so that everything except the initially selected area is now chosen. This concept may initially sound complex, but it is an essential tool in your Photoshop toolkit. Inverting a selection can be helpful for various jobs. For instance, if you want to remove the background of an object, you might start by selecting the object itself. However, to focus on and manipulate the background, you need to reverse the selection. This allows you to precisely edit the background without affecting the subject, or vice versa. This means you can turn to either side of the selection just by inverting the selection repeatedly.
Methods for Inverting Selections
There are several straightforward methods to invert a selection in Photoshop, catering to different user preferences and workflows.
Method 1: Using the Right-Click Menu
This method is intuitive and accessible for users who prefer using their mouse.
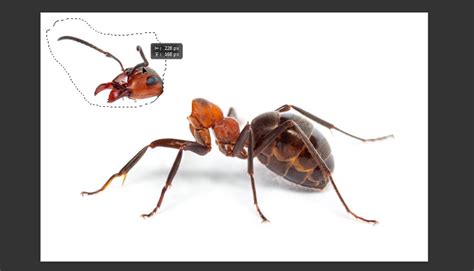
- Make Your Initial Selection: First, use any selection tool from the Tool Bar or Tool Panel to select the desired area of your image. This could be a person, an object, or even a specific color range.
- Access the Options: With your tool selected and the area chosen (indicated by "marching ants"), bring your cursor into the selected area.
- Right-Click: Right-click your mouse. An options window will appear.
- Select Inverse: Click on "Select Inverse" from the context menu.
And there you go. You have just inverted the selection on the image. This method is particularly useful when you have made a selection and then realized it’s easier to edit the area outside of your initial choice.
Method 2: Using Keyboard Shortcuts
For those who prioritize speed and efficiency, keyboard shortcuts are invaluable.
- For Windows users: Press
Control + Shift + I. - For Mac users: Press
Command + Shift + I.
This method achieves the exact same result as the right-click menu but is significantly faster, especially if you're performing this action frequently. This shortcut quickly changes your selection without needing to click around in menus.
Method 3: Using the Select Menu
This is another menu-based approach that offers clarity and is easy to remember.
- Make Your Initial Selection: As with the other methods, begin by making your desired selection using any of Photoshop's selection tools.
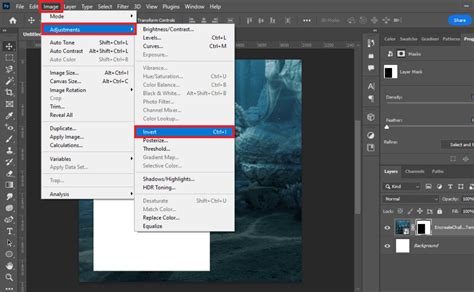
- Navigate the Menu Bar: From the menu bar at the top of the Photoshop interface, click on "Select."
- Choose Inverse: In the dropdown menu that appears, find and click on "Inverse."
This option provides a clear, step-by-step way to invert your selection.
Practical Applications of Inverted Selections
The ability to invert a selection opens up a world of possibilities for image manipulation and editing. Here are some common and effective use cases:
1. Background Removal and Replacement
This is perhaps one of the most common applications. If you want to isolate a subject and change its background, it can often be easier to select the subject and then invert the selection to work on the background.
- Example: Imagine you have a portrait where the background is a very consistent shade of blue. You could easily select the sky using a tool like the Magic Wand tool. Then, by inverting the selection, you would have a perfect selection of the tower. This selection will be flawless, allowing you to easily remove the tower or apply effects to the sky.
How to Change Backgrounds in Photoshop | Photoshop in 5 | Adobe Photoshop
2. Applying Selective Adjustments and Filters
Inverting a selection allows you to apply effects or adjustments to specific parts of an image without affecting the rest.
- Applying a Blur to the Background: You can apply a blur filter to the background of an image, leaving the foreground unscathed. To do this, you would select the foreground subject, then invert the selection to select the background, and finally apply the blur filter. Alternatively, you could invert the foreground selection and apply the filter to the edges of the subject if you wanted a subtle blur around them.
- Color and Brightness Adjustments: You can create an adjustment layer and then invert the selection of your subject. This allows you to adjust the color and brightness of the background independently of the foreground.
3. Creating Composite Images
When creating composite images, where elements from different photos are combined, inverting selections is invaluable. You can flip the selection of specific regions to seamlessly blend elements or isolate parts for further editing.
4. Isolating Elements for Further Editing
By inverting a selection, you can focus on just the sections of a picture that need tweaking. You can also use it to separate elements for additional editing, ensuring that changes made to one element do not impact others.
5. Creating Specific Shapes and Cutouts
Sometimes, it's easier to select the opposite of what you want to work on and then invert your selection. For example, if you want to create a circular cutout of a face, you might start by making a rectangular selection around the face and then using other tools to refine it. However, if you want to create a circular mask, it might be easier to select the area outside the circle and then invert that selection to get the circle itself.
- Example: To make a circular cutout of a face, you could use the Elliptical Marquee Tool. This tool works like the Rectangular Marquee Tool but allows you to draw oval selections. You can draw oval selections, or by holding down the
Shiftkey, you can draw a perfectly circular selection. Once this circular selection is made, you can invert it if your intention was to select everything but the circle, or use it directly if you wanted to isolate the circular area. This could be useful for social media graphics or stickers.
Refining Inverted Selections
While inverting a selection is straightforward, sometimes the initial selection might be imperfect, leading to rough or jagged edges after inversion. Photoshop offers tools to refine these selections.
Refine Edge / Select and Mask
If the inverted selection’s edges are rough or jagged, you can use the "Refine Edge" function (in older versions) or the more powerful "Select and Mask" tool (in newer versions) to improve the appearance.
- Activate Select and Mask: After making and inverting your selection, go to the "Select" menu and choose "Select and Mask."
- Adjusting Borders: Within the Select and Mask workspace, you can use various sliders and brushes to smooth, feather, or adjust the selection's borders. You can adjust the size of the inverted selection to add more space around it or contract it.
- Tool Options: The "Select and Mask" tool allows for better results to adjust the areas of the object with the selection’s borders, ensuring a clean and professional outcome.
Quick Mask Mode
Another option for refining selections before or after inverting is using Quick Mask mode.
- Activate Quick Mask: Click the Quick Mask button in the toolbar or press the
Qkey to activate the mode. - Paint Your Refinements: In Quick Mask mode, you can use the Brush tool to paint over the areas you wish to select or deselect. White reveals, and black conceals. This provides a very visual way to fine-tune your selection.
- Exit Quick Mask: Press
Qagain to exit Quick Mask mode and return to a standard selection.
Common Issues and Troubleshooting
While Photoshop makes it easy to invert selections, some frequent issues can arise.
- No Changes Made: If you have inverted the selection and no changes appear to have been made, first check to see if the selected layer is locked or hidden in the Layers panel. You cannot make changes to a locked layer, and a hidden layer will not show any modifications.
- Unwanted Areas in Selection: If you have selected more regions than intended before inverting, you can use the Marquee or Lasso tools in combination with
Shift(to add to selection) orAlt/Option(to subtract from selection) before inverting to fine-tune the initial selection.
Advanced Techniques and Considerations
Layer Masks
When you invert a selection, you can also use it in conjunction with layer masks for non-destructive editing.
- Make and Invert Selection: Make your initial selection and then invert it.
- Create Layer Mask: With the inverted selection active, create a new layer mask on your layer. This will apply the mask to everything except your original selection.
- Reverse Masking: If you made your first selection and want to hide what you picked and show everything else, you can create a layer mask directly from that selection. To then "reverse" the effect of the mask (i.e., to show what was hidden and hide what was shown), you can select the mask thumbnail and use
Ctrl+I(Windows) orCmd+I(Mac) to invert the mask itself. Alternatively, using a white brush on the layer mask to paint over the parts you want to keep will effectively reveal them.
Using the Pen Tool
For extremely precise selections, especially of complex objects, the Pen Tool is often the preferred choice. Once you've created a path with the Pen Tool, you can convert it into a selection. This selection can then be inverted for background manipulation or other purposes. If you use an updated version of Photoshop, you can often use the "Object Selection" or "Quick Selection" tools for automatic object selection, which can then be inverted.
Conclusion
Inverting a selection in Photoshop is a powerful and versatile technique that can significantly streamline your image editing workflow. Whether you're removing backgrounds, applying selective adjustments, creating composites, or isolating elements, understanding how to easily and effectively invert selections is a fundamental skill. By mastering the various methods-from simple right-clicks and keyboard shortcuts to more advanced techniques involving layer masks and the Pen Tool-you gain greater control and flexibility, allowing you to produce more intricate and striking images with greater ease. The ability to invert selections is a powerful tool in Photoshop, giving you more leeway and flexibility when editing photos. Creating an inverted selection is as simple as selecting the appropriate tool, going to the menu, and selecting "invert selection," or using a quick keyboard command. This Photoshop tutorial has shown you how to invert selections, a skill that editors can greatly benefit from.