Adobe Lightroom, in its various iterations - Lightroom CC, Lightroom Classic, and Lightroom Mobile - stands as a powerful suite for photographers aiming to transform RAW files and other image formats into polished masterpieces. A crucial, yet often perplexing, step in this creative workflow is the export process. Understanding how to save your photos from Lightroom ensures that the quality and intent behind your edits are preserved, whether for digital display or tangible print. This guide delves into the intricacies of Lightroom's export settings, demystifying the options to empower you to save your work with confidence.
The Foundation of Quality: Pre-Export Considerations
Before even venturing into the export dialog, several foundational elements contribute to the final quality of your saved images. Adhering to these principles sets the stage for successful exports.
The Power of RAW
For optimal quality and maximum editing flexibility, it is paramount to work with RAW photos. RAW files capture the most unadulterated data from your camera's sensor, providing a broader dynamic range and more information to manipulate during post-processing compared to compressed formats like JPEG. This uncompressed or minimally compressed data is the bedrock upon which high-quality edits are built.
The Calibrated Canvas
Your monitor is your window into the digital world of your photographs. A calibrated monitor is essential for accurate color representation. Without calibration, the colors you see on your screen may not accurately reflect how they will appear on other devices or in print, leading to unexpected and often disappointing results. Regularly calibrating your work monitor ensures that your designs don't look wildly different on new devices or in print.
Defining Your Purpose: Web vs. Print
A critical question to ask yourself before exporting is the intended purpose of your image. Are you editing for the web, where file size and specific color spaces are often paramount, or for print, where resolution, color depth, and specific output sharpening are key? Understanding this distinction will guide many of your export choices.
Navigating the Export Dialog: Lightroom Classic and Lightroom CC
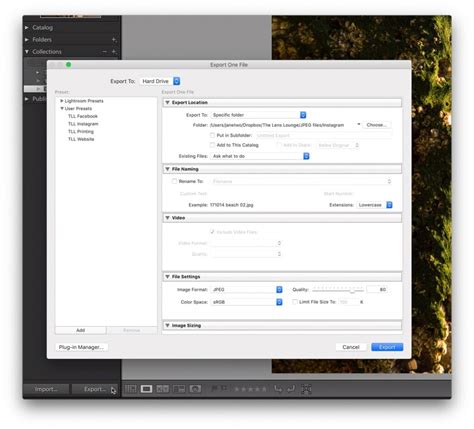
The export process in Lightroom Classic and Lightroom CC, while sharing core functionalities, has distinct nuances. Accessing the export dialog is straightforward: navigate to File > Export (or use the keyboard shortcut Shift+E in Lightroom CC and Shift+Ctrl/Cmd+E in Lightroom Classic). This action opens a comprehensive dialog box with numerous settings to tailor your output.
File Settings: Format, Compression, and Color Space
This section is where you make fundamental decisions about the nature of your exported file.
TIFF vs. JPEG: A Tale of Compression
The choice between TIFF and JPEG is a cornerstone of export decisions, hinging on the fundamental differences in their compression systems.
- JPEG (Joint Photographic Experts Group): JPEG files utilize lossy compression. This means that to achieve significantly smaller file sizes, some image data is discarded. While this makes JPEGs ideal for web use and general sharing due to their manageability, it comes at the expense of image quality. Repeatedly saving and re-sharing JPEGs, especially through online platforms that recompress images, can lead to visible artifacts and a degradation of picture quality. This is why many JPGs online lose their quality over constant reshares.
- TIFF (Tagged Image File Format): TIFF, conversely, employs lossless compression. This method preserves all the original image data, ensuring that no quality is lost during the export process. The downside of this fidelity is that TIFF files are considerably larger than JPEGs, making them less practical for direct online sharing. However, their high quality makes TIFFs perfect for archival storage and professional printing, as they do not suffer from compression artifacts.
Color Space Considerations: sRGB, Adobe RGB, and ProPhoto RGB
The color space defines the range of colors that can be displayed or reproduced.
- sRGB (Standard Red Green Blue): This is the most common color space and is the standard for the web and most digital displays. It has a relatively limited gamut compared to other color spaces.
- Adobe RGB: This color space offers a wider gamut than sRGB, encompassing more colors, particularly in the cyan-green range. It is generally considered a better choice for print workflows than sRGB, as it can reproduce a broader spectrum of colors that are achievable with printers.
- ProPhoto RGB: This is a very wide-gamut color space that encompasses virtually all colors visible to the human eye. While it offers the greatest potential for editing and preserving subtle color nuances, it's important to note that not all devices can display the full range of ProPhoto RGB colors. For TIFF exports, particularly in Lightroom Classic and Lightroom Mobile, you have the flexibility to select between these color spaces, offering greater control over your output.

Bit Depth and HDR
- Bit Depth: This refers to the amount of color information per channel. 8-bit images (common for JPEGs) have 256 levels of color per channel, while 16-bit images (often used for TIFFs) have 4,096 levels. Higher bit depths result in smoother gradients and more subtle tonal transitions, crucial for high-quality prints and avoiding banding. Lightroom Mobile, in particular, offers the ability to export at 16 bits with LZW compression, a feature that has been historically removed from CC and Classic versions.
- HDR (High Dynamic Range): For displays capable of HDR, you can leverage HDR color spaces. Lightroom Classic allows for the use of HDR color spaces with most file formats, excluding DNG. This feature enables the creation of images with a greater range of luminance and color, offering a more immersive viewing experience on compatible devices. Gain Map technology can further enhance the consistent and adaptive display of HDR images.
Image Sizing and Resolution
The Image Sizing panel allows you to control the dimensions and resolution of your exported photos.
- Resizing: While you can adjust the pixel dimensions here, for high-resolution exports intended for print, it's often best to avoid altering the size unless necessary. For web use or specific applications, resizing to a predetermined pixel width or height might be appropriate. For example, resizing for social media might involve adjusting the resolution to around 100 pixels per inch.
- Resolution: For print, a resolution of 300 pixels per inch (PPI) is generally considered the standard for high-quality output. For web use, resolution is less critical than pixel dimensions, as displays vary widely.
Output Sharpening
Output sharpening is applied specifically to compensate for the perceived loss of sharpness that can occur during the export process or when an image is viewed on a screen or printed. Lightroom offers options to sharpen for different output mediums (screen, glossy paper, matte paper). However, some photographers prefer to forgo this setting, opting instead to retain the exact sharpness as edited within Lightroom, and handle any necessary output sharpening in a dedicated application like Photoshop.
Metadata and Watermarking
- Metadata: You can choose to include or exclude metadata when exporting. Metadata contains information about the image, such as camera settings, copyright information, and keywords. Including metadata is generally recommended for professional use and organization.
- Watermarking: Lightroom provides the ability to add text or graphic watermarks to your exported images. This is a valuable feature for protecting your work, especially when sharing proofs or submitting images for publication. You can customize the font, size, opacity, and placement of your watermark. You can also add a PNG or JPG file as a watermark.
File Naming and Export Location
- File Naming: Lightroom offers robust file-naming conventions, allowing you to create custom names, include sequences, or use original filenames. This is crucial for organizing large batches of exported images. Options like "Custom Name (x of y)" or "Custom Name - Sequence" help in managing and identifying files.
- Export Location: You need to specify where your exported files will be saved. You can choose a specific folder on your hard drive, an external drive, or opt for "Choose folder later," which will prompt you to select a location at the end of the export process. For Lightroom Classic, you can also choose to export to a specific folder or a subfolder.
Lightroom Mobile: Exporting on the Go
Lightroom Mobile has become an indispensable tool for photographers, offering powerful editing capabilities directly on smartphones and tablets. While the editing experience might feel slightly different from the desktop versions, its export functionality is robust.
To share an image, tap the Share icon. You can also choose to add a border before sharing. For more advanced export settings, tap "Export as." Similar to Lightroom Classic, Lightroom Mobile allows for the selection of Bit Depth and Color Space for TIFF exports. It stands out by offering LZW compression at 16 bits, a feature beneficial for maximum quality preservation.
The Best Export Settings for Lightroom (Instagram, Facebook, Web, Print)
Understanding Lightroom's Non-Destructive Workflow
A fundamental aspect of Lightroom is its non-destructive editing workflow. When you edit an image in Lightroom, the original image file is never altered. Instead, Lightroom saves your edits as instructions within its catalog or associated XMP sidecar files. This means that the original image data remains intact.
When you export an image, Lightroom applies these saved edits to create a new, derivative file (e.g., JPEG, TIFF) with the adjustments "baked in." Alternatively, you can choose to export the "original + settings," which creates a copy of the original image alongside the applied settings. This non-destructive nature ensures that you can always revert to your original file or re-edit your work without fear of permanent changes. The concept of "saving" in Lightroom is, therefore, synonymous with "exporting" a processed version of your image.
Automating and Streamlining Your Exports: Presets and Batch Exporting
Lightroom's export presets are invaluable for saving time and ensuring consistency. These presets are essentially saved sets of export settings that you can quickly apply to future exports. You can create custom presets for various purposes, such as high-resolution prints or optimized web images, and save them for easy access.
Furthermore, Lightroom allows you to export multiple photos at once. By selecting a batch of images in the Library module and initiating the export process, you can apply your chosen settings to all selected photos simultaneously. This batch exporting capability is a significant time-saver for photographers working with numerous images.
Troubleshooting Export Issues
Occasionally, you might encounter issues during the export process. Common problems and their solutions include:
- No Internet Connection: Ensure your device is connected to the internet, especially if you are using cloud-based features or syncing.
- Not Enough Storage: Free up space on your device or external drive if you are running out of storage capacity to perform the export.
- Sync Problems: In cloud-based versions, look for a "Sync Problems" album or folder. This indicates missing or incomplete data that hasn't made it to the cloud. Addressing these sync issues is crucial for data integrity.
Advanced Export Options and Sharing Features
Lightroom offers several advanced features that enhance the export and sharing workflow:
- Content Credentials: For JPEG exports, you can attach Content Credentials, which are a form of digital provenance that can help verify the authenticity of an image.
- Edit Replays: Lightroom allows you to quickly create short videos of your editing process, which can then be shared with others.
- Group Albums and Collaboration: You can create shared albums with friends and family, allowing them to view, contribute, and even edit photos collaboratively. This feature is particularly useful for photographers who work with clients or want to share their work in an interactive way. You can invite others to view, contribute, or edit photos within shared albums, and manage access permissions.
- Publishing Services: Lightroom allows you to publish your work directly to online services like Adobe Portfolio, Blurb, and WHCC, streamlining the process of getting your images out into the world.
By understanding and utilizing the comprehensive export settings within Lightroom, you can ensure that your edited images are saved with the highest possible quality, tailored to their intended purpose, and ready for whatever your photographic journey demands.