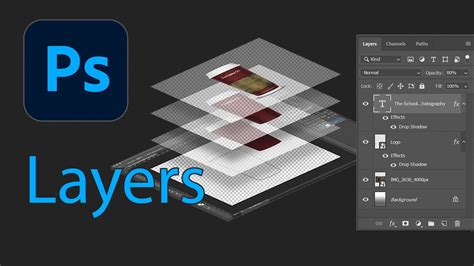
Photoshop layers are fundamental to digital image editing, acting as transparent sheets that enable precise, non-destructive modifications to specific image areas. Understanding how to merge these layers is crucial for streamlining workflows, managing complex projects, and optimizing file performance. Merging layers involves combining two or more distinct layers into a single one, where the content of the upper layer supersedes any overlapping content on the lower layers. This process, while powerful, is generally considered "destructive," meaning the original individual layers are permanently altered or lost once merged.
The Mechanics of Merging Layers
At its core, merging layers in Photoshop is about consolidating information. When you merge layers, the data from the top layer replaces any data it overlaps with on the lower layers. This can be a highly efficient way to finalize certain elements of your design or to prepare an image for export.
Selecting Layers for Merging
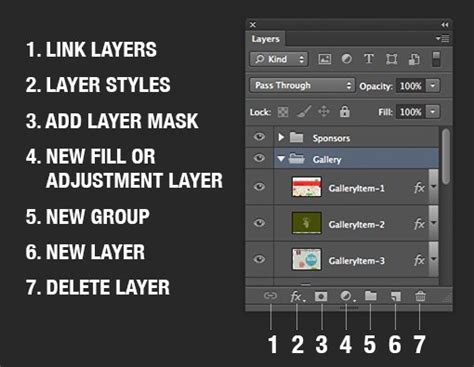
The first step in merging is to select the layers you intend to combine. A straightforward method involves clicking on one layer, then holding down the Shift key and clicking on another layer. This action selects both the initial layer and the second layer, along with all layers positioned between them in the Layers panel. For non-consecutive layers, you can achieve selection by holding down the Ctrl key (or Command on macOS) and clicking on each desired layer individually. The selected layers will be highlighted in the Layers panel, indicating they are ready for the merge operation.
Standard Merge Commands
Once layers are selected, the actual merging can be initiated. The most common command for merging selected layers is Ctrl+E (Windows) or Cmd+E (macOS). Alternatively, you can right-click (or Control-click on macOS) on the selected layers within the Layers panel and choose "Merge Layers" from the context menu. This action collapses the selected layers into a single layer, applying the content of the upper layers to the base layer.
Advanced Layer Merging Techniques
Beyond the basic merge, Photoshop offers more nuanced ways to combine layers, catering to different editing needs and workflows.
Merging with Clipping Masks
Clipping masks offer a way to merge layers while respecting specific boundaries. A clipping mask is a layer that dictates the visible area for the layers grouped beneath it. For instance, a triangular clipping mask will confine the visibility of all layers within its group to a triangular shape. To merge layers within a clipping mask, first, ensure any layers you do not wish to merge are hidden. Then, select the base layer of the Clipping Mask. While the provided information doesn't detail a specific shortcut for merging within a clipping mask, the general merge commands (Ctrl+E/Cmd+E) would apply to selected layers that are part of such a group, assuming they are compatible for merging. Releasing a clipping mask can be done with Shift+Ctrl+G (Windows) or Shift+Command+G (macOS).
Merging Visible Layers
A powerful option is to merge only the layers that are currently visible in your project. This is achieved by using the eye icon next to each layer in the Layers panel to toggle visibility. Once all desired layers are visible and those not to be merged are hidden, you can initiate the "Merge Visible" command. This can be accessed by right-clicking (or Control-click on macOS) in the Layers panel and selecting "Merge Visible." This is an efficient way to consolidate parts of your image without affecting hidden elements.

Flattening Layers: A Comprehensive Merge
Flattening layers is the most encompassing merge operation, combining all visible layers into a single background layer. This process discards any hidden layers and fills any transparent areas with white. While it significantly reduces file size, it also permanently removes the ability to edit individual layers. To flatten all layers, the shortcut is Shift+Ctrl+E (Windows) or Shift+Command+E (macOS). This command essentially flattens the entire image onto a single layer. Flattening can also occur implicitly when changing between certain color modes.
Stamp Visible: Non-Destructive Merging
For a less destructive approach to merging, Photoshop offers the "Stamp Visible" command. This technique creates a new, merged layer from all currently visible layers without altering the original layers. This is particularly useful when you want to apply effects or further edits to a combined version of your visible elements while retaining the flexibility of the original layers. The shortcut for "Stamp Visible" is Shift+Alt+Ctrl+E (Windows) or Shift+Option+Command+E (macOS). Similarly, "Stamp" a selected layer with the one below it can be achieved with Ctrl+Alt+E (Windows) or Cmd+Option+E (macOS), which creates a new layer that is a merged copy of the selected layer and the layer directly beneath it.
Difference between Merge and Flatten in Photoshop
Essential Keyboard Shortcuts for Layer Management
Efficiency in Photoshop is greatly enhanced by the proficient use of keyboard shortcuts. Mastering these commands can significantly boost productivity and confidence.
Opening and Creating Layers
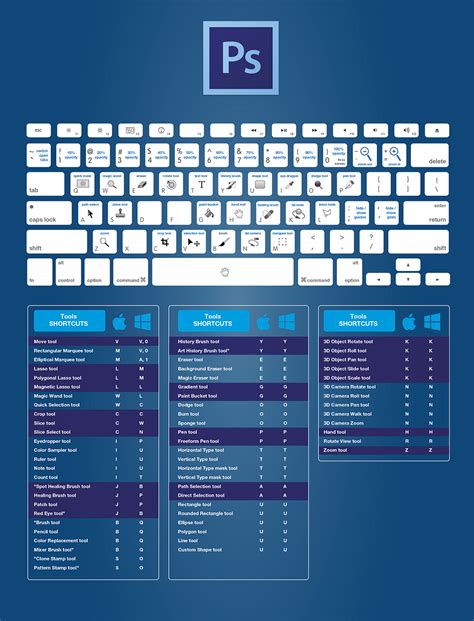
- To open the Layers palette if it's not visible, press F7.
- To create a new layer, press Shift+Ctrl+N (Windows) or Shift+Command+N (macOS). This shortcut also brings up the "New Layer" dialog box.
- To add a new layer below the currently selected layer, hold down Ctrl (Windows) or Command (macOS) and click the "New Layer" icon. This does not work with the Background layer.
Copying and Selecting Layers
- To copy a layer or a selection to a new layer, press Ctrl+J (Windows) or Command+J (macOS).
- To select all layers at once (excluding the Background layer), use Ctrl+Alt+A (Windows) or Command+Option+A (macOS) in Photoshop CS2 and later.
- To select similar layers, right-click (Windows) or Control-click (macOS) on a layer and choose "Select Similar Layers."
Manipulating Layer Position
- To move a layer up the stack, hold Ctrl (Windows) or Command (macOS) and press the right bracket key (]). Repeated presses move it higher.
- To move a layer down the stack, hold Ctrl (Windows) or Command (macOS) and press the left bracket key ([). Repeated presses move it lower. These shortcuts do not work with the Background layer.
- To jump a layer directly to the top of the stack, press Shift+Ctrl+] (Windows) or Shift+Command+] (macOS).
Controlling Layer Visibility
- To temporarily show or hide a layer, click its Layer Visibility (eyeball) icon.
- To temporarily hide all layers except the one you're currently focused on, hold down Alt (Windows) or Option (macOS) and click the Layer Visibility icon.
- To cycle through layers, making each one visible while hiding others, hold down Alt (Windows) or Option (macOS) and press the left or right bracket keys ([ or ]). The right bracket cycles up, and the left bracket cycles down.
Selecting Entire Layers
- To select an entire layer, press Ctrl+A (Windows) or Command+A (macOS).
Layer Groups and Sets
Photoshop CS2 and later versions use "Layer Groups" instead of the older "Layer Sets." These function similarly, allowing for organization and manipulation of multiple layers as a single unit.
Layer Blend Modes and Opacity
- To cycle through different layer blend modes, hold down Shift and use the + (plus) and - (minus) keys.
- To quickly change a layer's opacity, select the Move Tool (V) and then type a number. For example, typing "5" sets opacity to 50%, "8" to 80%, and "25" for 25%. Typing "0" sets opacity to 100%.
Considerations for Merging Layers
While merging layers is a powerful tool, there are several points to consider to ensure a smooth and effective workflow.
Destructive Editing and Rasterization
Merging is a destructive process. Once layers are merged, they cannot be easily unmerged or edited individually. For this reason, it is often recommended to duplicate layers or groups of layers before merging, or to save versions of your file prior to performing destructive operations.
Certain tools and filters, such as the Camera Raw filter, operate on only one layer at a time. Merging can be necessary to apply these to multiple elements. Additionally, some tools can only work on non-vector or rasterized layers. If you encounter issues merging layers, try rasterizing them first. Rasterizing converts vector data (like text or shape layers) into pixel-based data, making them compatible with a wider range of editing tools. However, be aware that once rasterized, these layers lose their scalability and editability as vectors.
Organizing for Efficiency
Staying organized is paramount when working with numerous layers. Naming your layers descriptively and adhering to a consistent naming scheme can save significant time and prevent confusion. Color-coding layers and groups can further enhance visual organization within the Layers panel, making it easier to locate related elements. Grouping similar or related layers together before merging can also streamline the process.
File Size and Performance
Merging layers can lead to a smaller file size, which can be beneficial for performance, especially in large or complex documents. Working with an excessive number of layers can sometimes cause Photoshop to slow down or even crash. Merging layers that you have finished editing can help maintain a smoother workflow and prevent these issues.
Merging Type Layers
It's important to note that type layers, once merged, cannot be edited as text anymore. They are converted into pixel-based layers. If you need to retain the ability to edit text, ensure you have saved a version of your file before merging type layers or consider using Smart Objects.
When to Merge Layers
Merging layers is a valuable technique in several scenarios:
- Reducing File Size and Improving Performance: When a document becomes slow due to a large number of layers, merging completed elements can significantly improve performance.
- Copying and Pasting Elements: To quickly copy and paste an image with its associated adjustments (like brightness and contrast applied via adjustment layers) into another Photoshop document, merging them into a single layer first makes this process straightforward.
- Finalizing Edits: Once you are certain that specific layers are finalized and no further individual edits are required, merging them can clean up your Layers panel and simplify the overall structure of your project.
- Applying Layer-Specific Edits: When a filter or adjustment can only be applied to a single layer, merging the relevant layers allows you to apply that edit to the combined result.
In conclusion, understanding Photoshop's layer merging capabilities, from basic shortcuts to advanced techniques like clipping masks and stamping, is a fundamental skill for any Photoshop user. By leveraging keyboard shortcuts and employing strategic merging practices, you can significantly enhance your efficiency and control over your digital creations.