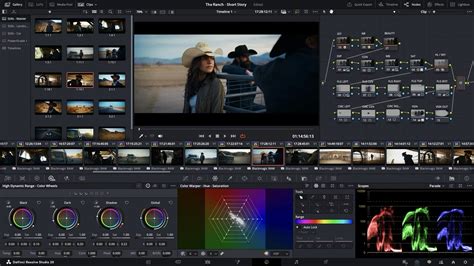
The world of video editing is often a delicate dance between creative vision and technical execution. When working with professional software like DaVinci Resolve, understanding fundamental settings, such as frame rate, is paramount to achieving a polished final product. Many editors, from seasoned professionals to enthusiastic beginners, have encountered a perplexing issue: the DaVinci Resolve timeline frame rate appearing grayed out, unchangeable. This article aims to provide a comprehensive breakdown of frame rate settings within DaVinci Resolve, demystifying why this crucial setting might be inaccessible and offering clear solutions to navigate and resolve such challenges.
The Fundamental Concept of Frame Rate
Before delving into the intricacies of DaVinci Resolve, it's essential to grasp the core concept of frame rate. At its most basic, frame rate refers to the number of images, or frames, that a camera captures within one second. This is commonly expressed as Frames Per Second (FPS). A video is essentially an illusion created by displaying these individual still images in rapid succession, giving the impression of motion. The frame rate you choose significantly impacts the visual appearance and the overall viewing experience of your video.
Understanding the meaning of frame rate is crucial because the frame rate you choose for your video will impact its appearance and the experience it delivers to viewers. For instance, higher frame rates can be used to create smooth slow-motion effects by capturing more detail within each second. Conversely, lower frame rates might be suitable for a more cinematic feel, often seen in feature films.
Frame Rate at Different Levels in DaVinci Resolve
DaVinci Resolve offers flexibility by allowing frame rate adjustments at multiple levels within a project:
- Project Level: At the project level, you can establish the overall frame rate for your entire project. This is the foundational setting that most other elements will adhere to unless specifically overridden.
- Timeline Level: Within each timeline, you can adjust the frame rate to suit specific sequences or scenes. This is particularly useful if different parts of your project require distinct motion characteristics.
- Clip Level: At the clip level, you can modify the frame rate for individual clips. This allows for fine-tuning the playback speed and motion characteristics of specific pieces of footage.
The project frame rate refers to the frame rate of all timelines within a specific project. When you start a new project and set its frame rate, this becomes the default for any new timelines you create.
The "Grayed Out" Timeline Frame Rate: Why It Happens
The most common reason for the DaVinci Resolve timeline frame rate being grayed out is directly linked to the order in which you perform certain actions within the software. Strictly speaking, choosing the correct frame rate should start even before capturing the first footage with a camera. Even if you're not involved in the shooting process and simply using DaVinci Resolve, it's still important to understand frame rates.
The primary culprit is importing media into your project before setting the project's timeline frame rate. Once you import media into the media pool, the timeline frame rate setting in the project settings can become disabled or grayed out, preventing you from changing it. Resolve will not let you change the frame rate directly once the clips are imported. Therefore, it's crucial to know your target frame rate in advance and set it accordingly.
Solutions for the Grayed Out Timeline Frame Rate
Fortunately, this common issue has straightforward solutions, depending on whether you've just started a project or are in the midst of editing.
Solution 1: Setting Frame Rate Before Importing Media (New Projects)
This is the most straightforward approach and the one recommended by best practices.
- Start a New Project: Open DaVinci Resolve and initiate a new project. You can do this by clicking on "New Project" in the Project Manager window.
- Name Your Project: Give your new project an appropriate name.
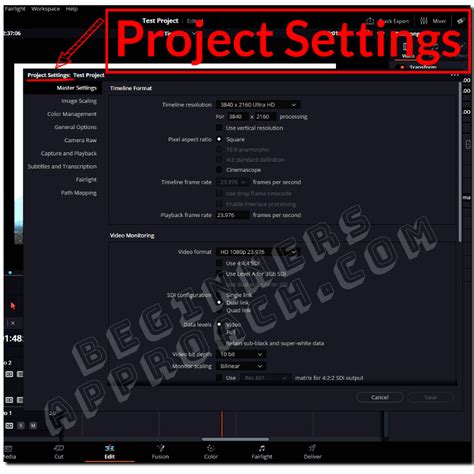
- Access Project Settings: Before importing any materials, locate and click the cog icon in the bottom right corner of the DaVinci Resolve interface. This will open the "Project Settings" window.
- Set Timeline Frame Rate: Navigate to the "Master Settings" tab. Within this tab, you will find the "Timeline Frame Rate" dropdown menu. Select your desired frames per second (FPS) from this menu. Common choices include 23.976 fps (for a cinematic look), 24 fps (standard for film), 25 fps (common in PAL regions), 29.97 fps (common in NTSC regions), and 59.94 fps (for smoother motion or slow-motion potential).
- Import Media: Once the project frame rate is set, you can proceed to import your desired media into the media pool.
Solution 2: Creating a New Timeline with a Different Frame Rate (During Editing)
If you've already imported media and find your project's timeline frame rate grayed out, you can create a new, separate timeline with a different frame rate.
- Navigate to the Edit Page: Ensure you are on the "Edit" page of DaVinci Resolve.
- Create a New Timeline: Right-click on a space in the Media Pool panel or go to "File" > "New Timeline."
- Name the New Timeline: Enter an appropriate name for this new timeline.
- Disable "Use Project Settings": Crucially, uncheck the "Use Project Settings" option. This will unlock the timeline-specific settings.
- Select Timeline Frame Rate: Click on the "Format" tab and select your desired frames per second (FPS) from the "Timeline frame rate" dropdown menu.
- Create the Timeline: Click "Create" to generate the new empty timeline with your chosen frame rate.
- Transfer Clips: Switch back to your original timeline. Select all the clips on that timeline (using "Ctrl + A" or "Cmd + A"). Copy these clips ("Ctrl + C" or "Cmd + C"). Then, switch to the new empty timeline (using the timeline drop-down menu in the Viewer) and paste the clips ("Ctrl + V" or "Cmd + V").
The new frame rate will only apply to this specific timeline. The original project timeline frame rate will remain as it was, potentially still grayed out if media is present. This method allows you to work with different frame rates within the same project, but it's important to manage them carefully to avoid playback inconsistencies.
Solution 3: Adjusting Clip Attributes for Mixed Frame Rates
DaVinci Resolve is designed to handle clips with different frame rates automatically. When you import media into a timeline with a set project frame rate, Resolve will attempt to play each clip at its native speed within that timeline. For example, if you have a 30 fps timeline and import clips shot at 24 fps, 30 fps, and 60 fps, all clips will play at normal speed on the 30 fps timeline.
However, this automatic handling might not always yield the desired effect. For instance, you might want your 60 fps clips to play at half speed for a smooth slow-motion effect on a 30 fps timeline. In such cases, you need to adjust the clip's frame rate interpretation.
- Locate the Clip: On the "Edit" page, ensure you are viewing the Media Pool or the Media tab.
- Select the Clip: Select the clip you want to modify (or use "Ctrl"/"Cmd" to select multiple clips with the same original frame rate).
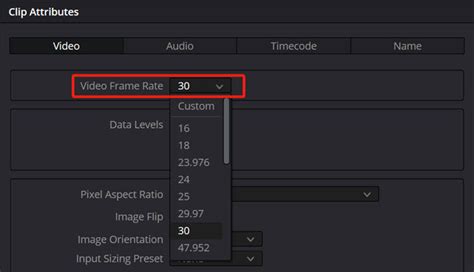
- Open Clip Attributes: Right-click on the selected clip(s) and choose "Clip Attributes."
- Adjust Video Frame Rate: In the "Clip Attributes" panel, navigate to the "Video" tab. Under "Video Frame Rate," choose the desired frame rate for how Resolve should interpret this clip. For example, to make a 60 fps clip play at half speed on a 30 fps timeline, you might set its interpretation to 30 fps.
- Confirm: Click "OK."
When you update the frame rate in the clip attributes, DaVinci Resolve will re-interpret the clip with the new frame rate. Changing the frame rate of a clip may also affect its duration. If you are certain and want to export the final project at the frame rate of the clip, DaVinci Resolve might prompt you with a warning like: "The selected clips have a different frame rate to the project. Would you like to change your timeline frame rate to match?" Clicking "Change" will update the project timeline frame rate with the clipâs frame rate. Clicking "Don't change" will not affect the project timeline frame rate. In the future, even if you import media with different frame rates, you will no longer receive this warning if you select "Change."
Understanding Playback Frame Rate
It's also important to distinguish between the timeline frame rate and the playback frame rate. The playback frame rate is the speed at which frames are shown on your external display or monitor. For example, let's say you have a 4K timeline with a frame rate of 24 FPS. Your monitor might have a refresh rate of 60 Hz. DaVinci Resolve synchronizes the playback to your timeline's frame rate, so you'll see 24 frames per second displayed, even on a 60 Hz monitor. In fact, even if the frame rate exceeds 60 frames, it can still be displayed on a 60 Hz monitor, though it might lead to dropped frames if the system can't keep up.
A common piece of advice for beginners is: Just keep your playback frame rate the same as your timeline frame rate! This simplifies the process and ensures that what you see is what you get in your final export.
Choosing the Right Frame Rate: Considerations
The choice of frame rate is not arbitrary; it impacts the final look and technical requirements of your video.
Desired Effect and Realism
The frame rate of your video has a significant impact on its appearance and feel, ultimately affecting how realistic it looks. Higher frame rates (e.g., 60 fps, 120 fps) capture more motion information, resulting in smoother playback and the ability to create convincing slow-motion effects. Lower frame rates (e.g., 24 fps) are often associated with a more cinematic, film-like aesthetic. Personally, some editors find 30 fps to look too "smooth" and prefer the aesthetic of 24 fps or 25 fps.
Type of Video and Platform
Different media platforms and genres have established frame rate conventions. For example:
- Movies: Typically shot at 24 fps.
- Television (NTSC): Often uses 29.97 fps.
- Television (PAL): Commonly uses 25 fps.
- YouTube/Online Content: Can vary widely, but 24, 30, and 60 fps are all popular.
- Gaming: Gamers often prefer higher frame rates like 60 fps or even 120 fps for smoother gameplay visuals.
Consider the type of video you are creating and where it will be viewed. If your footage is in 25fps, then your project should ideally be in 25fps. If you slow 50fps footage by 50% in a 50fps project, the footage will appear jumpy to the rest that is playing in normal motion. Your frame rates should generally only vary from 23.987 to 30fps for most standard content, unless you are a gamer or specifically aiming for a high-frame-rate aesthetic.
File Size and Export Time
Choosing a higher frame rate means dealing with more information per second of video. This will naturally lead to larger file sizes and longer export times. If you have limited storage or need to deliver projects quickly, opting for a more standard frame rate like 24 or 30 fps might be more practical.
Advanced Frame Rate Scenarios
Variable Frame Rate (VFR) Footage
Variable frame rate footage is typically captured using smartphones or screen recording software like OBS Studio. These devices often adjust the frame rate on the fly to save space or optimize performance. DaVinci Resolve, traditionally, works best with Constant Frame Rate (CFR) footage.
To fix variable frame rate issues in DaVinci Resolve, it's best practice to convert them to constant frame rate clips before importing them into Resolve. You can use tools like HandBrake or Shutter Encoder for this conversion. Once converted, import all the clips back into DaVinci Resolve.
Mixed Frame Rates and Best Practices
Mixing frame rates can cause all sorts of issues, leading to jumpy footage or dropped frames if not handled correctly. If you've ever seen a video and noticed frames looking jumpy or some frames freezing, they've probably mixed frame rates improperly. It's good practice to stick to multiples of your base frame rate to ensure a smooth final render. For example, if your project is set to 30 fps, using clips at 30 fps and 60 fps (which is a multiple of 30) is generally manageable. However, mixing 24 fps and 30 fps without proper re-interpretation can lead to problems.
To fix the mixed frame rates issue in DaVinci Resolve, set the project timeline frame rate to a FPS value based on the majority of the clips' frame rate. If the majority of clips are shot in 24 fps and only a few are in 60 and 120 fps, setting your project to 24 fps and then re-interpreting the higher frame rate clips in "Clip Attributes" might be the solution.
FIX Audio/Video desync | Variable to Constant Frame Rate (VFR to CFR)
Workflow Enhancements and Tools
While DaVinci Resolve offers robust editing capabilities, certain tools can streamline the editing process, especially when dealing with complex projects or repetitive tasks. For instance, the TourBox is a versatile and intuitive creative controller designed specifically for video editing and other creative tasks. It allows users to assign shortcuts and functions, reducing the need to memorize keyboard shortcuts or rely solely on traditional keyboard and mouse operations.
Conclusion: Mastering Frame Rates in DaVinci Resolve
Understanding and correctly managing timeline frame rates in DaVinci Resolve is crucial for a seamless video editing experience. The "grayed out" timeline frame rate issue is a common hurdle, but it stems from a straightforward procedural order: set your project frame rate before importing media. If you're already in the midst of editing, creating new timelines with specific frame rates or adjusting clip attributes provides viable workarounds.
By adhering to best practices, understanding the impact of different frame rates, and knowing how to troubleshoot common issues, editors can ensure their projects are technically sound and visually compelling. This knowledge empowers you to bring your creative ideas to the screen without being held back by tedious technicalities.
If you have any questions about the above content or need any help when it comes to the process, feel free to seek out further resources. You may have noticed that while DaVinci Resolve is a powerful tool, adjusting the frame rate is not always as simple as you might expect. In this article, you have learned how to address these common frame rate challenges.