Working with multiple layers in Adobe Photoshop is fundamental to creating complex and polished images. However, navigating through these layers, especially in densely layered documents, can become a time-consuming and frustrating experience, particularly if layers are not consistently named. This article delves into efficient methods for managing and accessing your layers, alongside powerful techniques for importing images, all designed to streamline your Photoshop workflow.
The Power of Naming Layers and Groups
Before diving into specific tools, it's crucial to emphasize a core principle of effective Photoshop work: naming your layers and groups. This practice, while seemingly simple, is paramount for your own sanity and significantly enhances the utility of many Photoshop features, including the shortcuts we will explore. Getting into the habit of assigning descriptive names to each layer and group from the outset will not only prevent confusion later but also make your editing process far more organized and intuitive.
Isolating Layers for Focused Editing
One of the most direct methods for managing your layers is the "Isolate layers" function. Located within the Select menu, this command allows you to temporarily hide all layers except for the one you are currently working on.
To utilize this feature, navigate to Select > Isolate layers. The current layer you are on, whether it's an individual layer or an entire group, will be the only one displayed in your Layers panel. If you select a group, all the layers contained within that group will become visible, while everything outside of that group will be hidden. This focused view enables you to make precise adjustments without the distraction of other layers. Once you have completed your edits, you can return to the Select menu and uncheck the "Isolate layers" option to reveal all your layers again.
Quick Layer Navigation with Right-Click
For immediate access to layers directly from your canvas, a right-click on the image itself offers a remarkably efficient shortcut. When you right-click on any part of your image, a contextual menu will appear, displaying a hierarchical list of layers situated beneath your current active layer.
By selecting any of the named layers from this drop-down menu, Photoshop will instantly navigate to and select that specific layer in the Layers panel. This bypasses the need to scroll through a potentially extensive Layers panel, saving valuable time and effort, especially in documents with 10-12 layers or more.
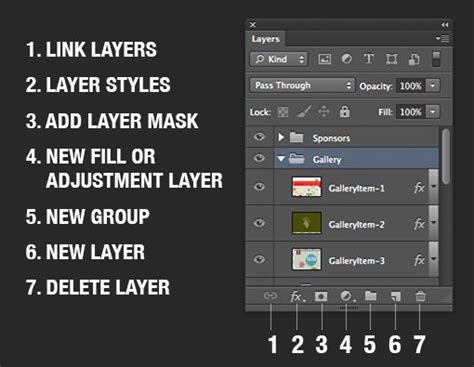
Leveraging the Selection Function Drop-down
Above the Layers panel, you'll find a powerful selection function, which by default is set to "Kind." This drop-down menu offers a variety of options that can significantly speed up the process of selecting specific types of layers.
By clicking on this menu, you can choose different criteria for selection. The available options often depend on how you have named your layers or the types of edits you have applied. Exploring and understanding these selection methods is a highly versatile and time-saving strategy that every Photoshop user should incorporate into their workflow.
For instance, if you have a consistent naming convention, you can select all layers containing a specific keyword. If you've applied certain adjustment layers, you can select only those. This feature is incredibly useful for quickly targeting and manipulating subsets of your layers, proving its worth even in less complex documents.
Importing Images: Place Embedded and Place Linked
Bringing external images into your Photoshop document is a common task, and Photoshop offers efficient ways to do this, ensuring that imported images are managed as separate layers.
Using Place Embedded
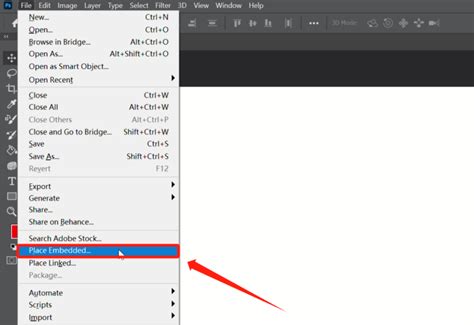
The "Place Embedded" command is your go-to for importing a single image into your current document as a new layer. To use it, navigate to File > Place Embedded.
When you select an image file (e.g., "portrait.jpg", "sunset.jpg", or "texture.jpg"), Photoshop will place it into your document. By default, if the imported image is larger than your canvas, Photoshop will automatically resize it to fit within the canvas boundaries. This is a convenient feature, but it also means that the image's original dimensions are altered.
If you prefer to have full control over the resizing process and avoid automatic scaling, you can adjust this behavior in Photoshop's Preferences. Within the Preferences, under the File Handling section, you can uncheck the "Resize Image During Place" option. This will ensure that the image is placed at its original size, allowing you to then use the Free Transform tool (Edit > Free Transform, or Ctrl+T / Cmd+T) to resize it precisely to your needs. After adjusting the size and position, click the checkmark in the Options Bar to accept the changes and exit Free Transform mode.
Understanding Place Linked
A closely related command is "Place Linked." Unlike "Place Embedded," which copies the image data into your Photoshop document, "Place Linked" creates a link to the original file on your computer. This means that the image data itself is not embedded within the PSD file.
The primary advantage of "Place Linked" is that it keeps your PSD file size significantly smaller, especially when working with numerous high-resolution images. Furthermore, if you update the original linked image in its source location using another program, the linked layer in your Photoshop document will automatically update to reflect those changes.
However, there's a crucial limitation: linked files must remain in their original location. If you move or delete the original file, the link will break, and the image will appear with a warning or disappear entirely within Photoshop.
Smart Objects: Power and Limitations
Smart Objects are a powerful feature in Photoshop that offer non-destructive editing capabilities, particularly for scaling images without losing quality. When you place an image using "Place Embedded" or "Place Linked," it is often converted into a Smart Object by default.
Smart Objects in Photoshop - Day 16
The benefit of a Smart Object is that you can scale, rotate, and transform it multiple times without degrading the pixel data. This is especially valuable when resizing images up or down. However, Smart Objects also have limitations. For instance, certain direct pixel-based editing operations, such as applying certain filters or using tools like the Eraser tool directly on the Smart Object layer, are not permitted. Photoshop will often warn you that it "could not complete the request because the smart object is not directly editable."
If your workflow requires direct pixel manipulation of an image, you may need to rasterize the Smart Object layer. To do this, right-click on the Smart Object layer in the Layers panel and select "Rasterize Layer." Be aware that rasterizing converts the Smart Object into a standard pixel layer, and any future transformations will be destructive. Therefore, it's essential to consider what you'll be doing with the image before deciding whether to keep it as a Smart Object or rasterize it.
Importing Multiple Images with Load Files into Stack
For scenarios where you need to import several images into Photoshop at once, with each image becoming its own layer, the "Load Files into Stack" command is exceptionally useful. This command is found under File > Scripts > Load Files into Stack.
This command allows you to select multiple image files from your computer, and Photoshop will create a new document, automatically placing each selected image onto its own separate layer. This is a significant time-saver compared to importing images one by one, especially when dealing with batch processing or assembling composite images from multiple sources.
By understanding and implementing these techniques â from the fundamental practice of naming layers to the advanced utilization of selection functions, "Place Embedded," "Place Linked," and "Load Files into Stack" â you can dramatically enhance your efficiency and control within Photoshop. Mastering layer management and image import is a cornerstone of a productive and professional Photoshop workflow.