Shading is a fundamental technique in digital art that imbues illustrations with depth, dimension, and a compelling sense of realism. Procreate, a powerful and intuitive drawing application, offers a versatile toolkit for artists to master the interplay of light and shadow. This tutorial delves into the core principles and practical applications of shading within Procreate, guiding you from basic concepts to advanced techniques. By understanding how light behaves and how shadows define form, you can elevate your artwork from flat representations to dynamic, lifelike creations.
Understanding Light and Shadow: The Foundation of Depth
Before diving into Procreate's tools, it's crucial to grasp the fundamental principles of light and shadow. Light is the source that illuminates your subject, dictating the overall mood and tone of your artwork. Conversely, shadows are the areas that light does not reach, and they are essential for defining form, conveying texture, and creating a sense of three-dimensionality.
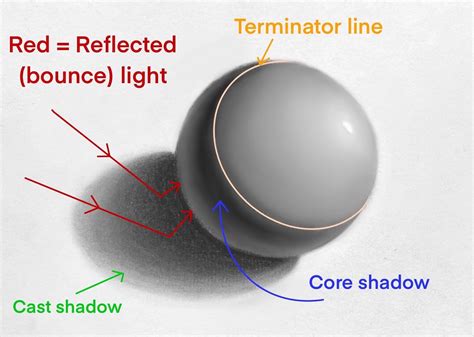
The first step in any shading process is to imagine the light source. Ask yourself: Where is the light coming from? Is it a harsh, direct light, or a soft, diffused glow? Understanding this will inform the shape, intensity, and placement of your shadows. Consider the composition of your subject - for instance, when shading a face, visualize how light would wrap around the contours of the features. Shadows are rarely pure black, and highlights are rarely pure white. They exist on a spectrum, influenced by the color of the light, the surface of the object, and the surrounding environment.
Procreate's Toolkit for Shading
Procreate provides a rich array of features to facilitate effective shading. These include a diverse selection of brushes, sophisticated layer blending modes, and the indispensable layer system.
Brushes: The Artist's Hands
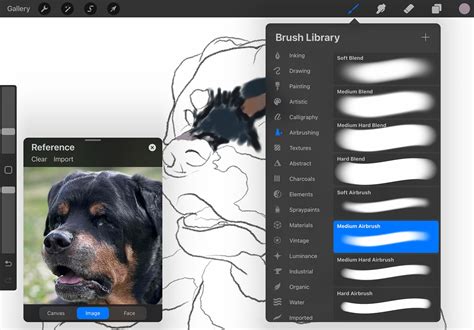
Procreate boasts a vast library of brushes, each with unique characteristics that can be leveraged for shading. Some brushes are designed to lay down color smoothly, mimicking soft airbrushes, while others create distinct, sharp edges, ideal for hard shadows.
- Soft Brushes: These are excellent for creating gradual transitions and diffused shadows. An airbrush, for example, allows for subtle buildup of color, producing soft, blended edges. When using a stylus, varying the pressure applied to the screen directly impacts the brush's opacity and flow. Less pressure results in a lower flow, leading to softer blending, while increased pressure yields a more opaque stroke with harder edges. This pressure sensitivity is a powerful tool for creating nuanced shading without needing to constantly switch brushes.
- Hard Brushes: These brushes are perfect for defining sharp edges and creating distinct cast shadows. They are useful for conveying a sense of solidity and for illustrating objects with well-defined forms.
For this tutorial, we will explore the use of a specific soft-edged brush from a "cartoon-ish make up brush set" which is particularly handy. This brush allows for the creation of both hard and soft shadows simply by adjusting pressure. Applying less pressure results in a lower flow, leading to softer blending, while applying more pressure creates hard, sharp edges. This adaptability means you don't necessarily need to switch between different brush types for soft and hard edges.
Layers: Building Depth Systematically
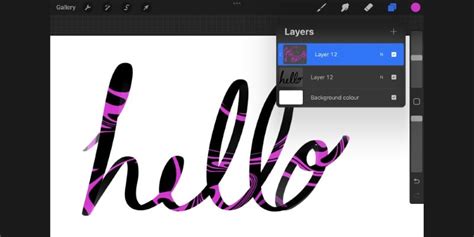
The layer system in Procreate is fundamental to non-destructive editing and efficient shading. Layers allow you to apply shadows, highlights, and other effects independently, making it easy to refine your work without affecting other parts of your illustration.
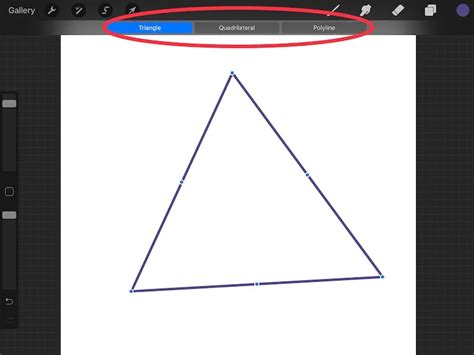
Base Shape: Begin by drawing your base shape. For instance, an oval can be drawn using Procreate's "Monoline" brush. Holding down on the shape activates the QuickShape tool, allowing for precise forms. The Transformation tool, with its "Freeform" option, can then be used for any necessary adjustments. Once satisfied with the outline, fill the shape with a solid color by pressing and dragging the color from your color indicator.
Layering Shades: To add depth, start layering different shades of color. It's beneficial to plan your color palette beforehand and begin with your main shade.
- New Layer and Clipping Mask: Create a new layer above your base shape and turn it into a Clipping Mask. This ensures that all subsequent shading stays within the boundaries of the base shape, preventing accidental marks on other layers and allowing for easy corrections.
- Building Shading Colors: Add new clipping mask layers for each shade you introduce. Begin with the darkest shade, then add a low-light color. As you work, constantly refer to your imagined light source to guide the placement of these shades.
- Highlighting: For the final clipping mask layer, add highlights. These are typically white or a very light color, indicating the areas where the light source directly hits the object. Highlights can also be strategically placed near the edges to create an illusion of semi-transparency, similar to how light interacts with materials like gems or water droplets.
Applying Blur Effects: After adding highlights, a subtle blur can significantly soften the shading strokes and enhance the overall aesthetic. Applying a Gaussian blur with a moderate strength (e.g., around 8.1%) can soften the edges without losing the definition of the highlights.
Blending Modes: Enhancing Realism
Blending modes are powerful tools that alter how colors on one layer interact with the colors on the layers below. They can be used to quickly add depth and complexity to your shading.
- Multiply: This is a common blending mode for creating darker shades. When applied to a layer filled with a dark color, it darkens the underlying layers, simulating the effect of light being absorbed.
- Overlay, Soft Light, Hard Light: These modes can be used to add color casts or enhance contrast, contributing to a more realistic and nuanced look.
Experimenting with different blending modes can unlock a wide range of visual effects, allowing you to achieve specific atmospheric qualities or material properties.
Advanced Shading Techniques: The Selection Tool and Blending
Beyond basic layering, Procreate offers more advanced techniques for creating sophisticated shading.
Creating Shadows with the Selection Tool
A particularly effective technique for generating both hard and soft shadows involves the use of the Selection tool in conjunction with an airbrush.
- Define the Shadow Area: Use the Selection tool to outline the area where you want to create a shadow. This could be a cast shadow from another object or a shadow falling on a surface.
- Apply with Airbrush: Select an airbrush tool and a suitable shadow color. Fill the selected area with the airbrush. The airbrush's inherent softness will create a gradient within the selection.
- Refine with Soft Brushes: After using the selection tool and airbrush, take a soft-edged brush (like the one mentioned from the "cartoon-ish make up brush set") and begin to refine the shadows. This brush is adept at creating both hard and soft edges based on stylus pressure.
- Blending the Edges: Even hard edges can benefit from a touch of blending. Using a very small blending brush, gently blend the edges of the shadows created with the selection tool. This process makes the shadows appear more natural and less "messy."
A key observation during this process is how shadows behave in reality. For instance, on lips, the shadow closest to the skin might have hard edges, while the shadow extending further away becomes progressively softer and more blended. This principle of shadow diffusion based on distance is crucial for achieving realism.
The Art of Blending
Blending is a critical step in achieving smooth and natural-looking shading. Procreate offers dedicated blending brushes that can be used to soften transitions between colors and values.
- Small Blending Brush: A small, soft blending brush is invaluable for refining the edges of shadows. By gently dragging the brush along the boundaries of your shadows, you can soften harsh lines and create a more seamless integration with the surrounding artwork. This is particularly effective for subtle shadows and for ensuring that hard-edged shadows don't appear too stark.
- The "Looks Better" Principle: The act of blending, even the hard edges, often results in a more aesthetically pleasing outcome. It prevents the artwork from looking overly graphic or artificial and contributes to a sense of organic form.
Helpful Tips for Shading in Procreate
To further enhance your shading workflow, consider these helpful tips:
- Reference Photos: Instead of importing reference photos directly into your canvas, utilize Procreate's Reference Companion. This feature allows you to display a reference image in a separate panel that can be moved and zoomed independently, keeping your main canvas clear.
- Drawing Guides: Procreate's drawing guides are not limited to symmetry and spacing. Perspective guides, for example, can be invaluable for accurately depicting the direction of light and the resulting shadows, especially in complex scenes.
- Blurring for Effects: As mentioned, blur effects are excellent for softening shading, but they can also be used to create atmospheric effects like glows or a sense of motion.
- Layer Masks: When working with light and shadow, employing layer masks provides an extra layer of control. They allow you to selectively reveal or conceal parts of a layer without permanently erasing anything, offering immense flexibility during the editing process.
How To Use Reference Companion In Procreate - Procreate Tutorial For Beginners
Mastering light and shadow in Procreate is a journey that requires understanding, practice, and experimentation. By leveraging the app's powerful tools, from its diverse brush library to its sophisticated layer system and blending modes, you can imbue your digital art with a new level of depth and realism. Start with simple shapes, observe how light interacts with form in the real world, and don't be afraid to explore different techniques. With consistent effort, you'll soon be adding sophisticated depth and dimension to your artwork like a seasoned professional.