Clipping in digital audio production, particularly within a Digital Audio Workstation (DAW) like Studio One, is a common concern for both novice and experienced producers. It refers to a distortion that occurs when an audio signal's amplitude exceeds the maximum level that the system can handle. This can lead to undesirable harshness and artifacts in your audio. While often considered a problem to be avoided at all costs, understanding the nuances of clipping, including its intentional use in saturation, is crucial for effective mixing and mastering.
What Exactly is Clipping and How Does It Occur?
Clipping is fundamentally a destructive alteration to an audio signal. It happens when the signal's level becomes too high for the particular system it is traversing. In practical terms, this often manifests during the recording phase, when input levels into an audio interface are set too "hot," or when the master fader within a DAW is pushed into the red zone. When a signal's amplitude surpasses the maximum limit imposed by the system, the apexes of the waveform are unceremoniously "chopped off" at that boundary.
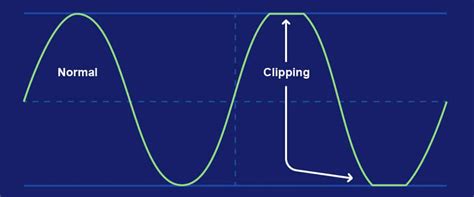
In a digital environment, such as a DAW, this digital clipping results in audibly harsh, unpleasant clicking and popping distortion sounds. These are precisely the types of artifacts that most producers strive to eliminate from their mixes. However, it's important to distinguish between this detrimental form of clipping and a more nuanced application. Producers frequently employ a gentler variant, known as saturation, as a deliberate mixing tool. Saturation plugins can introduce pleasing harmonic content and a sense of loudness without the aggressive distortion of digital clipping. If you're interested in exploring how this type of clipping can enhance your mix, a detailed overview is available to deepen your understanding.
Despite the potential for creative saturation, the "bad" type of clipping, which stems from poor gain staging, is almost invariably a negative outcome. In fact, it represents one of the most prevalent mix issues encountered in professional mastering submissions. This is because clipping is one of the few truly destructive processes in digital audio. Once it occurs, there is no inherent way to recover the original, unclipped signal. While some advanced software solutions claim the ability to reconstruct clipped waveforms, the resulting "de-clipped" material is essentially an educated guess about what the original signal might have sounded like.
The Best Approach: Prevention is Key
The most effective strategy for dealing with clipping audio is to prevent it from happening in the first place. This principle underpins the entire workflow of a professional audio engineer. The core practice for achieving this is called "gain staging." Gain staging involves meticulously managing the signal levels at each stage of your audio signal chain, ensuring that there is sufficient "headroom" - the space between the peak signal level and the maximum level the system can handle.
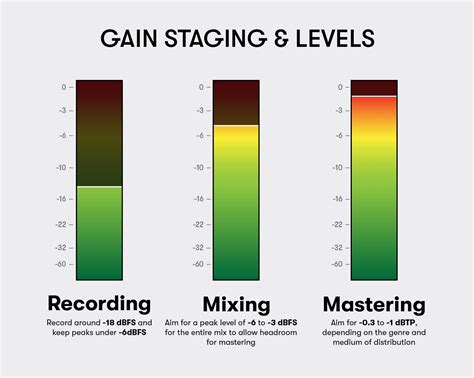
While the terms "gain staging" and "headroom" have specific, related meanings, the fundamental concept is straightforward: learn to read your audio meters and monitor them diligently as you work. For those needing a refresher on how to interpret meters to gauge signal levels, a dedicated guide can provide essential insights. As a general rule of thumb, aim for your signal peaks to register around -9 dBFS (decibels Full Scale) and the main body of your signal to hover around -18 dBFS. This provides a healthy buffer.
A critical juncture where avoiding clipping is paramount is during the export process. Once all your audio has been captured and mixed within your DAW, the final export stage is where clipping can unexpectedly manifest, even if it wasn't overtly audible during the mixing process. This is due to the mathematical operations your DAW's internal mixer performs when combining multiple signals. Even if individual tracks appear to be within acceptable levels, their sum can exceed the digital ceiling. Therefore, addressing the potential for clipping should be a high priority on your pre-mastering checklist.
Good practices for managing gain staging include making adjustments to the master fader, reducing the levels of individual track faders, or rectifying gain issues using plugins. Adhering to the -9 dBFS/-18 dBFS guideline ensures ample headroom for subsequent mastering processes.
Analog vs. Digital Clipping: A Tale of Two Worlds
It's essential to understand that not all clipping is created equal, and the distinction between analog and digital clipping is significant. As previously discussed, there's a marked difference between the desirable sonic qualities of saturation and the problematic nature of digital clipping.
In the analog realm, operating equipment at higher levels can result in a gentler, more gradual form of clipping. This can actually enhance a sound by introducing pleasing harmonic overtones that subtly reinforce the original signal in a musically pleasing way. This process is often referred to as analog saturation.
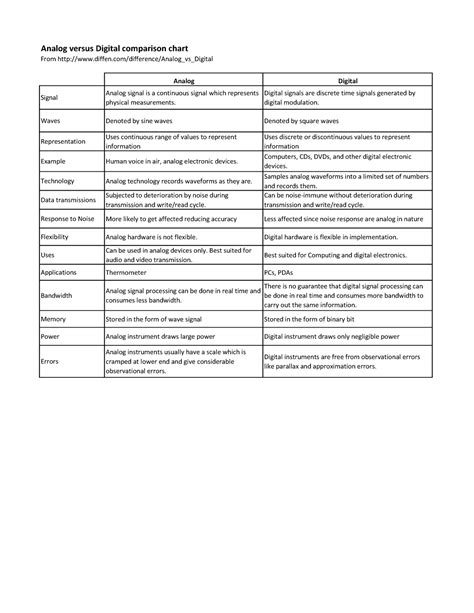
Conversely, in the digital world of your DAW, harsh clipping begins abruptly and without sonic pleasantries. While an analog component might gradually become nonlinear before distorting completely, any digital file that surpasses 0 dBFS is unceremoniously truncated. This doesn't mean that analog-style clipping is unattainable in the digital domain. Engineers have dedicated decades to developing sophisticated analog-style clipping plugins designed to replicate these desirable characteristics within a DAW environment. For a comprehensive exploration of musical saturation and the leading plugins available, a dedicated guide offers valuable insights.
Navigating Clipping in Studio One: Practical Scenarios and Solutions
Even with diligent prevention, producers may sometimes encounter clipped audio, especially when working with material recorded live or captured with portable devices. You might even be tempted to use a fantastic take that, at its loudest moment, accidentally exceeded the digital limit. In such instances, audio restoration software can offer some relief, helping to mitigate the most severe effects of clipped audio. A curated selection of such options is available, but be aware that this type of plugin relies on highly advanced technology and can often be quite expensive.
A particularly useful tool for addressing these issues is LANDR ReHance, an AI-powered audio enhancement plugin designed to clean up unwanted clipping, reverb, background noise, bleed, and more. If you find yourself with audio requiring restoration, exploring how ReHance can assist is a worthwhile endeavor.
Encountering Unheard Clipping in Studio One
A common scenario for Studio One users is experiencing clipping that isn't immediately audible. For instance, a producer might record a song with multiple tracks that sound "pretty solid" without any discernible distortion, yet the track is reported as clipping, sometimes by a significant margin like 18 dB over. This can be baffling.
This situation often points to internal digital clipping occurring within Studio One itself. While +18 dB might represent the top of a particular digital scale, this type of clipping can be subtle and difficult to perceive directly. It can arise from increasing the gain on one or multiple tracks, which then feeds into a bus or the master output. It might also be a result of cranking the gain within a plugin.
Why Your Mix Might Be Clipping — Even If It Sounds Fine in Studio One
When faced with this, producers should meticulously check these potential sources. If individual tracks appear to be within acceptable levels, the cumulative effect within the DAW's mixer is likely the culprit. The mixer in a DAW can easily result in a mix that reaches -15 dB FS RMS or higher. When a signal is reported as 18 dB over 0 FS, it's a clear indication of an issue, even if not immediately apparent to the ear.
The question then becomes: "Should I just lower their volume?" The answer is generally yes, but it requires a systematic approach to identify the specific tracks contributing to the overload.
Identifying Clipping Across Multiple Tracks
Finding clipping in a complex mix with numerous tracks can be challenging. One effective technique involves bouncing mixes to a new track within the project. This creates a consolidated representation that allows for easier A/B comparisons and a precise, time-aligned overview of the signal's behavior.
Another helpful tip for Studio One users is to right-click on any fader meter and select "pre-fader" to observe the signal levels before they are affected by the fader's position. This can reveal if a track is sending an overly hot signal to the mix bus, regardless of its final output level.
For a more fundamental understanding, it's crucial to grasp these core concepts:
- Understanding Clipping: Know what clipping is and why it's a problem in digital audio.
- How and Why Clipping Occurs: Understand the mechanics of how audio signals become too "hot" for the system. This is particularly important when considering transients.
- Identifying Transient Sources: Recognize which parts of your mix are generating these fast, loud peaks. Drums are common culprits due to their sharp attack, but vocals and bass can also contribute significantly.
- Compression and Limiting: Avoid using compression and limiting until you fully understand their operation. Mixing without these tools can actually foster a better understanding of balance.
- Master Limiter Setup: Employ a master limiter set to lop off everything at 0 dBFS and deliver a final output level of -0.3 dBFS. This acts as a safety net.
- Avoid Mixing into Limiters: Do not mix into compressors or limiters. This practice can lead to an artificial sense of balance that collapses when the audio is played back on different systems. Instead, focus on achieving a good balance of individual parts.
- Exporting Practices: For export, you may push the overall level by 1-2 dB using the limiter. Beyond this, consider seeking mentorship from an experienced mixer to refine your skills.
By systematically addressing these points, producers can gain better control over their signal levels and avoid the pitfalls of clipping in Studio One, ensuring a cleaner and more professional-sounding final product.